Understanding Image Capture on Mac: Your Gateway to Visual Management

In an age dominated by visual content, from breathtaking wallpapers and aesthetic backgrounds to professional high-resolution photography and intricate digital art, managing your images efficiently is paramount. For Mac users, Apple provides a robust, often underestimated, native application: Image Capture. This powerful tool acts as a direct conduit between your external devices—be they digital cameras brimming with nature shots, an iPhone holding cherished memories, or a scanner ready to digitize old photographs—and your Mac, streamlining the process of importing, organizing, and even curating your visual assets.
At Tophinhanhdep.com, we understand the diverse needs of image enthusiasts, photographers, and visual designers. Our platform serves as a hub for everything from abstract art inspiration to advanced image tools like AI upscalers and compressors. Image Capture on Mac is a fundamental starting point for many of these creative journeys, providing the raw material that can then be transformed, optimized, and shared using the comprehensive resources available at Tophinhanhdep.com. This article delves deep into what Image Capture is, how to use it effectively, and how it integrates seamlessly with a broader image management strategy, including the advanced capabilities offered by Tophinhanhdep.com.
![]()
What Is Image Capture on Mac?
Image Capture is an integral image management application pre-installed as part of macOS, typically residing within your Applications folder. Its primary design objective is to facilitate the transfer and collation of pictures and videos from various connected external devices. This includes a wide array of sources such as digital cameras, memory cards, scanners, and iOS devices like iPhones and iPads.
Unlike more feature-heavy photo management applications that might offer extensive organizational tools (like the Photos app), Image Capture excels in its straightforward, no-frills approach to direct media transfer. This simplicity is often its greatest strength, allowing users to quickly import high-resolution photography without being bogged down by unnecessary features. Beyond simple importing, Image Capture empowers you to control a connected scanner, allowing for precise configuration of resolution, color depth, size, and file format for your scanned documents or artwork. It’s an invaluable tool for digitizing physical media, from important documents to physical photographs you might want to transform into digital art or use as a background. Moreover, it allows you to configure what happens when a device is connected, preventing other applications from automatically launching.

How to Find and Open Image Capture on Mac
Locating and launching Image Capture on your Mac is straightforward, with several convenient methods available to suit your workflow.
Way 1. Open Image Capture via Launchpad Launchpad offers a visual grid of all your applications, making it easy to spot Image Capture.
- Step 1: Click the Launchpad icon in your Dock.
- Step 2: Navigate to the “Other” folder. This is the default location where Image Capture is usually grouped.
- Step 3: Locate the “Image Capture” icon and click on it to open the application.
Way 2. Open Image Capture Using Spotlight Spotlight is your Mac’s powerful search tool, perfect for quickly finding applications and files.
- Step 1: Click the magnifying glass icon in the top-right corner of your menu bar, or press
Command + Spacebaron your keyboard. - Step 2: In the search bar that appears, type “Image Capture.”
- Step 3: The “Image Capture” application should appear at the top of the search results. Click on it to launch.
Way 3. Open Image Capture via Finder For those who prefer navigating through their file system, Finder provides a direct path to Image Capture.
- Step 1: Click the “Go” option in the Finder menu bar (at the top of your screen), then choose “Applications” from the drop-down menu.
- Step 2: In the Applications folder, scroll down to find “Image Capture” and double-click its icon to open it.
No matter your preferred method, accessing Image Capture is quick, ensuring you can promptly begin managing your images, whether they are destined to become beautiful photography, creative ideas, or part of a visual design project.
Mastering Image Capture: Importing and Organizing Your Visual Assets
Image Capture is a surprisingly versatile tool that goes beyond mere file transfer. It offers crucial functionalities for managing your digital images, whether you’re bringing new photos onto your Mac or cleaning up existing collections. Understanding these features is key to maintaining a well-organized library of high-resolution images, creative ideas, and thematic collections.
Importing Photos from iOS Devices and Cameras
The core strength of Image Capture lies in its ability to import photos and videos from a variety of sources directly to your Mac. This is particularly useful for photographers, digital artists, and anyone curating extensive collections of aesthetic or nature-based imagery.
To import images from an iPhone, iPad, iPod touch, or a digital camera:
- Connect Your Device: First, ensure your device is powered on and unlocked (you may need to enter a password on your iOS device or trust your computer). Then, connect it to your Mac using a USB cable.
- Launch Image Capture: Open the Image Capture application on your Mac using one of the methods described above.
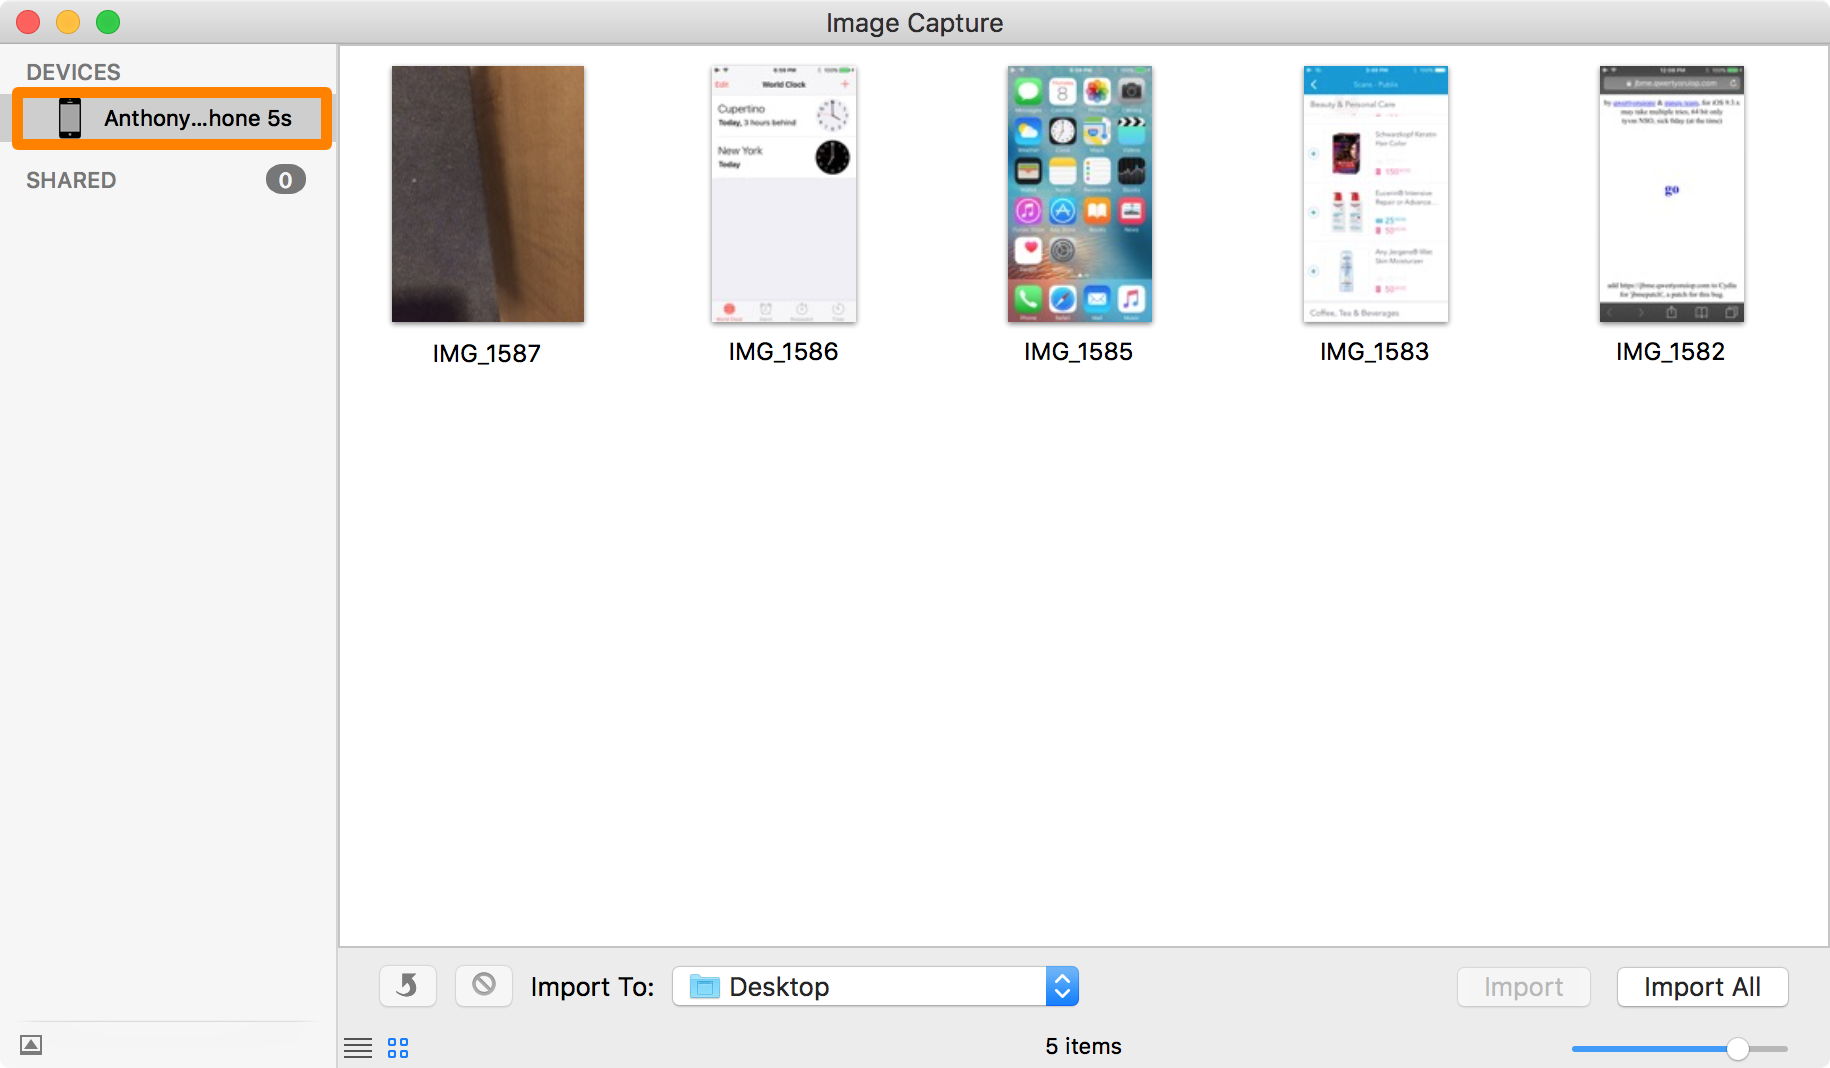
- Select Your Device: In the sidebar of the Image Capture window, under the “DEVICES” or “SHARED” list, select your connected iPhone, iPad, or digital camera. The application will then display all the photos and videos available on that device.
- Choose Your Destination: At the bottom of the Image Capture window, click the “Import To” pop-up menu. Here, you can select a specific folder on your Mac to save your photos, or even choose to create a PDF or a webpage containing them (though the latter is less common for general photo transfer). If you want to save them to a different location than the default, select “Other” and browse to your desired folder, perhaps one dedicated to “beautiful photography” or a specific “thematic collection.”
- Select and Import: You can select individual photos or videos by clicking on them (hold
Commandto select multiple non-contiguous items, orShiftfor a contiguous range). Once selected, click the “Import” button. If you wish to transfer all photos and videos currently displayed, simply click the “Import All” option. - Manage Post-Import: Image Capture offers two invaluable “hidden features” accessible by clicking the Show/Hide button in the lower-left corner of the app. These are “Delete after import” and “Keep originals.”
- Delete after import: Selecting this option will automatically remove the imported photos and videos from your source device after they have been successfully transferred to your Mac. This is excellent for freeing up storage on your camera or iOS device, especially after a long photo session capturing high-resolution images.
- Keep originals: This ensures that the original files remain on your device even after importing.
These options are vital for maintaining order, especially when dealing with large volumes of “digital photography” or when preparing for “photo manipulation.”
Scanning Documents and Images with Precision
Image Capture is not just for importing from cameras; it’s also a powerful tool for digitizing physical documents and photographs using a scanner connected to your Mac. This functionality is crucial for graphic design, creating visual design elements, or preserving old family photos.
To scan images with Image Capture:
- Connect Your Scanner: Ensure your scanner is connected to your Mac and powered on. If it’s the first time, you might need to install specific drivers, usually found on the manufacturer’s website. You can often check if your Mac recognizes the scanner via
Apple menu > System Settings > Printers & Scanners. - Launch Image Capture: Open the Image Capture application.
- Select Your Scanner: In the sidebar, select your scanner from the “DEVICES” or “SHARED” list.
- Configure Scan Settings: Once selected, Image Capture will present various options depending on your scanner’s capabilities. You can typically adjust:
- Resolution: Critical for capturing fine details, especially for high-resolution photography or documents intended for “digital art.”
- Color Mode: Choose between color, grayscale, or black & white.
- Size/Area: Define the specific area of the scanner bed to be scanned.
- File Format: Select the output format (e.g., JPEG, TIFF, PNG, PDF).
- Scan To: Choose the destination folder for your scanned images.
- Scan Your Images: Place the documents or photos on the scanner bed (or in the automatic document feeder). If you have a flatbed scanner and place multiple images, Image Capture can often detect and straighten crooked images, saving each as a separate file—a huge time-saver for digitizing “thematic collections” of prints. Click the “Scan” button to begin the process.
This feature allows for meticulous control over your digitized assets, preparing them for “image tools” like converters or optimizers, or for integration into “visual design” projects.
Deleting Photos and Videos to Streamline Your Collections
Beyond importing, Image Capture provides an excellent interface for reviewing and deleting photos and videos directly from your connected iOS device or camera. This is particularly useful for curated collections, removing blurry shots, or decluttering your device before a new “photography” session.
Here’s how to delete photos and videos using Image Capture:
- Connect and Launch: Plug your iPhone, iPad, or digital camera into your Mac via USB and launch Image Capture.
- Select Device: In the sidebar, select your connected device. You’ll see all its photos and videos. Ensure you “trust” your computer if prompted by your iOS device.
- Select Items for Deletion: Browse through your media. The larger screen of your Mac provides a much better viewing experience than a smaller device screen, making it easier to identify and select “out-of-focus” or unwanted images. You can select individual items, or use
Command+click/Shift+click to select multiple items. - Initiate Deletion: After selecting the items you wish to remove, click the “Delete” button (usually a small circle with a diagonal line through it, or a trash can icon).
- Confirm Deletion: Image Capture will prompt you to confirm the deletion. Review your selection carefully, and if you’re certain, click the confirmation button.
- Verify: The deleted photos and videos will disappear from the Image Capture window and, more importantly, from your device’s Camera Roll.
This capability is invaluable for maintaining a clean and optimized media library, especially when dealing with large volumes of “high-resolution” images or when preparing files for “photo manipulation” where only the best shots are needed.
Enhancing Your Image Management Workflow with Tophinhanhdep.com’s Tools
While Image Capture serves as an excellent foundational tool for importing and basic management of your visual assets on a Mac, its capabilities are intentionally streamlined. For users deeply involved in various aspects of image creation, photography, and visual design—whether curating aesthetic wallpapers, developing digital art, or optimizing high-resolution photography—there are scenarios where Image Capture reaches its functional limits. This is where a comprehensive platform like Tophinhanhdep.com becomes an indispensable companion, offering advanced tools, inspiration, and solutions that extend far beyond simple transfers.
Image Capture Limitations and When to Seek Alternatives
Image Capture is designed for specific tasks: importing photos from cameras/scanners, controlling certain device actions, and selective deletion from connected devices. However, it does have limitations:
- Device Scope for Transfer: Primarily focused on iOS devices, digital cameras, and scanners for photo import. It doesn’t natively support transferring a wide array of data types (like videos, music, contacts, messages) from all mobile platforms (e.g., Android devices) or offer robust two-way sync options.
- Organizational Tools: It lacks advanced organizational features such as tagging, facial recognition, or sophisticated album management found in dedicated photo libraries.
- Editing Capabilities: Image Capture offers virtually no editing features beyond basic rotation.
- Wireless Transfer: It relies exclusively on a wired USB connection, which can be a drawback for users seeking more flexible, wireless transfer solutions.
- File Format Limitations: While it handles common image formats, advanced conversion or optimization for specific uses (like web optimization or print preparation) is outside its scope.
These limitations highlight the need for more versatile solutions when your imaging needs evolve beyond basic import, especially when dealing with the intricate demands of “visual design” or preparing “high-resolution” images for various platforms.
Tophinhanhdep.com: Beyond Basic Image Transfer and Management
Tophinhanhdep.com stands as a premier resource for everything visual, offering a suite of tools and a vast library of inspiration that perfectly complements and expands upon Image Capture’s functionalities. Think of Image Capture as your initial bridge for getting images onto your Mac; Tophinhanhdep.com then provides the pathways and tools to refine, enhance, and utilize those images to their fullest potential.
Here’s how Tophinhanhdep.com enhances your image management and creative workflow:
-
Advanced Data Transfer and Management: For those needing to transfer more than just photos—including videos, music, messages, and contacts—or requiring more flexible transfer options between various devices (iOS, Android, Mac, PC), Tophinhanhdep.com offers advanced transfer solutions. These tools facilitate seamless movement of your digital assets, crucial for cross-platform projects or when you need to consolidate diverse media for a “thematic collection” or a “mood board.” This also extends to managing existing albums, allowing you to create, rename, delete, and preview information about your images with unparalleled ease, enhancing your organizational capacity for “digital photography” and “visual design” projects.
-
Comprehensive Image Tools: Once your images are on your Mac (thanks to Image Capture), Tophinhanhdep.com provides the robust “Image Tools” you need for further optimization and preparation.
- Converters: Easily convert image formats, such as transforming HEIC files (common from iPhones) into more universally compatible PNG or JPEG formats. This is essential for ensuring your “high-resolution” images are ready for any platform or “editing style.”
- Compressors: Optimize image file sizes without significant loss of quality, crucial for web design, faster loading times, or efficient storage of large “stock photos” and “beautiful photography” collections.
- Optimizers: Fine-tune image quality for specific outputs, whether for print, social media, or custom “wallpapers” and “backgrounds.”
- AI Upscalers: For images that aren’t quite “high-resolution” enough, Tophinhanhdep.com’s AI upscalers can intelligently enlarge and enhance images, making them suitable for larger prints, digital art projects, or as base material for “photo manipulation” without pixelation.
- Image-to-Text: Extract text from images, a valuable feature for digitizing documents or creatively integrating typography into “visual design.”
-
Visual Inspiration & Collections: Tophinhanhdep.com is a treasure trove of “Image Inspiration & Collections.” After importing your raw photos via Image Capture, you can turn to Tophinhanhdep.com for:
- Photo Ideas: Explore a vast gallery for fresh perspectives, composition techniques, and “trending styles” that can inspire your next “photography” endeavor.
- Mood Boards: Discover curated collections of “aesthetic,” “nature,” “abstract,” and even “sad/emotional” or “beautiful photography” to help conceptualize your “visual design” projects or personal photo albums.
- Thematic Collections: Dive into themed image sets that can spark “creative ideas” for your own projects, whether you’re designing a new wallpaper or preparing a portfolio of digital art.
By integrating Image Capture into a workflow that culminates with Tophinhanhdep.com’s advanced tools and inspirational resources, Mac users can achieve a truly comprehensive and efficient approach to managing all their visual content, transforming raw captures into refined masterpieces.
Troubleshooting Common Image Capture Issues and Tophinhanhdep.com’s Support
Even with a reliable native application like Image Capture, users may occasionally encounter issues that disrupt their workflow. Understanding how to troubleshoot these common problems, and recognizing when to leverage advanced solutions, ensures that your process of importing “high-resolution” images or digitizing “visual design” elements remains smooth. Tophinhanhdep.com not only provides advanced tools but also serves as a resource for addressing more complex challenges related to image management and recovery.
Resolving Device Connection and Recognition Problems
One of the most frequent issues users face is Image Capture not recognizing a connected device or failing to work altogether. This can be particularly frustrating when you’re eager to transfer a batch of “beautiful photography” or essential documents.
-
Device Not Recognized/Not Working:
- Check Connection: Ensure the USB cable is securely plugged into both your device and your Mac. A loose connection is a common culprit. Try a different USB port or even a different cable if the issue persists.
- Device Status: Make sure your digital camera or iOS device is turned on and unlocked. For iOS devices, you might need to tap “Trust This Computer” on the device’s screen. If you’ve previously denied trust, reset Location & Privacy settings on your iOS device (
Settings > General > Transfer or Reset iPhone > Reset > Reset Location & Privacy). - Restart Everything: Sometimes, a simple restart of both your Mac and the connected device can resolve transient software glitches.
- Check for Software Updates: Ensure both your macOS and your device’s operating system (e.g., iOS) are up to date. Updates often include compatibility fixes.
- Device Compatibility/Drivers: For certain scanners or older digital cameras, you might need to install specific software or drivers from the manufacturer. Check the documentation that came with your device to confirm its compatibility with macOS. If you’re struggling, Tophinhanhdep.com’s support resources can guide you through finding necessary drivers or suggest compatible methods for your “digital photography” equipment.
- SD Card Slot: If your Mac has an SD card slot and your camera uses an SD card, try removing the card from the camera and inserting it directly into your Mac. Image Capture should then recognize the card as a device.
-
iPhone Locked in Image Capture: This usually stems from a trust issue or security prompt. Re-plugging the device, ensuring it’s unlocked, and explicitly tapping “Trust” on your iPhone’s screen when prompted by your Mac should resolve this.
Addressing Missing Photos and Data Recovery
Another distressing scenario is when Image Capture doesn’t display all expected photos, or worse, images go missing after a transfer or a system update. This is particularly critical for irreplaceable “original photography” and “cherished memories.”
-
Image Capture Not Showing All Photos:
- File Corruption: Sometimes, certain image files on your device might be corrupted and thus not displayed by Image Capture.
- Device Settings: Check your device’s internal settings. Some cameras might store images in folders not immediately scanned by Image Capture, or iOS devices might have photos stored in iCloud that aren’t downloaded locally.
- Reinstall macOS (Last Resort): If Image Capture itself seems to be malfunctioning or has been accidentally deleted, reinstalling macOS is the most reliable way to restore native applications.
-
Recovering Lost/Missing Photos: If photos are truly lost or deleted during a transfer, or due to a system crash, this requires specialized data recovery solutions. Tophinhanhdep.com offers advanced data recovery tools designed specifically for Mac users. These powerful solutions can:
- Scan for Lost Files: Perform deep scans on your Mac, external devices, or even formatted drives to locate permanently deleted or missing photos.
- Handle Various Data Loss Scenarios: Whether it’s accidental deletion, photos lost during a faulty transfer, or data corruption, Tophinhanhdep.com’s recovery tools are equipped to retrieve your valuable “photography” and “visual design” assets.
- Preview and Recover: Allow you to preview recoverable images before restoring them, ensuring you retrieve precisely what you need. This gives peace of mind, especially when recovering crucial “beautiful photography” or “creative ideas.”
By understanding these troubleshooting steps and knowing that Tophinhanhdep.com’s advanced recovery options are available, Mac users can approach their image management with greater confidence and security.
Frequently Asked Questions (FAQs) about Image Capture
Here are some common questions Mac users have about Image Capture, along with answers that integrate the broader perspective of Tophinhanhdep.com’s offerings.
Q: What is Image Capture service on Mac? A: Image Capture is a native macOS application that allows you to import photos and videos from digital cameras, scanners, and iOS devices (like iPhones and iPads) to your Mac. It’s a straightforward tool for direct media transfer and scanning.
Q: Why is Image Capture not working on Mac? A: Issues with Image Capture often stem from connection problems (loose cable, un-trusted device), outdated software/drivers, or a corrupted application. Ensure your device is connected securely, unlocked, and that your macOS and device software are up to date. For specific device compatibility, consult your device’s documentation. If all else fails, a macOS reinstall can resolve core application issues.
Q: Why is my iPhone locked in Image Capture? A: This usually indicates a security or trust issue. Your iPhone needs to “trust” your Mac to allow access to its media. Unlock your iPhone, reconnect it to your Mac, and tap “Trust This Computer” when the prompt appears on your iPhone’s screen.
Q: Can I download Image Capture? A: No, Image Capture is an Apple native application that comes pre-installed with macOS. You cannot download it separately. If it’s missing or corrupted, the most reliable solution is to reinstall macOS.
Q: How do I transfer photos from PC to my iPad? A: While Image Capture is Mac-centric, Tophinhanhdep.com offers versatile transfer solutions that can facilitate moving photos from a PC to an iPad, or between various mobile devices. Our tools provide flexible options to add photos without erasing existing data, and support a wider range of file types and devices than native solutions.
Q: How do I transfer photos from Samsung to Samsung? A: For seamless transfers between Samsung phones, or any other Android or iOS devices, Tophinhanhdep.com provides dedicated transfer software. These tools offer robust features for transferring photos selectively or in bulk, along with other data types, ensuring a smooth transition of your “beautiful photography” and other media between devices.
Q: How do I uninstall Image Capture on Mac?
A: While uninstalling native macOS applications like Image Capture is generally not recommended and rarely necessary (as it occupies minimal space), you can attempt to locate it in the Applications folder via Finder, right-click, and select “Move to Trash.” However, for system-level apps, this often only removes links, and the core components may remain. If Image Capture is truly problematic, reinstalling macOS is the more definitive solution.
Conclusion
Image Capture on Mac is an essential, yet often overlooked, utility for anyone who interacts with digital images. It provides a foundational, straightforward method for importing, scanning, and managing visual content from a myriad of devices. Whether you’re a professional photographer moving “high-resolution” images, a designer digitizing physical art for “visual design” projects, or simply managing personal “thematic collections,” Image Capture streamlines the initial acquisition process.
However, the world of digital imagery extends far beyond basic transfers. For sophisticated tasks like advanced image conversion, compression, AI upscaling, and comprehensive data recovery, or for finding rich “image inspiration & collections” and exploring “trending styles,” Tophinhanhdep.com serves as the ultimate ecosystem. By leveraging Image Capture to bring your raw visual assets onto your Mac, and then utilizing the powerful suite of tools and resources at Tophinhanhdep.com, you can achieve an unparalleled level of efficiency, creativity, and security in your image management workflow. Embrace this powerful combination to unlock the full potential of your “photography,” “digital art,” and all your visual endeavors.