The ISO Image Format: A Digital Foundation for Visual Excellence and System Mastery on Tophinhanhdep.com

In the dynamic world of digital content, especially within the vibrant realm of images, photography, and visual design that Tophinhanhdep.com champions, understanding fundamental digital formats is paramount. While our passion often gravitates towards the aesthetic – the high-resolution wallpapers, the breathtaking nature photography, the intricate digital art, or the innovative graphic design – the tools and methods for managing these digital assets are equally crucial. Among these, the ISO image format stands as a cornerstone, a powerful yet often misunderstood digital blueprint that underpins the distribution, backup, and installation of essential software and entire operating systems.
On Tophinhanhdep.com, we believe that mastering the technical aspects behind your creative pursuits empowers you to achieve unparalleled visual excellence. This comprehensive guide will demystify the ISO image format, explaining what it is, how it functions, and why it holds such significance for anyone involved in digital photography, graphic design, or simply optimizing their system for visual content creation. We’ll explore how this robust format facilitates everything from installing your favorite photo editing suite to backing up critical design libraries, ensuring that your digital journey is as smooth and efficient as the beautiful images you create.
Demystifying the ISO Image: A Core Concept for Digital Content Enthusiasts
The term “ISO” might bring to mind the International Organization for Standardization, the body responsible for countless global standards, or perhaps the ISO sensitivity setting on your camera, which dictates how sensitive its sensor is to light. While these are valid associations, in the context of digital files, “ISO” refers to a specific type of archive file, often called an “ISO image” or “ISO file,” derived from the ISO 9660 file system standard used for optical media. This dual meaning of “ISO” (the organization vs. the file format) can sometimes lead to confusion, but for our purposes on Tophinhanhdep.com, we are focusing on the latter – the versatile digital container.
What Exactly is an ISO Image?
At its heart, an ISO file is a single, complete digital copy of an entire optical disc, such as a CD, DVD, or Blu-ray disc. Think of it not just as a collection of files, but as a perfect, sector-by-sector replica of the original disc’s data and file system structure. This means that every single piece of information, including boot sectors, file attributes, and directory organization, is preserved exactly as it was on the physical disc, without any compression of the internal data.

Imagine you have a cherished DVD containing a specialized graphic design software package, a collection of vintage high-resolution stock photos, or a bootable operating system designed for media professionals. An ISO image of that disc would be an exact digital twin, capable of replicating the original disc’s functionality and content. This uncompressed, bit-for-bit mirroring is what gives ISO images their power and utility. They are not merely compressed archives like ZIP or RAR files, which re-package data; instead, they are faithful digital blueprints.
The .iso file extension is the common identifier for these images. However, it’s worth noting that some obscure applications might use .iso for unrelated files, such as specific CAD drawings. It’s important to understand the context. For most users, an .iso file is synonymous with a disc image.
Why ISO Matters for Visual Creators and Tech Enthusiasts
For the Tophinhanhdep.com community, the significance of ISO images extends across several key areas:
- Software Distribution for Creative Tools: Many high-demand applications, including professional photo editing suites, 3D rendering software, digital art programs, and even entire operating systems optimized for creative workflows (like specific Linux distributions for video editing or graphic design), are distributed as ISO files. This allows developers to bundle all necessary installation files, drivers, and components into one easily downloadable package, streamlining the process for users. Instead of downloading dozens of individual files, you get one comprehensive installer.
- Archiving and Backup of Valuable Media and Software: Physical discs degrade over time, get scratched, or can be lost. Creating an ISO image of your original software installation discs, valuable photo and video archives stored on DVDs, or collections of digital assets (like font libraries, texture packs, or brush sets) provides a perfect, durable digital backup. This is crucial for protecting your investment in creative tools and your precious visual data. For photographers with vast libraries of high-resolution images, creating a bootable ISO for a dedicated photo management system could be a robust backup strategy.
- Virtualization and System Testing: Graphic designers and digital artists often work with multiple operating systems or need to test software in isolated environments. ISO images are indispensable for virtual machines (VMs). You can “mount” an ISO image within a VM, making it appear as if a physical disc has been inserted, allowing for seamless operating system installations or software testing without affecting your primary system. This is perfect for trying out a new photo editor without committing to a full installation on your main OS.
- Creating Bootable Media for OS Installation or Recovery: Whether you’re setting up a new workstation for digital art, installing a specialized OS on a dedicated photography editing machine, or needing a rescue disc to troubleshoot a system issue, ISO files are the standard for creating bootable USB drives or DVDs. This ensures that your system can start up from external media, a critical capability for installations, diagnostics, and data recovery – especially if your main drive fails and you need to access your precious image collections.
- Efficient Sharing of Large Collections: While Tophinhanhdep.com focuses on inspiring you with images, you might sometimes need to share large, curated collections of stock photos, custom brushes, or design templates with a team or collaborator. An ISO file can serve as an excellent container for such large, organized data sets, ensuring that the recipient receives an exact, uncorrupted, and neatly packaged collection.
In essence, ISO images provide a standardized, reliable, and efficient method for handling large digital packages, making them an invaluable asset for anyone navigating the technical landscape of visual content creation and consumption.
Crafting Your Digital Blueprint: How to Create ISO Files
The ability to create ISO files is as powerful as understanding what they are. For members of the Tophinhanhdep.com community, this capability translates into preserving valuable software, curating unique collections of visual assets, and ensuring the long-term integrity of their digital workspace. Creating an ISO image involves capturing either the contents of an existing physical disc or bundling a collection of digital files into this specialized format.
Creating ISOs from Physical Media: Archiving Your Creative Software
One of the most common and beneficial uses for creating an ISO file is to make a digital backup of a physical optical disc. This is particularly relevant for older, perhaps irreplaceable, software discs for graphic design tools, specialized photography utilities, or even comprehensive stock photo libraries that came on CD/DVD. Physical media can degrade, scratch, or simply become incompatible with newer hardware lacking optical drives. An ISO image bypasses these limitations, offering a pristine, eternal digital copy.
The Process: To create an ISO from a physical disc, you typically need “disk imaging software.” While Windows operating systems historically lacked a built-in tool for this specific task (unlike macOS and Linux which often include such utilities), numerous reliable third-party applications are available, many of them free. Tools like PowerISO, UltraISO, or Daemon Tools often provide this functionality.
The general steps involve:
- Insert the Disc: Place the CD, DVD, or Blu-ray disc you wish to image into your computer’s optical drive.
- Launch Imaging Software: Open your chosen disk imaging application.
- Select “Create ISO” or “Burn Disc to Image”: Look for an option that allows you to create an image file from a disc.
- Choose Output Location and Name: Specify where you want to save the
.isofile on your hard drive and give it a descriptive name (e.g.,PhotoshopCS6_Install.iso,Nature_Photography_Stock_Vol1.iso). - Start the Process: Initiate the creation. The time taken will depend on the size of the disc and your computer’s speed. A full DVD can take anywhere from a few minutes to over an hour.
Why this is vital for Tophinhanhdep.com users:
- Software Longevity: Preserve installation discs for expensive or legacy design software that might not be easily re-downloadable.
- Asset Protection: Back up valuable collections of fonts, textures, brushes, or stock images distributed on discs, future-proofing them against physical damage.
- Convenience: Once an ISO is created, you no longer need the physical disc. You can access its contents instantly from your hard drive or network storage.
Assembling ISOs from Digital Assets: Packaging Your Masterpieces
Beyond duplicating physical discs, you can also create an ISO file from a collection of existing files and folders on your computer. This capability is exceptionally powerful for content creators on Tophinhanhdep.com who want to package and distribute their own digital products, create organized backups, or prepare bootable media from scratch.
Use Cases for Tophinhanhdep.com:
- Distributing Curated Image Collections: Imagine creating a thematic collection of stunning wallpapers or background images, a comprehensive set of abstract art pieces, or a portfolio of your best high-resolution nature photography. By compiling these into an ISO, you create a single, easily manageable file for distribution or archiving. This ensures all files are together and retain their original structure.
- Packaging Graphic Design Asset Packs: For graphic designers, an ISO could be the perfect container for a “design starter kit” – bundling fonts, custom brushes for Photoshop, vector graphics, icons, and templates into one easily sharable file.
- Creating Custom Bootable Systems: Advanced users might want to create a bootable USB drive containing a specific operating system setup with all their preferred photo editing and design software pre-installed. You’d compile all these elements into an ISO first, then burn that ISO to a bootable drive.
The Process:
Software like PowerISO, ImgBurn (for Windows), or mkisofs (for Linux/macOS command line users) allows you to select files and folders and consolidate them into an ISO image.
General steps:
- Launch Software: Open your chosen optical disc authoring software (e.g., PowerISO).
- Start a New Compilation: You’ll typically begin with an empty “compilation” or “project.”
- Add Files and Folders: Drag and drop or use the software’s interface to add all the files and folders you want included in your ISO. This could be a folder full of “Aesthetic Backgrounds,” your “High Resolution Photography Archive,” or “Digital Art Brushes.”
- Configure Options (Optional):
- Label: Change the disc label for easy identification (e.g., “Tophinhanhdep_AbstractArt_Vol3”).
- File System: Choose the file system (ISO9660 for broad compatibility, UDF for larger files/DVDs).
- Boot Information: If you’re creating a bootable ISO (e.g., for an OS installer), you’ll need to add a boot information file.
- Save as ISO: Select the “Save” or “Save As” option and choose “Standard ISO Images (*.iso)” as the output format.
- Create: The software will then compile your selected files into a single ISO file at your specified location.
This ability to custom-build ISOs empowers the Tophinhanhdep.com community to package, manage, and share their digital creations and essential tools with unparalleled precision and efficiency.
Bringing ISOs to Life: Mounting and Interacting with Virtual Discs
Once you have an ISO file, whether created by you or downloaded from a software vendor, the next step is often to “use” it. This doesn’t necessarily mean burning it to a physical disc. In most modern operating systems, ISOs can be treated like virtual discs, providing instant access to their contents without any physical media. This process is known as “mounting” the ISO image.
Mounting ISOs: Instant Access to Your Digital Worlds
Mounting an ISO file tricks your computer into believing that a physical CD, DVD, or Blu-ray disc has been inserted into an optical drive, even though no physical drive or disc is involved. Instead, the ISO file itself is treated as a virtual drive. This is incredibly convenient for installing software, accessing archived files, or running applications that expect to be launched from a disc.
How Mounting Works: When you mount an ISO, your operating system (or a third-party tool) creates a temporary virtual drive letter (e.g., D:, E:, etc.) that points to the contents within the ISO file. You can then navigate this virtual drive using File Explorer (Windows), Finder (macOS), or your file manager (Linux) just as you would a physical disc. You can run executables, copy files, and browse directories directly from the mounted ISO.
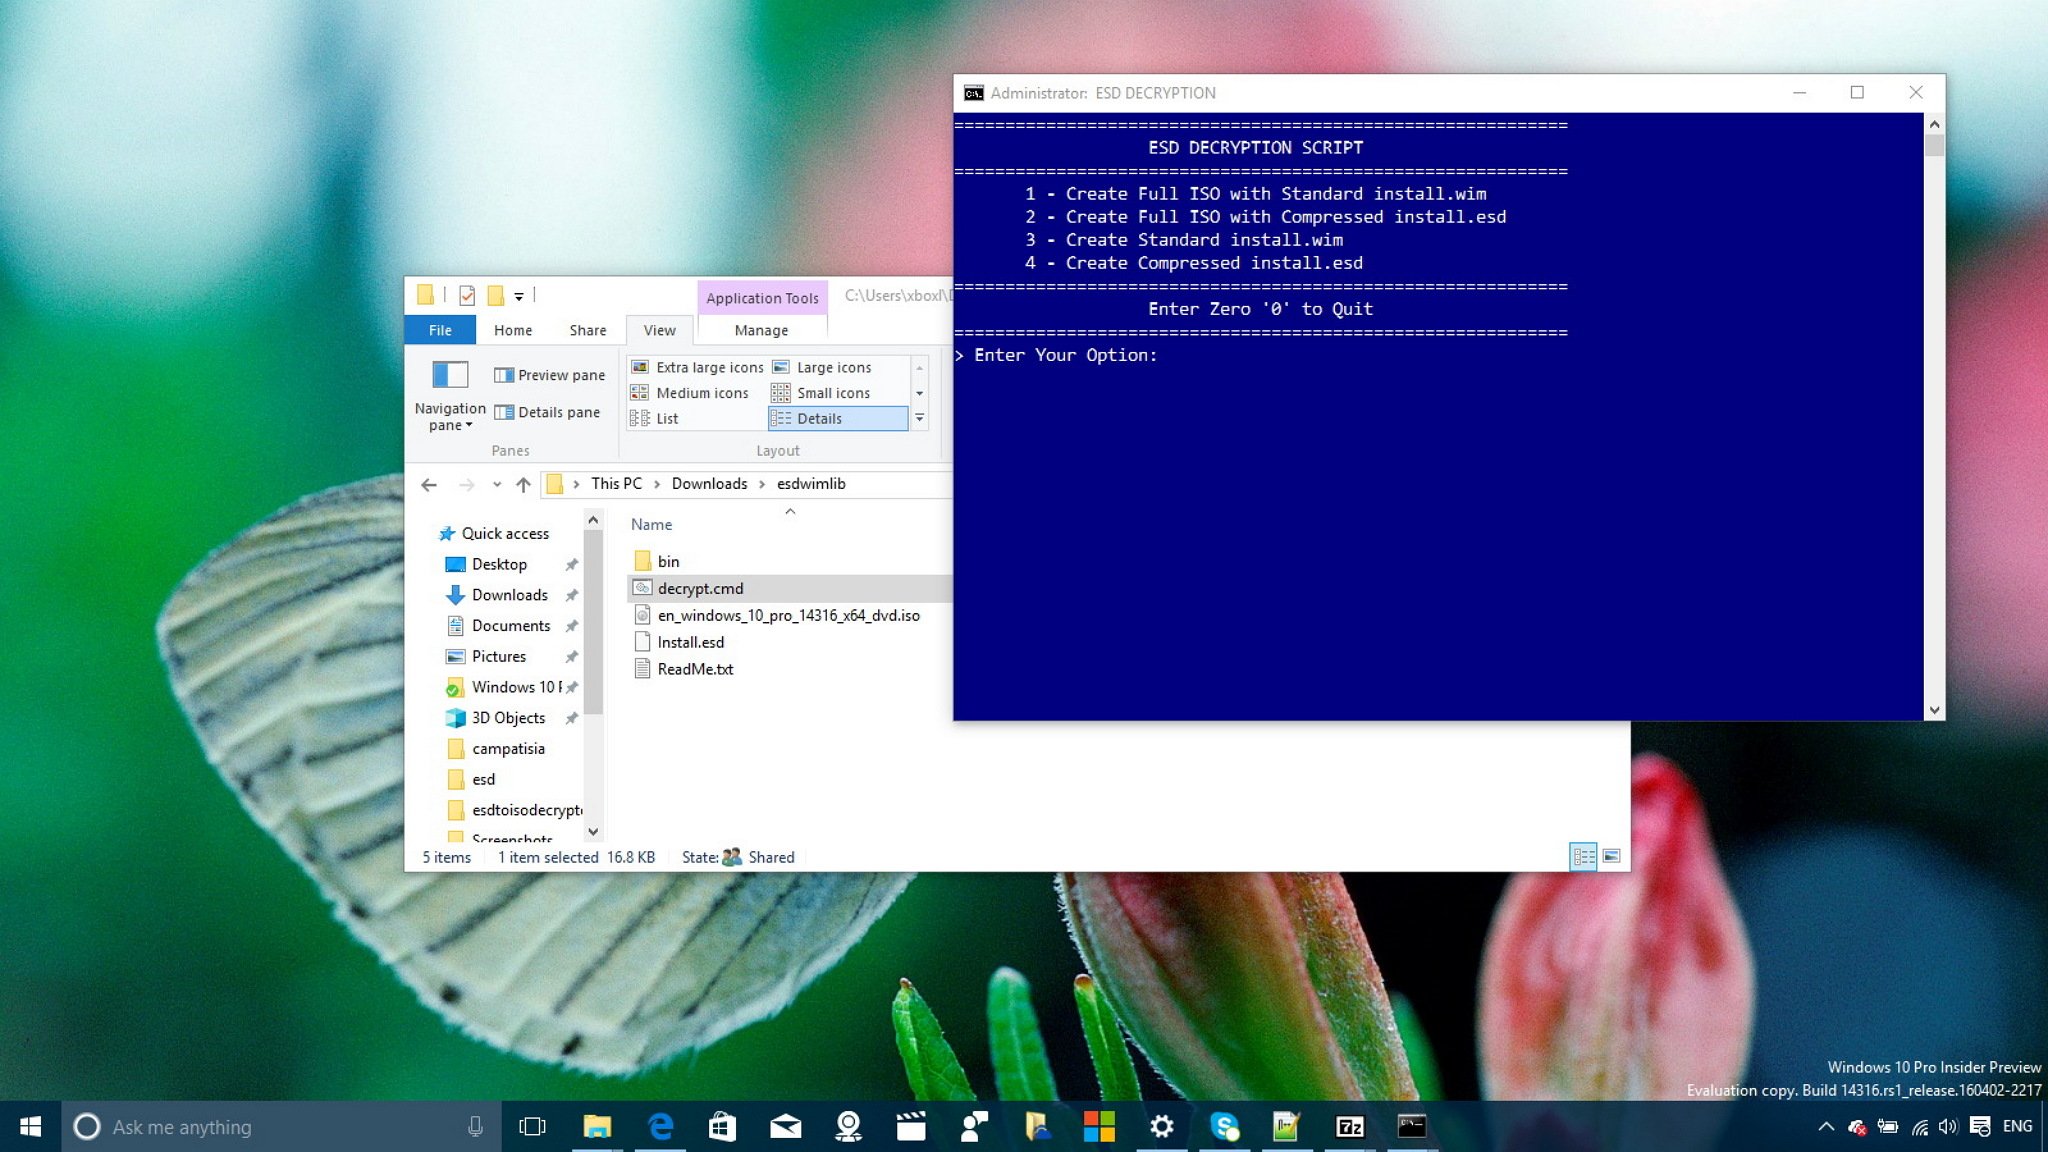
Mounting in Windows (8, 10, 11): Modern Windows versions have native ISO mounting capabilities, making the process incredibly simple:
- Method 1: Double-Click: The easiest way is often to simply double-click the
.isofile. Windows will usually mount it automatically. (Note: This might not work if a third-party archive program like 7-Zip or WinRAR has taken over the.isofile association). - Method 2: Right-Click “Mount”: Right-click the
.isofile, and from the context menu, select “Mount.” - Method 3: File Explorer Ribbon: Select the
.isofile in File Explorer, then look for the “Disk Image Tools” tab in the ribbon menu at the top. Click the “Mount” button there.
Once mounted, you’ll see a new drive listed under “This PC.” When you’re finished, you can “eject” the virtual drive by right-clicking it and selecting “Eject” to unmount the ISO.
Mounting in Older Windows (e.g., Windows 7) or for Enhanced Features: For Windows 7 or earlier, or if you prefer more advanced control (such as mounting multiple ISOs simultaneously or handling other disk image formats), you’ll need a third-party utility. Free and reliable options include WinCDEmu or Daemon Tools Lite. These tools install virtual optical drives that you can then use to mount your ISO files.
Benefits for Tophinhanhdep.com Users:
- Seamless Software Installation: Install graphic design software, photography tools, or digital art applications directly from the ISO without needing to burn a disc or extract files.
- Access to Asset Libraries: Quickly browse and retrieve assets from large ISO archives of stock photos, textures, or fonts without cluttering your main storage.
- Testing and Virtualization: Essential for installing operating systems within virtual machines, allowing designers to test compatibility or run niche software in isolated environments.
- Reduced Wear and Tear: Save your physical optical drives from overuse and reduce the risk of scratching valuable original discs.
Mounting ISOs is a cornerstone of efficient digital workflow, especially for anyone dealing with large software packages or extensive digital content collections, as is common within the Tophinhanhdep.com community.
Extracting Contents: Unpacking Creative Resources
While mounting treats an ISO as a virtual disc, sometimes you might simply want to access the individual files and folders within the ISO without creating a virtual drive. This is where “extracting” the ISO comes in. Extracting an ISO file copies all its contents directly to a specified folder on your hard drive, just as if you were unzipping a compressed archive.
How Extraction Works: When you extract an ISO, the software reads the ISO file and then writes all the contained directories and files to a new folder that you define. This gives you direct access to the raw files, allowing you to selectively copy, modify, or delete them as needed.
Tools for Extraction: Many popular file compression/decompression programs can handle ISO files. On Tophinhanhdep.com, we recommend widely used tools such as:
- 7-Zip (Free and Open Source): Highly efficient and supports a vast array of archive formats, including ISO.
- WinRAR (Shareware): Another popular choice with robust features.
- PeaZip (Free and Open Source): A modern, feature-rich alternative.
The Extraction Process (using 7-Zip as an example):
- Right-Click the ISO: Navigate to the
.isofile in File Explorer. - Select 7-Zip Options: Right-click the file, hover over the “7-Zip” option in the context menu.
- Choose Extraction Method:
- “Extract files…”: This opens a dialog box, allowing you to choose a specific destination folder for the extracted contents.
- “Extract Here”: This extracts all files and folders directly into the same directory where the ISO file is located. Be cautious with large ISOs, as this can clutter your current folder.
- “Extract to
\"(where\is the ISO filename): This is often the most convenient option. It creates a new folder with the same name as the ISO file and extracts all contents into that new folder, keeping things organized.
Benefits for Tophinhanhdep.com Users:
- Selective Access: If you only need one specific driver, a single high-resolution image, or a particular font from a large software or asset ISO, extraction allows you to grab just that file without dealing with a virtual drive.
- No Virtual Drive Overhead: For systems with limited resources, or when you just want the files on your hard drive permanently, extraction is more straightforward than mounting.
- Integration with Workflow: Extracted files can be directly integrated into your graphic design projects, photo editing workflows, or digital art compositions. For instance, you could extract a collection of “Sad/Emotional Backgrounds” from an ISO and immediately begin using them.
- Conversion and Manipulation: Once extracted, individual files can be converted, compressed, or optimized using various image tools – exactly the kind of functionality Tophinhanhdep.com users frequently engage with.
It’s important to note a common pitfall: if an archive program like 7-Zip or WinRAR is set as the default opener for .iso files, double-clicking the ISO will open it in that program for extraction rather than mounting it as a virtual drive. If you prefer Windows’ built-in mounting feature, you might need to adjust your default app settings for .iso files to “Windows Explorer” or “Windows Disc Image Burner.” This ensures you have the flexibility to choose between mounting and extracting based on your immediate needs.
Physical Manifestations: Burning ISOs to Discs or USB Drives
While mounting and extracting ISOs offer incredible digital flexibility, there are still scenarios where a physical copy of the ISO’s contents is essential. This usually involves “burning” the ISO image to an optical disc (CD, DVD, Blu-ray) or writing it to a bootable USB flash drive. This process transforms the digital blueprint of the ISO into a tangible, usable piece of media, critical for specific system tasks and large-scale data distribution.
Bootable Media: Essential for OS Installations and Rescue Discs
One of the most critical applications for burning an ISO is to create bootable media. This is indispensable for tech-savvy members of the Tophinhanhdep.com community, especially those who maintain their own systems, install operating systems, or need to recover from system failures.
Key Scenarios for Bootable Media:
- Operating System Installation: When you want to install Windows (10, 11), a Linux distribution (like Ubuntu for graphic design workstations), or any other operating system onto a new computer, a blank hard drive, or a virtual machine, you need bootable media. The OS installer is almost always distributed as an ISO file. Burning this ISO to a DVD or, more commonly now, a USB drive, creates the necessary bootable environment to start the installation process.
- System Repair and Recovery Discs: Every digital artist or photographer knows the anxiety of a system crash. Many diagnostic tools, antivirus boot CDs, and system repair environments (like Windows Recovery Environment or various Linux-based rescue kits) are provided as ISO images. Burning these ISOs to a disc or USB allows you to boot your computer from this external media, even if your main operating system is unbootable, to perform diagnostics, recover data (like your precious image files), or repair system issues.
- Live Environments for Testing: Some operating systems or specialized toolkits offer “live” versions via ISO. When burned to a USB, these allow you to boot into a fully functional OS environment without installing anything on your hard drive. This is perfect for testing hardware compatibility, trying out new software, or troubleshooting without altering your main system.
The Process of Burning ISOs:
- To Optical Disc (CD/DVD/BD):
- Windows 7, 8, 10, 11: These versions include a built-in “Windows Disc Image Burner.” Insert a writable optical disc (CD-R, DVD-R, etc.). Right-click the
.isofile and select “Burn disc image.” Follow the simple wizard. - Third-Party Tools: For more control, verification, or burning to Blu-ray, tools like ImgBurn (Windows) or the disc utility in macOS can be used.
- Windows 7, 8, 10, 11: These versions include a built-in “Windows Disc Image Burner.” Insert a writable optical disc (CD-R, DVD-R, etc.). Right-click the
- To USB Flash Drive (More Common Now):
- Since many modern computers lack optical drives, burning ISOs to USB drives has become the standard. This requires specific tools designed to make a USB drive bootable from an ISO.
- Popular Tools: Rufus (for Windows), Etcher (cross-platform), or the
ddcommand (Linux/macOS) are widely used. These tools format the USB drive, transfer the ISO contents, and configure the USB to be bootable. - Steps (Example with Rufus):
- Plug in your USB drive (ensure it’s empty or backed up, as it will be formatted).
- Launch Rufus.
- Select your USB drive from the “Device” dropdown.
- Click “SELECT” and choose your
.isofile. - Configure partition scheme (usually GPT for UEFI systems, MBR for older BIOS systems).
- Click “START” to begin the process.
Considerations: The speed of your optical drive or USB port, and the size of the ISO, will determine how long the burning process takes. Always verify the integrity of the burned media if your software offers the option.
Distributing Large Collections: From Software to High-Res Image Packs
Beyond bootable systems, burning ISOs can still be a viable method for distributing extremely large, structured collections of data that are too cumbersome for traditional file transfers or for users who prefer physical media.
Relevance for Tophinhanhdep.com:
- Archival Distribution: For sharing massive archives of high-resolution stock photos, panoramic wallpapers, or extensive digital art portfolios that might exceed practical internet download limits for some users, burning to a DVD or Blu-ray provides a robust physical medium.
- Offline Data Sharing: In scenarios without reliable internet access, a burned ISO disc or USB drive becomes the most efficient way to transfer large design software installers or curated image collections.
- Thematic Collections: Imagine a Tophinhanhdep.com exclusive collection of “Beautiful Photography: Nature’s Masterpieces” that spans several gigabytes. Creating an ISO and burning it ensures the entire collection, with its original folder structure and metadata, is preserved and transferable as a single unit.
While cloud storage and faster internet connections have reduced the everyday need for burning ISOs, the ability to create bootable media and physical archives remains an indispensable skill for comprehensive digital mastery, especially for those managing the powerful tools and vast libraries that fuel visual creativity.
The Broader Impact of ISO Standards: Beyond Disk Images
On Tophinhanhdep.com, our exploration of the ISO image format highlights its technical utility for managing digital assets and software vital to visual creativity. However, the term “ISO” itself, as an abbreviation for the International Organization for Standardization, signifies a broader commitment to uniformity and quality across diverse fields. This commitment to standards profoundly impacts the world of images and visual design, extending far beyond disk images to influence how we capture, process, and interpret visual information.
ISO in Photography: Light Sensitivity and Image Capture
It’s impossible to discuss “ISO” on a photography-focused platform like Tophinhanhdep.com without acknowledging its most common usage in image capture: ISO sensitivity. This “ISO” (often expressed as ISO 100, 200, 400, etc.) refers to a camera sensor’s sensitivity to light, a standard defined by the International Organization for Standardization.
- Impact on Images: A higher ISO setting increases light sensitivity, allowing photographers to capture images in dimmer conditions without flash. However, it typically introduces more digital noise, affecting image clarity and aesthetic appeal, especially in high-resolution photography where every pixel matters.
- Creative Control: Understanding ISO sensitivity is a fundamental aspect of digital photography, offering photographers creative control over exposure alongside aperture and shutter speed. For Tophinhanhdep.com users striving for beautiful photography, balancing ISO for optimal image quality is paramount.
- Connection to File Format (Conceptual): While completely distinct from the ISO file format, this photographic ISO exemplifies the power of standardization. Just as a standard ISO setting ensures consistent light sensitivity across different camera manufacturers, the ISO file format ensures a consistent, faithful digital representation of a disk’s contents across different computing platforms. Both aim for predictability and reliability in their respective domains.
This brief detour into photographic ISO underscores a larger theme for Tophinhanhdep.com: the pursuit of excellence through standardized practices, whether it’s in capturing light or packaging software.
ISO in Digital Design: Standards for Seamless Creation
Beyond photography, the spirit of ISO standards permeates digital design, albeit often in less explicit ways than a file format or camera setting. Graphic design, digital art, and photo manipulation all benefit from various standards that ensure compatibility, quality, and consistent experience.
- Color Management (ICC Profiles): International Color Consortium (ICC) profiles, while not “ISO” in name, are developed under the umbrella of international standardization efforts. They ensure that colors look consistent across different devices – from your camera to your monitor to your printer. For designers creating aesthetic and beautiful visuals, accurate color representation is non-negotiable.
- File Formats (JPEG, PNG, TIFF): While not all image file formats are direct ISO standards, many are widely adopted global standards that ensure universal compatibility. JPEG for compressed photos, PNG for transparent graphics, and TIFF for high-quality, uncompressed images are examples of formats that allow seamless exchange of visual content across different software and platforms. The very act of converting images or optimizing them, as discussed in our image tools section on Tophinhanhdep.com, relies on these widely accepted formats.
- Web Standards: For digital art and graphic design displayed online, web standards (HTML, CSS, etc.) ensure consistent rendering across browsers. These standards, often influenced by international bodies, enable designers to create visual experiences that are predictable and accessible.
- Data Exchange Standards: In complex workflows involving large datasets, or when distributing specific types of visual content (like vector graphics or 3D models), various data exchange standards ensure that files can be opened and manipulated correctly by different software packages.
These invisible standards collectively contribute to the seamlessness of modern digital creation. They allow a photographer to capture a high-resolution image, a graphic designer to incorporate it into a digital art piece, and a web developer to display it beautifully online – all without encountering major compatibility hurdles.
Tophinhanhdep.com’s Commitment to Digital Excellence
On Tophinhanhdep.com, our focus on high-resolution images, stunning wallpapers, and innovative visual design is deeply intertwined with the underlying digital infrastructure that makes it all possible. Understanding formats like the ISO image, alongside the broader principles of standardization, is crucial for several reasons:
- Empowering Creators: By demystifying technical concepts, we empower our community to better manage their creative tools, back up their valuable work, and navigate the digital landscape with confidence. This leads to more efficient workflows and, ultimately, more beautiful photography and digital art.
- Facilitating Access to Tools: Many of the powerful “Image Tools” – from AI upscalers to sophisticated photo manipulation software – are distributed via ISOs. Knowing how to handle these files is essential for accessing and utilizing these tools.
- Ensuring Data Integrity: For “Image Inspiration & Collections,” ensuring that thematic collections and mood boards are archived and distributed faithfully relies on robust formats. The ISO image offers a gold standard for this.
- Promoting Best Practices: Tophinhanhdep.com advocates for best practices in digital photography and visual design. This includes not just artistic techniques but also technical proficiency in managing your digital assets.
In conclusion, the ISO image format, far from being just a dry technical specification, is a vital component in the ecosystem of digital creativity. It’s the sturdy digital box that holds your essential software, the perfect blueprint for your operating systems, and a reliable archive for your most cherished visual collections. By understanding and utilizing ISO files, the Tophinhanhdep.com community can build a more robust, efficient, and inspiring foundation for their artistic and technical endeavors, continually pushing the boundaries of what’s possible in the world of beautiful images and innovative design.