What's the Best Size for Blog Post Images for WordPress on Tophinhanhdep.com?

In the vibrant digital landscape, where attention spans are fleeting and competition is fierce, the visual appeal of your website is paramount. For content creators and enthusiasts like those visiting Tophinhanhdep.com, renowned for its stunning wallpapers, aesthetic backgrounds, and high-resolution photography, the importance of captivating imagery cannot be overstated. However, simply using beautiful pictures isn’t enough; you must also ensure they are optimally sized for performance and presentation, especially when publishing on WordPress.
Imagine crafting a compelling blog post, meticulously detailing the allure of nature photography or the intricate beauty of abstract art, only for your readers to be met with slow loading times or pixelated visuals. Statistics show that nearly 40% of users will abandon a website if images fail to load quickly, a fate no one, particularly Tophinhanhdep.com, wishes for their valuable visitors. This guide delves into the crucial world of WordPress image sizes, offering a comprehensive strategy to empower your blog posts with visuals that are not only stunning but also fast, responsive, and SEO-friendly.
From understanding WordPress’s default settings to leveraging advanced optimization techniques and image tools, we’ll cover everything you need to know to make your blog stand out. Whether you’re showcasing breathtaking landscapes, intricate digital art, or providing creative ideas, mastering image sizing is your key to a seamless user experience and a visually superior online presence.
Understanding WordPress Default Image Sizes and Their Impact
WordPress, the world’s most popular content management system, aims to simplify image management by automatically generating several versions of an uploaded image. While this offers convenience, a deeper understanding of these default settings and their implications is crucial for sophisticated image handling, aligning perfectly with Tophinhanhdep.com’s focus on visual excellence.
What are WordPress’s Built-in Image Sizes?
When you upload an image to your WordPress media library, it doesn’t just store one file. Instead, it creates multiple resized versions, each serving a specific purpose within your theme and content layout. These default sizes are defined in pixels and include:
- Thumbnail (150 x 150 pixels): These are small, square-cropped images primarily used for compact displays such as post lists, archives, widgets, or small previews in galleries. They are excellent for offering a quick glance at content without consuming much space.
- Medium (300 x 300 pixels max): A step up from thumbnails, medium-sized images are ideal for embedding within blog posts and articles. They provide enough detail to be informative without dominating the content area or slowing down page loads. WordPress resizes the image proportionally to fit within these dimensions, so it won’t necessarily be exactly 300x300 unless it’s a square.
- Large (1024 x 1024 pixels max): Designed for images that need to retain quality and detail, large images are often used for full-width content sections or when a clearer view is required within an article. Similar to medium, images are scaled proportionally to fit within these maximum dimensions.
- Full Size (Original Upload): This is the unedited, original image file you uploaded. While sometimes necessary for very high-resolution displays or downloadable assets, directly embedding the full-size image in a blog post is often detrimental to page speed due to its potentially massive file size.
These default sizes are a starting point. Your WordPress theme might add its own custom image sizes, or you might define them using plugins, giving you greater flexibility to tailor visuals to your specific design needs.
Adjusting WordPress Image Settings
WordPress offers straightforward ways to modify these default image dimensions, allowing for a degree of customization without diving into code. This is particularly useful for Tophinhanhdep.com users who might have specific aesthetic or functional requirements for their digital photography and visual designs.
- Dashboard Settings (Settings > Media): The most accessible method is via your WordPress dashboard. Navigate to Settings > Media. Here, you can directly adjust the width and height for Thumbnail, Medium, and Large image sizes. Remember, these settings apply to new uploads. For existing images, you’ll need a way to “regenerate” them to apply the new dimensions.
- Theme-Specific Configurations: Many modern WordPress themes, especially those built for visual-heavy sites like Tophinhanhdep.com, come with their own image size options. These are often found within the theme customizer or a dedicated theme options panel, providing more granular control over how images are displayed in different parts of your site, such as hero sections, galleries, or post layouts.
- Leveraging Plugins: When you alter default image sizes, older images in your media library won’t automatically update. This is where plugins like Regenerate Thumbnails become invaluable. This tool allows you to regenerate all existing image sizes with your new settings, ensuring consistency across your entire site. Other powerful tools like “Bulk Images” (as mentioned in the references) can also assist in bulk resizing and even converting images to modern formats. These tools are indispensable for managing extensive image collections, such as the diverse wallpapers and thematic collections featured on Tophinhanhdep.com.
The Double-Edged Sword of Default Sizes
While convenient, relying solely on WordPress’s default image sizes without optimization can present challenges. Understanding these pros and cons will help Tophinhanhdep.com leverage the benefits while mitigating potential drawbacks.
Pros:
- Convenience: For beginners, default settings require minimal configuration, streamlining the process of adding and displaying images. This plug-and-play simplicity is a big draw.
- Consistency: Using uniform default sizes can help maintain a consistent visual aesthetic across your website, contributing to a professional and cohesive design, which is essential for showcasing beautiful photography.
- Saves Server Space (when used correctly): If smaller default sizes are chosen, they can reduce the overall storage footprint on your server compared to always displaying full-size originals. This optimizes website performance and responsiveness.
Cons:
- Customization Restrictions: Default sizes might not perfectly align with unique visual design requirements. Creators aiming for a tailored look, characteristic of digital art or photo manipulation, may find these sizes restrictive, necessitating additional effort to achieve their desired aesthetics.
- Influence on Performance (if not optimized): If default images are larger than what’s actually needed for display and then scaled down by the browser using HTML or CSS, they can adversely affect loading times. This “wasted” bandwidth can lead to slower page loads, a frustrating experience for visitors, and a negative impact on SEO.
- Wasted Space/Bandwidth: Displaying a 1024px image where a 300px image would suffice means unnecessary data transfer. This inefficient use of resources can increase hosting costs and slow down the site, contradicting the very purpose of image optimization.
Ultimately, while default sizes offer a foundation, Tophinhanhdep.com benefits most from a strategic approach to image sizing, combining WordPress’s built-in functionalities with careful optimization.
Tophinhanhdep.com’s Recommended Image Sizes for Optimal Performance & Aesthetics
For a website like Tophinhanhdep.com, dedicated to providing high-quality visual content—from wallpapers and backgrounds to aesthetic and nature photography—precise image sizing is not just a best practice, it’s a fundamental requirement. Achieving the perfect balance between visual fidelity and loading speed is an art form itself. While default sizes offer a baseline, embracing tailored dimensions ensures your images truly shine and perform flawlessly.
It’s crucial to remember that these are recommendations, and your specific WordPress theme and layout design might require slight adjustments. Always test your images across various devices to ensure optimal display.
Strategic Sizing for Blog Posts and Featured Images
The cornerstone of any blog is its content, and for Tophinhanhdep.com, that content is intrinsically linked to compelling visuals. Proper sizing for blog posts and their accompanying featured images is vital for both on-site engagement and social media sharing.
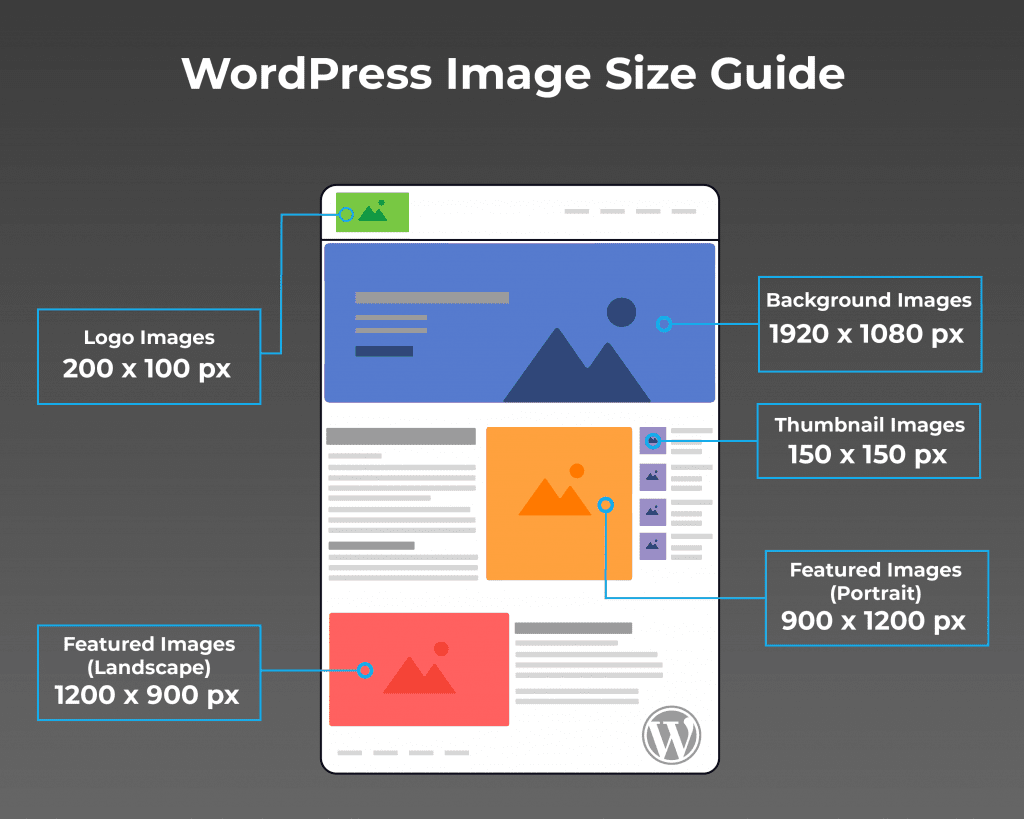
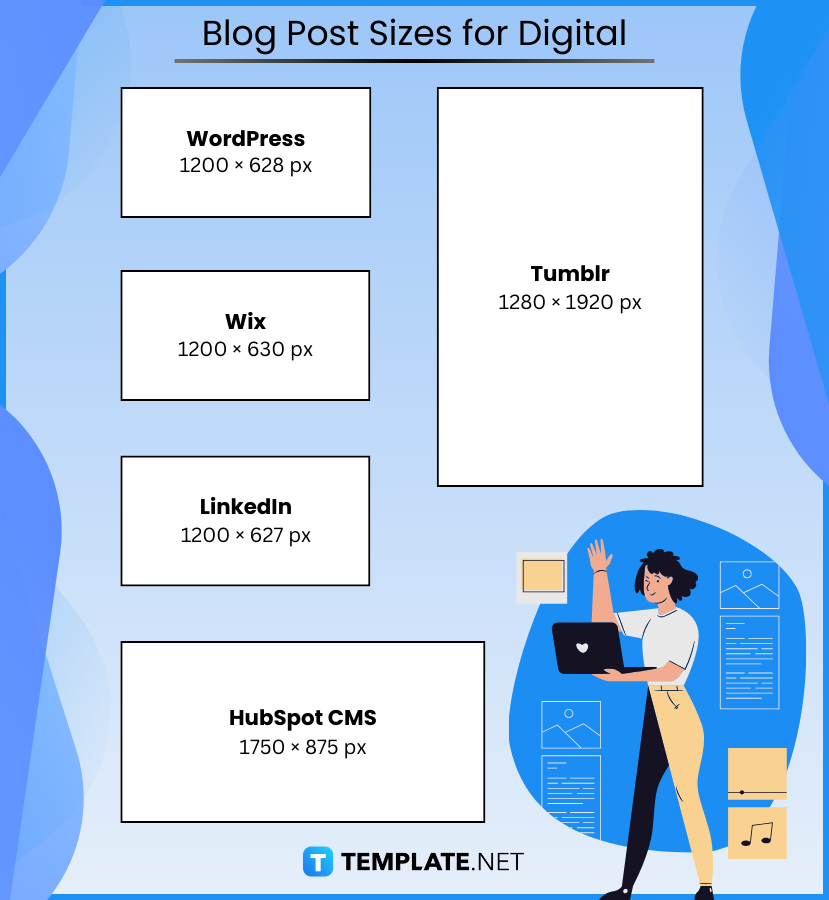
- Blog Post / Hero Image: 1200x630 pixels: This is often considered the golden standard for a blog post’s primary image. At this dimension, your “hero” image, often displayed at the top of an article, will appear crisp and engaging on most desktop screens. More importantly, a 1200x630px image is perfectly optimized for sharing on major social media platforms like Facebook, Twitter, and LinkedIn. It ensures your link previews include a high-quality, uncropped visual, making your content more appealing and clickable. This aligns with John Espirian’s recommendation and is a crucial aspect for extending the reach of Tophinhanhdep.com’s beautiful photography and creative ideas.
- Featured Landscape Image: 1200x900 pixels: For featured images that lean towards a landscape orientation, this size maintains clarity and appeal, especially for content categories like nature or abstract images. It offers a slightly taller aspect ratio than the social-optimized 1200x630px, providing more vertical breathing room without becoming overly large.
- Featured Portrait Image: 900x1200 pixels: When your subject demands a portrait orientation, such as certain aesthetic or sad/emotional photography, this dimension provides versatility. It ensures your vertically aligned content is displayed prominently and professionally across various layouts.
Optimizing Other Key Website Visuals
Beyond blog posts, other elements of your Tophinhanhdep.com site also require precise image sizing for a polished and high-performing experience.
- Logo: 200x100 pixels (or scalable SVG): Your logo is your brand’s face. While 200x100 pixels is a common and effective size for many header layouts, consider using a Scalable Vector Graphic (SVG). SVGs remain crisp at any resolution, making them perfect for retina displays and responsive design, ensuring your Tophinhanhdep.com brand identity is always sharp, regardless of the device. If using a raster format (like PNG), provide a slightly larger version (e.g., 400x200 pixels) for high-resolution screens and optimize its file size diligently.
- In-Content Images: 1024px width (height auto): For images embedded within the body of your text, such as illustrations for digital photography techniques or examples of editing styles, aim for a width of around 1024 pixels. The height should be set to ‘auto’ to maintain the image’s original aspect ratio, preventing distortion. This size provides excellent quality for most screen widths without being excessively large, especially if your content area is typically 600-800 pixels wide.
- Background Images: 1920x1080 pixels (Full HD): For immersive backdrops, such as on landing pages showcasing stunning wallpapers or thematic collections, 1920x1080 pixels (Full HD) is an excellent starting point. This ensures the background covers most desktop screens without pixelation. For sites targeting users with high-resolution (4K) displays, consider up to 3840x2160 pixels for truly sharp and detailed backgrounds, but be mindful of the increased file size and implement aggressive compression.
- Product Images: 1000x1000 pixels: If Tophinhanhdep.com expands into selling digital art prints or high-resolution stock photos, consistency is key. A square dimension like 1000x1000 pixels is ideal. It allows for zoom functionality in e-commerce interfaces while keeping file sizes manageable. Always use a consistent aspect ratio for all product images to maintain a uniform and professional look in your galleries.
- Gallery Images: 1024px width (height auto): For image galleries that showcase your diverse collections, a width of 1024 pixels is generally recommended. This allows WordPress to create various sizes, offering flexibility for different gallery layouts and lightbox functionality. For lightboxes that display full-size images, uploading originals around 2000 pixels on their longest side is beneficial, allowing for maximum detail when users click to view.
- Favicon: Minimum 260x260 pixels, square: This tiny icon represents your brand in browser tabs and bookmarks. While small, it needs to be high quality. Start with a square image of at least 260x260 pixels and use a tool like Real Favicon Generator to create all the necessary sizes and code for various devices and browsers.
Pixel Density vs. Physical Dimensions: Understanding PPI and DPI
A common point of confusion in digital imaging is the terminology surrounding resolution. For Tophinhanhdep.com, which deals with both digital photography and potential print-related aspects, understanding the distinction between PPI and DPI is crucial.
- Pixels Per Inch (PPI): This refers to the density of pixels in a digital image on a screen. For web images, PPI is the relevant metric. A higher PPI generally means a sharper image on a digital display. The standard for web images has long been 72 PPI. However, with the rise of high-resolution (Retina) screens, simply using 72 PPI might result in images appearing less sharp. For optimal clarity on modern displays, aiming for an effective pixel density closer to 144 PPI (or even higher by simply providing a larger pixel dimension image, which the browser then scales down to fit the physical space) can be beneficial. The key is that the number of actual pixels (e.g., 1200x630) is what truly matters for web display, as browsers will render an image based on its pixel dimensions, not its embedded PPI value.
- Dots Per Inch (DPI): This is a print-specific term referring to the density of ink dots a printer lays down on paper. It is largely meaningless for images displayed solely on screens. While many image editing tools might display a “DPI” setting, for web use, focus on the image’s total pixel dimensions (e.g., 1920 pixels wide by 1080 pixels high) and its file size. Only when preparing images for physical prints would you prioritize a higher DPI (e.g., 300 DPI) to ensure a high-quality output.
For Tophinhanhdep.com’s web content, prioritize creating images with sufficient pixel dimensions for the intended display size and optimize their file size. The “72 PPI” rule for web images essentially means “don’t create unnecessarily large pixel dimensions,” but with modern screens, using higher pixel counts for the same physical display size improves sharpness.
Mastering Image Optimization for Tophinhanhdep.com
Optimizing images is not merely about resizing; it’s a multi-faceted process that enhances user experience, improves SEO, and ensures that the beautiful photography and digital art on Tophinhanhdep.com are delivered efficiently. This section explores the tools, techniques, and formats necessary to achieve peak performance.
Choosing the Right Image Format for Your Content
The format you choose for your images significantly impacts their quality, file size, and how they perform on your website. For Tophinhanhdep.com, with its diverse image types, selecting the appropriate format is key to visual fidelity and speed.
- JPEG (JPG): This is the go-to format for photographs and complex images with rich color gradients, such as nature landscapes, abstract art, or beautiful photography collections. JPEG offers excellent compression, drastically reducing file sizes with minimal perceptible loss in quality for photographic content. However, it’s a “lossy” format, meaning repeated compression can degrade quality.
- PNG: PNG is a lossless format best suited for images requiring sharp edges, text overlays, or transparency. This makes it ideal for logos, icons, infographics, or digital art pieces where crisp lines and transparent backgrounds are critical. While PNG files are generally larger than JPEGs, they maintain perfect quality, making them indispensable for graphic design elements on Tophinhanhdep.com.
- GIF: Limited to 256 colors and supporting transparency, GIF is primarily used for simple animations and small, low-color graphics. It’s generally not recommended for high-quality images but can be effective for subtle movement in icons or brief illustrative animations.
- WebP: Introduced by Google, WebP is a modern, next-generation image format that offers superior compression for both lossy and lossless images, typically resulting in 25-35% smaller file sizes than JPEGs or PNGs without sacrificing quality. This makes WebP an ideal choice for Tophinhanhdep.com, enabling faster loading times and improved SEO. While widespread browser support exists, it’s wise to implement fallbacks for older browsers if your audience dictates.
- SVG (Scalable Vector Graphics): SVG is a vector-based format perfect for logos, icons, and illustrations that need to scale infinitely without any loss of quality. As they are code-based, SVG files are incredibly lightweight. For Tophinhanhdep.com’s branding and minimalist design elements, SVGs ensure sharpness across all screen sizes.
Essential Tools and Techniques for Image Compression
Once you’ve selected the right format, compressing your images is the next critical step to minimize file size and maximize loading speed. Tophinhanhdep.com can greatly benefit from these image tools and techniques.
- Pre-upload Compression: It’s best practice to compress images before uploading them to WordPress. Online tools like TinyPNG (which also has a WordPress plugin), Squoosh.app, and desktop applications like ImageOptim (macOS) or PNGGauntlet (Windows) can significantly reduce file sizes without noticeable quality degradation. The aim is to keep standard images under 150KB and larger hero/background images under 500KB. This pre-processing is akin to Iain Laird’s workflow of converting large, clean PNGs into small, attractive JPGs for sale—a practice Tophinhanhdep.com can adopt for all its image collections.
- WordPress Plugins: After uploading, several WordPress plugins continue the optimization process. Smush is a popular choice for compressing images without losing quality, even in bulk. Plugins like “Bulk Images” (as noted in the references) can also resize and convert images to WebP, further boosting performance. These tools automate what would otherwise be a tedious manual task, ensuring your entire media library is optimized.
- The “Original” File and Workflow: For photographers and digital artists on Tophinhanhdep.com, starting with high-resolution master files (like Iain Laird’s large clean PNGs) is essential. These can then be processed (cleaned up in Photoshop, resized, and compressed) into optimized JPGs or WebPs for web use. Always retain your high-resolution originals for future editing or printing.
Implementing Lazy Loading for Faster Page Performance
Lazy loading is a technique that defers the loading of images (or other media) until they are actually needed—i.e., when they enter the user’s viewport as they scroll down a page. This significantly reduces initial page load times, especially for content-heavy pages like blog posts filled with aesthetic images or extensive photography collections.
- How Lazy Loading Works: Instead of loading all images at once, lazy loading loads placeholders first. As a user scrolls, images become visible and are then fetched from the server. This results in a faster “perceived” loading time, providing a smoother user experience.
- Native WordPress Support: WordPress versions 5.4 and higher include a built-in feature for lazy loading images by default. This automatic implementation means many sites already benefit from this optimization without any extra steps.
- Browser-Level Lazy Loading: Modern browsers like Chrome, Firefox, and Opera offer native lazy loading support. You can manually enable this by adding the
loading="lazy"attribute to your image tags:<img src="image-name.webp" loading="lazy" alt="Image description" width="1200" height="630">. - Dedicated Plugins: For more control or if you’re on an older WordPress version, plugins like Lazy Load Plugin or Optimole provide robust lazy loading functionalities. Optimole, in particular, offers a comprehensive suite of image optimization features beyond just lazy loading, making it an excellent choice for Tophinhanhdep.com.
Ensuring Responsiveness Across All Devices
In today’s multi-device world, images must look great and function seamlessly on everything from a large desktop monitor to a tiny smartphone screen. Responsive images are a cornerstone of a user-friendly website, especially for Tophinhanhdep.com’s diverse audience accessing visual content.
- Importance of Responsive Design: Responsive images adapt to different screen sizes and resolutions, ensuring faster load times on mobile (by serving smaller files) and higher quality on desktop. This adaptability prevents horizontal scrolling, image stretching, and pixelation, directly impacting user satisfaction and SEO.
- WordPress Native Responsive Image Features: WordPress automatically generates
srcsetandsizesattributes for images, telling browsers which image size to serve based on the user’s screen resolution and viewport. This largely handles responsiveness out of the box for most scenarios. - Using the
<picture>Element: For more fine-grained control over how different image versions are displayed based on specific criteria (like screen width or pixel density), the HTML<picture>element allows you to provide multiple<source>elements. This is especially useful when you want to serve different aspect ratios or entirely different images for various contexts, aligning with complex visual design needs. - Image Processing Tools: Tools like Adobe Photoshop, Gimp, or online services can help you prepare multiple responsive versions of your images. For Tophinhanhdep.com, utilizing image tools such as converters, compressors, and AI upscalers can ensure that every image, whether a wallpaper or a background, is perfectly tailored for responsiveness.
Troubleshooting Common Image Issues on Your WordPress Site
Even with the best practices, image issues can arise, disrupting your website’s visual harmony. For Tophinhanhdep.com, a site built on visual appeal, quick and effective troubleshooting is essential to maintain a pristine user experience. Here’s how to diagnose and solve common WordPress image problems.
Diagnosing and Fixing Image Display Problems
Understanding these typical roadblocks and their solutions will help you ensure flawless image display across all your blog posts and galleries.
- Improper Thumbnail Size:
- Problem: Thumbnails appearing too large, too small, or cropped incorrectly, as observed by users like Michelle. This often stems from misconfigured settings or a theme overriding defaults.
- Solution: First, navigate to Settings > Media in your WordPress dashboard and adjust the thumbnail dimensions. If the problem persists, especially for existing images, use a plugin like Regenerate Thumbnails. This will recreate all your image sizes according to your updated settings. If a theme is causing the issue (as Katie experienced with her logo), contact your theme developer for specific guidance on their image handling.
- Image Stretching:
- Problem: Images appear distorted, stretched, or squashed. This typically happens when an image is forced into a display area with a different aspect ratio than its original, or when CSS attempts to stretch it to fill space.
- Solution: Always upload images with an aspect ratio that closely matches their intended display area. If images are being resized by your theme, ensure that the original image provides enough “dead space” or padding around the subject, as Iain Laird discussed, so cropping doesn’t sacrifice context. Use CSS properties like
object-fit: cover;orobject-fit: contain;within your stylesheets to control how images scale and fit within their containers without distortion.
- Blurred or Pixelated Images:
- Problem: Images looking fuzzy or blocky, often cited by Santiago regarding graphs, or Marcel with fuzzy featured images. This occurs when a low-resolution image is displayed at a size larger than its native pixel dimensions.
- Solution: The primary fix is to always start with high-resolution original images. For Tophinhanhdep.com, this means using your high-resolution photography and digital art as source files. Upload images that are at least as large (in pixels) as their largest intended display size on your website. After uploading, ensure proper optimization (compression, WebP conversion) to reduce file size without sacrificing the initial high quality. AI upscalers (mentioned in Tophinhanhdep.com’s tools) can also be used as a last resort for lower-res source images, but starting high-res is always preferable.
- Large File Sizes:
- Problem: Your website is slow, and PageSpeed Insights flags images as a major “opportunity” (as Steve experienced). This is almost always due to images with excessively large file sizes, even if their pixel dimensions are appropriate.
- Solution: Re-emphasize the compression techniques discussed earlier: pre-upload optimization with tools like TinyPNG or Squoosh.app, and server-side compression with WordPress plugins like Smush. Ensure lazy loading is enabled. The goal is to keep image file sizes as low as possible (e.g., under 150KB for standard images) without compromising visual quality. JohnL’s success in reducing his page size from 8MB to 1.5MB through these methods highlights their efficacy.
Leveraging Tophinhanhdep.com’s Expertise and Resources
For more complex image issues, or when you need specialized assistance, Tophinhanhdep.com can guide you toward the right resources:
- WordPress Forums and Community: The official WordPress support forums are a valuable resource for community support and troubleshooting. Many common issues have already been discussed and resolved by other users.
- Plugin Documentation/Support: If an issue is tied to a specific plugin (e.g., a gallery plugin or a page builder), consult its documentation or support channels directly. The developers often have specific solutions for their tools.
- Professional Development Assistance: For intricate problems, particularly those involving custom themes, advanced CSS, or server configurations, consider hiring a professional WordPress developer or agency.
- Tophinhanhdep.com’s Image Tools: Don’t forget the powerful image tools available through Tophinhanhdep.com! Our Converters can help you switch formats (e.g., from PNG to WebP). Our Compressors and Optimizers can fine-tune image file sizes for web performance. And for those rare instances where a source image is too small, our AI Upscalers can enhance resolution, helping to combat pixelation.
- Image Inspiration & Collections: If you’re struggling to find high-quality source images, explore Tophinhanhdep.com’s vast Image Inspiration & Collections. Starting with a high-resolution, professionally curated image (like our wallpapers, aesthetic, or nature photography) provides the best foundation for optimization, minimizing the chances of blurred or pixelated results down the line.
Conclusion
In the visually driven world of the internet, the images on your WordPress blog posts are far more than mere embellishments; they are critical components that define user experience, influence search engine rankings, and ultimately, communicate the essence of your content. For Tophinhanhdep.com, a platform celebrated for its commitment to high-resolution, aesthetic, and diverse photography, mastering the art and science of WordPress image sizing is not just a best practice—it’s an absolute necessity.
By strategically implementing the recommended image sizes, carefully choosing the optimal file formats, and diligently applying robust optimization techniques, you ensure that every image on your blog loads swiftly and renders beautifully, regardless of the viewer’s device. From the captivating hero image that draws readers in, sized perfectly at 1200x630 pixels for social sharing, to the detailed in-content visuals and immersive background graphics, each element contributes to a harmonious and high-performing website.
Remember the power of pre-upload compression, the efficiency of lazy loading, and the responsiveness that ensures your stunning wallpapers and digital art shine across all screens. Leverage the built-in capabilities of WordPress alongside powerful image tools like Smush, TinyPNG, and WebP conversion to keep your site lean and lightning-fast. And when challenges arise, from stretched thumbnails to pixelated graphics, know that solutions, from simple dashboard adjustments to advanced troubleshooting, are within reach.
By adopting these comprehensive strategies, Tophinhanhdep.com can continue to lead in visual excellence, providing an unparalleled experience for every visitor. So, go ahead and implement these best practices. Let your beautiful photography, creative ideas, and compelling visual designs truly stand out in the digital landscape, powered by images that are perfectly sized for success. Explore Tophinhanhdep.com’s resources for high-quality images and powerful tools to elevate your blog today!