Mastering the Art of Image Cropping in Figma: A Comprehensive Guide for Visual Creators

In the dynamic realm of digital design, where visual aesthetics dictate user experience and brand perception, tools like Figma have become indispensable for creators worldwide. Figma, a browser-based interface design and prototyping tool, empowers designers to craft stunning visuals, develop intuitive user interfaces, and collaborate seamlessly. Among its myriad capabilities, the ability to efficiently crop images stands out as a fundamental skill. Image cropping isn’t merely about cutting off unwanted edges; it’s a powerful technique that refines composition, enhances focus, and aligns visuals with the overarching design narrative. For designers, photographers, and visual artists seeking to elevate their work, understanding how to precisely manipulate images within Figma is crucial.
At Tophinhanhdep.com, we understand the profound impact of compelling visuals. Our platform is dedicated to providing an extensive array of resources, from high-resolution photography and aesthetic backgrounds to advanced image tools and visual design inspiration. Whether you’re curating a mood board with trending styles, optimizing a background for a new website, or diving deep into digital art, the clarity and intention behind your image selection and manipulation are paramount. This comprehensive guide will navigate you through the various methods of image cropping in Figma, ensuring your designs are not only visually appealing but also strategically effective, all while leveraging the rich ecosystem of resources available at Tophinhanhdep.com.
The Essential Toolbox: Direct Cropping Methods in Figma
Figma offers several intuitive ways to crop images, catering to different workflows and levels of precision. These methods are designed to be non-destructive, meaning your original image data is always preserved, allowing for adjustments and reversions without loss of quality. This non-destructive editing approach aligns perfectly with the iterative nature of design, granting you the freedom to experiment and refine your visuals.
Double-Clicking for Instant Crop Access
The quickest and most straightforward path to cropping an image in Figma begins with a simple double-click. This method is ideal for rapid adjustments and when you know exactly which part of the image you want to highlight.
To execute this:
- Select Your Image: Begin by clicking on the image layer you wish to crop within your Figma canvas. Ensure it is the active selection.
- Double-Click to Activate Crop Mode: With the image selected, simply double-click on it. This action immediately transitions the image into crop mode, revealing a set of blue handles around its bounding box.
- Define Your Crop Area: Utilize these blue handles, located at the corners and sides of the image, to adjust the cropping area. Click and drag them inward or outward to define the desired portion of the image. As you manipulate the handles, Figma provides a real-time preview of your final crop, showing the area outside the crop box as faded or hidden.
- Finalize the Crop: Once you are satisfied with the defined crop area, simply press the
Enterkey on your keyboard or click anywhere outside the image on the canvas. The image will instantly be trimmed to your specified dimensions, removing the unnecessary parts and sharpening the focus on your subject.
This method is praised for its efficiency, allowing designers to quickly iterate on image compositions without diving into complex menus. It’s perfect when you’re working with “Beautiful Photography” from Tophinhanhdep.com and need to quickly frame a subject for maximum impact.
Leveraging the Fill Panel for Granular Control
While double-clicking offers speed, the Fill panel in Figma’s Design Inspector provides a more explicit and often preferred method for cropping, particularly when dealing with intricate designs or when you want to understand the underlying image properties. This approach gives you a clearer view of the image’s fill settings and allows for easy toggling between different fill modes.
Here’s how to crop using the Fill panel:
- Select the Image Layer: As before, click on the image layer on your canvas or within the Layers panel on the left sidebar.
- Navigate to the Design Inspector: On the right-hand side of the Figma interface, locate the “Design” tab within the inspector panel.
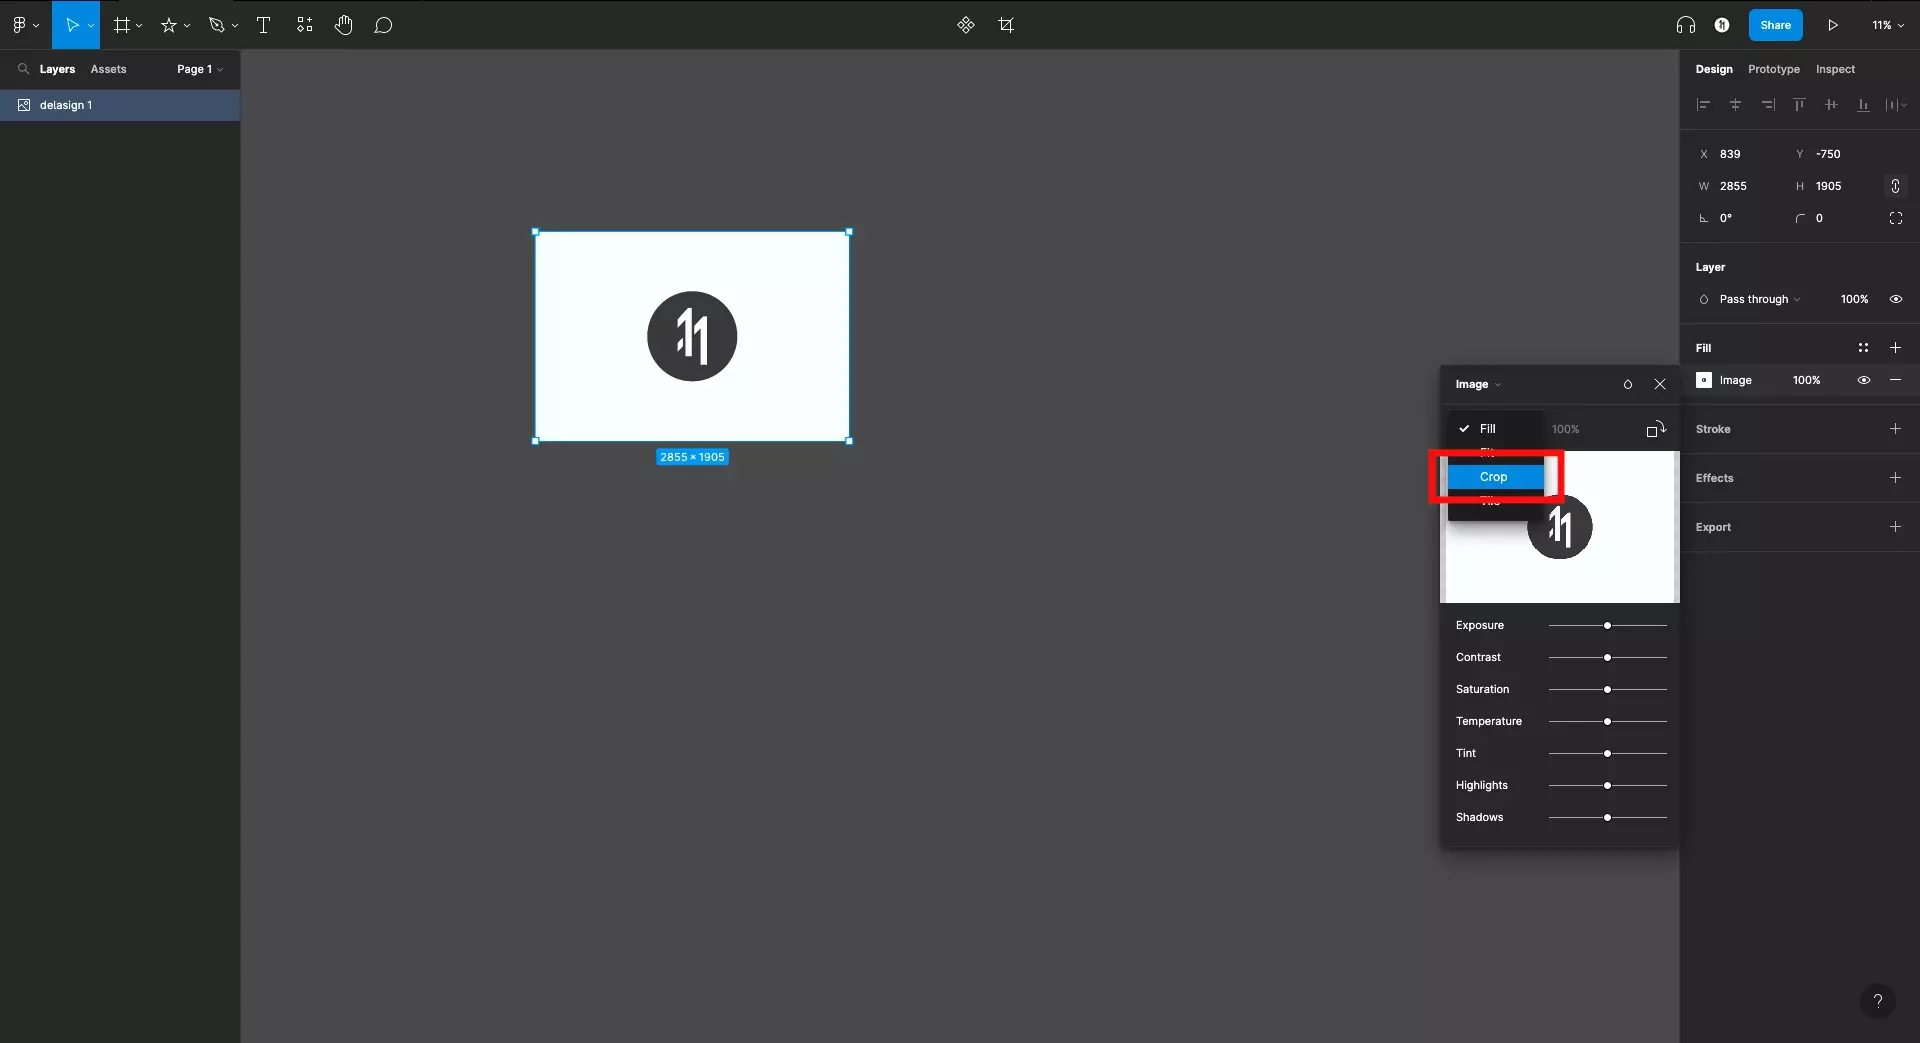
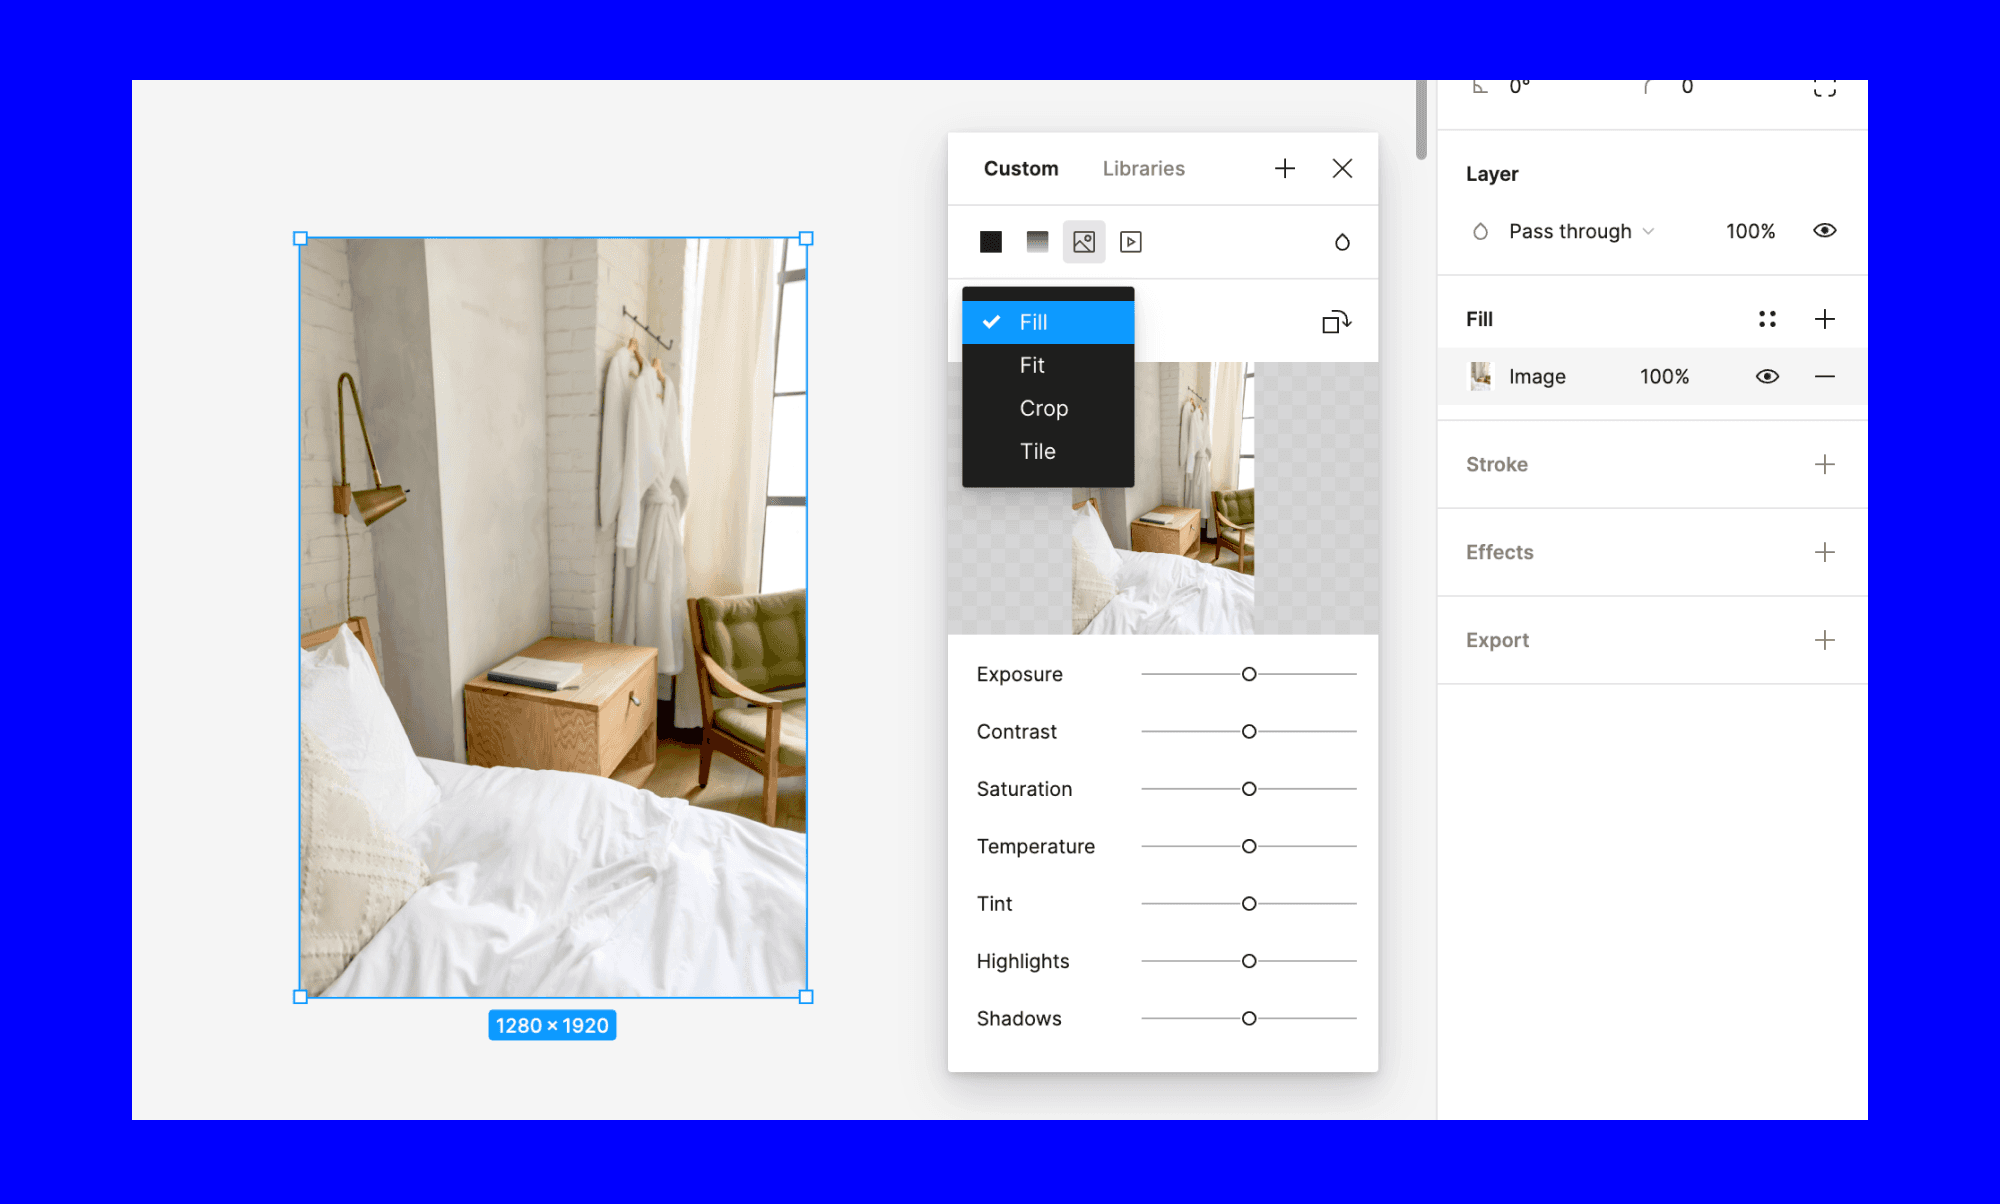
- Access Fill Settings: Within the Design tab, find the “Fill” section. If your layer has an image fill, you will see a preview thumbnail of the image. Click on the swatch or the image thumbnail itself within the Fill section. This action opens up the image properties pop-up.
- Change Fill Mode to “Crop”: Inside the image properties pop-up, there’s a drop-down menu (often defaulting to “Fill” or “Fit”). Click this drop-down and select “Crop” from the available options.
- Adjust the Crop Area: Similar to the double-click method, entering crop mode via the Fill panel will display the blue handles around your image. Drag these handles to resize the crop box, focusing on the desired part of the image. The area outside this box will be visually faded to indicate what will be hidden.
- Confirm Your Crop: Once the crop area is precisely set, either press
Enteron your keyboard or click outside the image on the canvas to apply the changes.
This method is particularly useful when you’re incorporating “High Resolution” images or “Stock Photos” from Tophinhanhdep.com into a complex layout, as it provides clear visual feedback and control over the image’s properties.
Keyboard Shortcuts for the Power User
For those who prioritize speed and efficiency, Figma offers a powerful keyboard shortcut that combines selection and cropping in one fluid motion. This shortcut is a favorite among seasoned designers for its ability to integrate seamlessly into a fast-paced workflow.
To use the keyboard shortcut for cropping:
- Select the Image: Click once on the image you wish to crop.
- Activate and Adjust: Hold down the
Commandkey (Mac) orCtrlkey (Windows) on your keyboard. While holding the key, click and drag any of the corner blue handles of the image. This action simultaneously activates crop mode and allows you to define the crop area. - Release and Finalize: Release the mouse button and the keyboard modifier key once your desired crop is achieved. The crop will be applied automatically.
A crucial tip: Be mindful to hold the Command/Ctrl key before clicking and dragging. Releasing the key too soon might result in scaling the image rather than cropping it, potentially leading to distortion. Should this occur, a quick Ctrl/Cmd + Z will undo the action, allowing you to try again.
These direct cropping methods form the foundation of image manipulation in Figma. They are essential skills for any designer working with “Wallpapers,” “Backgrounds,” or any visual element requiring precise framing.
Advanced Cropping and Masking Techniques for Creative Visual Design
While direct cropping is excellent for rectangular adjustments, the world of visual design often demands more intricate and artistic approaches. Figma excels in this area with its powerful masking capabilities, allowing you to crop images into any custom shape imaginable. This opens up a vast realm of creative possibilities, moving beyond simple rectangles to sophisticated compositions that truly stand out.
Masking for Custom Shapes: Unleash Your Creativity
Masks in Figma are a game-changer for designers looking to achieve non-rectangular crops or to integrate images into unique visual elements. A mask essentially uses one shape to define the visible area of another, typically an image. This technique is entirely non-destructive, meaning the underlying image remains whole and editable at all times. This is especially beneficial when you’re working with “Digital Photography” or “Digital Art” from Tophinhanhdep.com, allowing for limitless experimentation.
Here’s a step-by-step guide to cropping an image into a custom shape using masks:
- Prepare Your Image: First, place the image you want to crop onto your Figma canvas. This can be any high-resolution image from Tophinhanhdep.com’s “Nature,” “Abstract,” or “Aesthetic” collections.
- Draw Your Masking Shape: Next, create the shape that will define your crop. This can be a basic shape like an ellipse (press
Ofor the ellipse tool) or a rectangle, or a more complex custom shape drawn with the Pen tool (pressP). Position this shape precisely over the part of your image you wish to keep visible. For example, to crop an image into a circle, draw a perfect circle (holdShiftwhile dragging the ellipse tool) over the desired area. - Stack Your Layers: Ensure your masking shape is positioned above the image layer in the Layers panel (left sidebar). This is crucial for the mask to function correctly. If your shape is below the image, simply drag it above, or use
Ctrl/Cmd + ]to bring it forward. - Select Both Layers: Select both the image layer and the masking shape layer. You can do this by holding
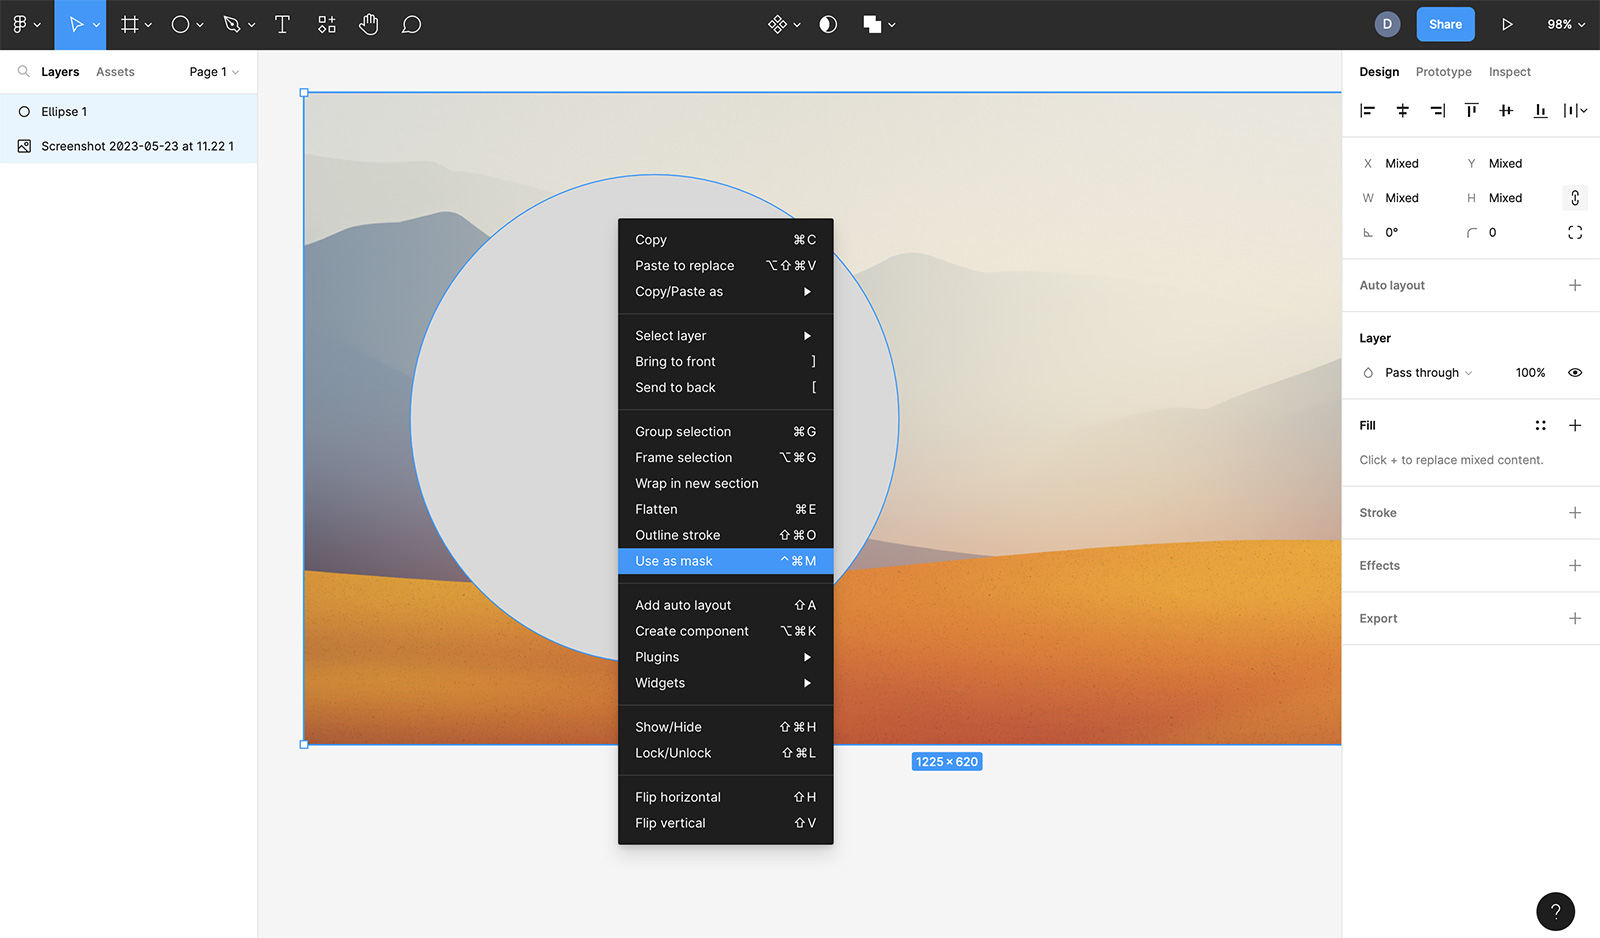
Shiftand clicking on each layer in the Layers panel, or by clicking and dragging your mouse over both objects on the canvas. - Apply the Mask: With both layers selected, there are a few ways to apply the mask:
- Toolbar Icon: Look for the “Use as mask” icon in the top toolbar (it often looks like a circle within a square, or two overlapping shapes). Click this icon.
- Right-Click Menu: Right-click on either of the selected objects and choose “Use As Mask” from the contextual menu.
- Keyboard Shortcut: For ultimate speed, use
Command + Option + M(Mac) orCtrl + Alt + M(Windows).
- Observe the Result: Immediately, your image will be “cropped” into the shape of your masking layer. The area of the image that falls outside the mask shape will become invisible.
- Refine and Adjust: The beauty of masking is its flexibility. You can:
- Reposition the Image: Double-click on the masked image within the mask group to select and reposition it, allowing you to choose which part of the image is visible through the mask.
- Edit the Masking Shape: Double-click on the masking shape within the mask group to resize, reshape, or move it. This dynamically updates the cropped area of your image.
- Release the Mask: If you decide you no longer need the mask, select the mask group and click the “Use as mask” icon again (it acts as a toggle) or right-click and choose “Unmask.”
This masking technique is fundamental for creating sophisticated “Visual Design” elements, allowing designers to create compelling “Photo Manipulation” effects or uniquely shaped image elements for “Creative Ideas.” Whether you’re cutting out a profile picture into a perfect circle or incorporating an image into a complex abstract shape, masking provides unparalleled control.
Cropping into Specific Shapes: Beyond the Mask
While masks offer ultimate flexibility, Figma also provides more direct ways to achieve certain common shapes, especially for rounded rectangles and circles, directly from the layer’s properties.
- Using Corner Radius: For images within a rectangular frame, you can easily round their corners. Select the image layer, and in the “Design” panel on the right, locate the “Corner Radius” setting. Increase the value to add a curve to the corners. If you set a sufficiently high corner radius (typically half of the smallest side’s dimension), your rectangular image will transform into a perfect circle or ellipse. This is a fast way to create profile picture placeholders or aesthetic circular image elements without explicitly using a mask.
- Combining with Frames: For more complex scenarios, especially when designing interactive components, placing your image inside a Figma Frame can be beneficial. Frames act as containers and allow for advanced clipping and layout controls, particularly when working with “Auto Layout.” You can select an image and choose “Frame Selection” from the right-click menu. Once framed, the image will conform to the frame’s boundaries, and you can apply corner radius to the frame itself to indirectly shape the image.
These advanced techniques empower designers to transcend basic cropping and delve into truly creative visual design, enabling the incorporation of “Aesthetic” and “Beautiful Photography” from Tophinhanhdep.com into complex and unique layouts.
Refining Your Crop: Tips and Tricks for Professional Results
Precision and thoughtful execution are hallmarks of professional design. Figma provides several helpful features and considerations to ensure your image crops are not just functional but also aesthetically perfect, enhancing the overall quality of your “Graphic Design” and “Digital Art.”
Maintaining Aspect Ratio: Preserving Proportions
One of the most common challenges in image manipulation is maintaining the original proportions, or aspect ratio, of an image during resizing or cropping. Distorting the aspect ratio can make an image look stretched or squashed, negatively impacting its visual quality and the message it conveys. Figma offers simple yet effective ways to prevent this.
- Hold
Shiftwhile Cropping/Resizing: When you are in crop mode (either by double-clicking or selecting “Crop” from the Fill panel), or when simply resizing an image, holding down theShiftkey while dragging any of the blue corner handles will constrain the proportions. This ensures that the width and height scale proportionally, keeping your image from appearing distorted. This is invaluable when you need to crop a “High Resolution” image from Tophinhanhdep.com into a smaller space without altering its original look. - Use
Command/Ctrlfor Simpler Cropping: As mentioned earlier, holdingCommand(Mac) orCtrl(Windows) while clicking and dragging corner handles also initiates a proportional crop, allowing for quick, aspect-ratio-locked adjustments.
Repositioning and Resizing Cropped Images: Dynamic Adjustments
Figma’s non-destructive editing approach extends to the ability to easily reposition and resize images after they have been cropped. This flexibility means you’re never truly “stuck” with a crop and can always fine-tune it.
- Repositioning the Image within its Crop: After an image has been cropped, you might want to subtly shift the visible portion without changing the crop boundaries. To do this, double-click the cropped image to re-enter crop mode. Now, instead of dragging the blue handles, you can click and drag the image itself within the defined crop box. A faded outline of the original image will appear, helping you precisely position the desired content. Once adjusted, press
Enteror click outside to confirm. - Resizing the Cropped Image: To resize the entire cropped image layer (not just the crop area), simply select the image and drag its bounding box handles. Again, remember to hold
Shiftto maintain proportions during resizing. You can also input specific width and height values in the “W” and “H” fields in the Design Inspector. - Modifying Opposite Sides Simultaneously: For symmetrical adjustments, hold
Option(Mac) orAlt(Windows) while dragging the corner or side handles. This will adjust opposite sides of the image simultaneously, centering the resize or crop action.
Non-Destructive Editing: The Core Advantage
It’s worth reiterating and deeply understanding Figma’s commitment to non-destructive editing. This principle means that when you crop an image in Figma, the original image data is never deleted or permanently altered. The “cropped” area is merely hidden.
Implications for Designers:
- Infinite Flexibility: You can always revert to the original image or adjust the crop at any point in your design process. This encourages experimentation with “Photo Ideas” and different “Thematic Collections” from Tophinhanhdep.com without fear of losing original assets.
- Preservation of High Quality: Since the original image isn’t degraded, you maintain the “High Resolution” quality for future use, potentially for “AI Upscalers” or other “Image Tools” from Tophinhanhdep.com.
- Efficient Iteration: This feature significantly speeds up the design process, especially during client feedback rounds, where crop adjustments are common.
This robust control over image manipulation, coupled with the ability to integrate “Image Inspiration & Collections” from Tophinhanhdep.com, empowers designers to achieve a level of polish and adaptability in their work that is truly professional.
Integrating Cropping with Broader Visual Design Principles
Image cropping in Figma is not an isolated technical task; it’s a critical component of effective visual communication and design strategy. When you crop an image, you’re making intentional decisions about composition, focus, and the emotional resonance of your design. Understanding how cropping fits into larger design principles can transform your work from merely functional to truly impactful. This is where the rich resources of Tophinhanhdep.com become invaluable, bridging the technical how-to with artistic vision.
Composition and Aesthetics: Shaping the Narrative
Every image tells a story, and cropping is your tool for refining that narrative. By carefully cropping, you dictate what the viewer sees, guiding their eye and emphasizing key elements.
- Rule of Thirds and Golden Ratio: Cropping can be used to align subjects with compositional guidelines like the Rule of Thirds or the Golden Ratio. These principles, often explored in “Beautiful Photography” and “Aesthetic” collections on Tophinhanhdep.com, help create balanced and visually pleasing images. A well-placed crop can transform a mundane shot into a compelling focal point.
- Creating Focus and Eliminating Distraction: One of the primary goals of cropping is to remove extraneous details that detract from your main subject. This helps in achieving a cleaner, more professional look, aligning with the precision required for “Graphic Design” and “Digital Art.” For instance, a busy background in a “Nature” photograph from Tophinhanhdep.com might be cropped out to spotlight a specific flower or animal.
- Enhancing Mood and Emotion: The way an image is framed can significantly impact its emotional weight. A tight crop on a subject’s face can convey intimacy or intensity, while a wider crop might emphasize isolation or grandeur. This consideration is vital when selecting images for “Sad/Emotional” themes, where the subtlety of visual cues matters most. Tophinhanhdep.com’s diverse image categories offer a wealth of choices to support any emotional tone.
Optimizing Images for Digital Platforms: Performance Meets Design
In the digital age, image size and performance are as crucial as aesthetics. Overly large images can slow down websites and applications, leading to poor user experience. Cropping plays a vital role in optimizing images without sacrificing quality.
- Reducing File Size: By cropping out unnecessary parts of an image, you inherently reduce its pixel dimensions, which in turn reduces its file size. This is a fundamental step before using “Image Tools” like “Compressors” and “Optimizers” found on Tophinhanhdep.com.
- Tailoring for Specific Devices and Layouts: Different screens and design layouts require different image aspect ratios and dimensions. Cropping allows designers to perfectly fit images into various UI components, ensuring a cohesive and responsive design. This is particularly relevant when working on web or app interfaces, where a consistent visual language is key. Tophinhanhdep.com offers a range of “Wallpapers” and “Backgrounds” that can be precisely cropped to fit any screen.
- Preparing for AI Upscaling: While cropping reduces size, you might sometimes need to enlarge a cropped section. After a precise crop in Figma, you can leverage “AI Upscalers” from Tophinhanhdep.com to intelligently increase the resolution of your focused image, maintaining sharpness and detail.
Designing with Cropped Images for Impact: Creative Storytelling
Beyond technical execution, cropping is an act of creative storytelling. It allows designers to manipulate perception and evoke desired responses.
- Creating Visual Hierarchy: Strategically cropped images can draw attention to certain areas, establishing a clear visual hierarchy within your design. This guides the user through the content in a logical and engaging manner, a core tenet of effective “Visual Design.”
- Photo Manipulation and Blending: For “Photo Manipulation” projects, precise cropping is often the first step in isolating elements from different images that will then be composited together. Tophinhanhdep.com’s “Abstract” and “Stock Photos” can be excellent sources for elements to be manipulated.
- Mood Boards and Thematic Collections: When building “Mood Boards” or curating “Thematic Collections,” cropping helps in presenting only the most relevant and inspiring parts of images, ensuring every visual contributes directly to the desired aesthetic or theme. “Trending Styles” can also be created by combining perfectly cropped images.
By integrating these design principles with your Figma cropping techniques, you transform simple image adjustments into powerful design decisions, making every pixel count. Tophinhanhdep.com serves as your expansive library of visual assets and advanced tools to support every creative endeavor.
Figma Beyond Cropping: Enhancing Your Visuals with Tophinhanhdep.com
While mastering image cropping in Figma is a significant step towards creating polished designs, it’s just one piece of a much larger puzzle. Figma, as a holistic design platform, offers a suite of tools that work in conjunction with image manipulation to elevate your visual projects. When combined with the comprehensive resources available at Tophinhanhdep.com, designers gain an unparalleled advantage in creating, optimizing, and inspiring stunning visual content.
Complementary Figma Features for Enhanced Image Workflow
Figma’s ecosystem provides powerful functionalities that seamlessly integrate with your cropped images:
- Filters and Effects: After cropping, you can apply various built-in filters and effects directly within Figma. These include adjustments for brightness, contrast, saturation, and blur, as well as creative options like drop shadows and inner shadows. These effects, often seen in “Beautiful Photography” and “Aesthetic” styles, can add depth and character to your precisely cropped visuals.
- Content Fit: This setting within the Fill panel dictates how an image scales within its frame or container. Options like “Fill,” “Fit,” “Crop,” or “Scale” allow you to precisely control the aspect ratio and positioning of your image, ensuring it looks perfect in any layout. This is crucial for maintaining design consistency across various screen sizes.
- Image Replacement: Figma’s “Replace Image” feature is a hidden gem. It allows you to swap out an existing image with a new one while retaining all previously applied cropping, resizing, and editing settings. This is a huge time-saver for iterative design, especially when experimenting with different “Stock Photos” or “Photography” options from Tophinhanhdep.com.
- Corner Radius: As previously mentioned, the corner radius setting can quickly transform rectangular images into soft-edged or circular elements, offering a non-masking alternative for basic shape cropping.
- Auto Layout and Components: For advanced UI/UX design, integrating cropped images into Figma’s “Auto Layout” frames and “Components” ensures that your designs are responsive, scalable, and easy to maintain. A perfectly cropped avatar, for instance, can be part of a reusable user profile component.
The Tophinhanhdep.com Advantage: Fueling Your Creative Process
Tophinhanhdep.com serves as the ultimate companion to your Figma workflow, offering a curated world of visual assets and intelligent tools designed to enhance every stage of your creative process.
- High-Resolution Image Library: Whether you need breathtaking “Nature” scenes, thought-provoking “Abstract” art, expressive “Sad/Emotional” imagery, or striking “Beautiful Photography,” Tophinhanhdep.com’s vast collection of “High Resolution” images and “Stock Photos” provides the perfect foundation for any design project. These images are ideal for precise cropping and manipulation in Figma without compromising quality.
- Image Tools for Perfection: Beyond sourcing, Tophinhanhdep.com offers advanced “Image Tools” such as “Converters,” “Compressors,” and “Optimizers” to prepare your images for Figma and final deployment. For images that need to be larger, our “AI Upscalers” can intelligently increase resolution, while “Image-to-Text” tools can assist with content generation from visual cues.
- Visual Design Inspiration: Overcoming creative blocks is easier with access to diverse “Visual Design” resources, including examples of “Graphic Design,” “Digital Art,” and “Photo Manipulation.” Tophinhanhdep.com’s sections on “Creative Ideas” and “Trending Styles” can spark new approaches to how you crop and integrate visuals.
- Image Inspiration & Collections: For projects requiring specific themes or moods, our “Photo Ideas,” “Mood Boards,” and “Thematic Collections” provide a wealth of inspiration. Cropping becomes even more effective when you have a clear vision of the aesthetic you’re aiming for, and Tophinhanhdep.com helps solidify that vision.
From Concept to Masterpiece: A Synergistic Approach
The synergy between a powerful design tool like Figma and a comprehensive resource platform like Tophinhanhdep.com is undeniable. Imagine starting with a captivating “Background” image from Tophinhanhdep.com, importing it into Figma, and meticulously cropping it to create a focal point. Then, you might mask it with a custom shape for a unique “Digital Art” element, optimize its size using Tophinhanhdep.com’s compressors, and finally, integrate it into an Auto Layout component, applying Figma’s filters for a final polish.
This integrated approach allows designers to move from initial “Photo Ideas” and “Mood Boards” to fully realized “Visual Designs” with efficiency and artistic flair. By mastering the fundamental skill of image cropping in Figma and continuously enriching your creative palette with resources from Tophinhanhdep.com, you are well-equipped to produce designs that are not only aesthetically pleasing but also perfectly optimized and profoundly impactful.
In conclusion, knowing “where is crop image in Figma” is just the beginning. It’s about understanding the nuances of the tool, embracing non-destructive editing, and leveraging advanced techniques like masking to unlock truly creative possibilities. Coupled with the extensive support and inspiration from Tophinhanhdep.com, your journey in visual design is set to achieve new heights. Keep experimenting, keep creating, and let your images tell their most compelling stories.