Why Windows 11 Thumbnails Aren't Showing Image Previews: A Guide for Visual Creators and Enthusiasts

For anyone deeply involved with visual content – from professional photographers managing high-resolution stock photos, graphic designers crafting digital art, to enthusiasts curating stunning wallpapers and aesthetic backgrounds – the ability to quickly preview images within Windows File Explorer is an indispensable part of their daily workflow. Imagine sifting through hundreds of nature photographs, abstract designs, or emotional portrait shots, each represented only by a generic icon. The efficiency loss is staggering, turning a simple task into a frustrating chore. Windows 11, designed with a sleek visual interface, is supposed to enhance this experience with crisp thumbnail previews. Yet, a common frustration for many users is discovering that their image and video thumbnails refuse to display, showing only default application icons instead.
At Tophinhanhdep.com, where we celebrate the power of images, photography, and visual design, we understand the critical role these small previews play. They are the gateway to your vast collections of beautiful photography, creative ideas, and thematic mood boards. When they vanish, it disrupts the entire process of image inspiration, selection, and even editing. This comprehensive guide will delve into the reasons why thumbnails might disappear in Windows 11 and, more importantly, provide you with a step-by-step approach to restore this vital visual functionality, integrating insights from our expertise in image tools, visual design, and high-resolution photography.

Understanding the Impact: Why Image Previews are Crucial for Visual Workflows
Thumbnails are more than just small pictures; they are visual shorthand, enabling rapid identification and organization of files. For users who frequently interact with large volumes of visual data – a core focus of Tophinhanhdep.com – their absence creates significant roadblocks:
- Efficiency in Image Management: Whether you’re sorting through recent photo shoots, categorizing aesthetic backgrounds, or selecting the perfect wallpaper, visual cues allow for instant recognition. Without them, you’re forced to open each file individually, a time-consuming process that stifles productivity. This is particularly true for high-resolution photography, where file sizes can be substantial, making individual opening and closing sluggish.
- Streamlined Creative Processes: Graphic designers and digital artists often work with multiple iterations and variations of their work. Thumbnails provide an at-a-glance overview, essential for comparing different editing styles, photo manipulations, or abstract designs without launching a heavy editing suite for each.
- Enhancing Image Inspiration & Collections: Curating thematic collections or building mood boards relies heavily on quick visual scanning. Thumbnails facilitate this, allowing users to rapidly find images that fit a specific aesthetic, be it sad/emotional, vibrant nature scenes, or intricate abstract patterns.
- Pre-emptive Quality Check: For stock photos or images destined for web use, thumbnails can offer a preliminary check of composition or color balance, saving time before committing to full-scale editing or optimization.
The disappearance of thumbnails isn’t just a minor inconvenience; it’s a direct impediment to effective visual management and creative expression. Understanding this impact underscores the importance of resolving the issue swiftly.
Diagnosing and Fixing Common Thumbnail Preview Issues
The problem of missing thumbnails in Windows 11 can stem from several sources, ranging from simple misconfigurations to underlying system corruption. Fortunately, many of these issues have straightforward solutions. This section covers the most common troubleshooting steps.
Adjusting File Explorer and Folder Options

Often, the thumbnail preview feature might simply be disabled in File Explorer’s settings. This is a common starting point for troubleshooting.
- Open File Explorer: You can do this by clicking its icon on the taskbar or pressing
Windows Key + E. - Access Folder Options:
- In Windows 11, click on the three dots (See more) icon in the command bar at the top, then select Options.
- Alternatively, in the search bar, type “File Explorer Options” and select it from the results.
- Navigate to the View Tab: In the Folder Options window, click on the View tab.
- Uncheck “Always show icons, never thumbnails”: Under the “Advanced settings” section, locate and uncheck the box next to “Always show icons, never thumbnails”. If this box is checked, File Explorer will override any other settings and display only generic icons.
- Apply and Confirm: Click Apply, then OK to save the changes.
After these steps, navigate to a folder containing images. If the issue was a simple setting, your thumbnails should now appear. For creators dealing with extensive image collections, ensuring this setting is correctly configured is foundational to a smooth workflow.
Optimizing System Performance Settings
Windows offers various performance settings that can influence how visual elements, including thumbnails, are displayed. Sometimes, these settings might be configured to prioritize performance over visual effects, leading to thumbnails not showing.
- Open Advanced System Settings: Press
Windows Key + Sto open search, type “View advanced system settings,” and click on the corresponding result. - Access Performance Settings: In the “System Properties” window, ensure you are on the Advanced tab. Under the “Performance” section, click on the Settings… button.
- Check Visual Effects: In the “Performance Options” dialog, go to the Visual Effects tab.
- Enable Thumbnail Display:
- You can select “Let Windows choose what’s best for my computer,” which usually enables thumbnails.
- For more precise control, choose “Custom” and ensure the box next to “Show thumbnails instead of icons” is checked.
- Apply and Confirm: Click Apply, then OK to save the changes in Performance Options, and then OK again in System Properties.
This adjustment is crucial for anyone keen on the visual aesthetic of their system, especially those who spend hours curating beautiful photography or abstract art collections where visual fidelity, even at the thumbnail level, is appreciated.
Clearing and Rebuilding the Thumbnail Cache
Windows stores small copies of your image previews in a dedicated database called the thumbnail cache. Over time, this cache can become corrupted or grow excessively large, leading to display issues. Clearing and rebuilding it is a highly effective solution.
There are several ways to clear the thumbnail cache:
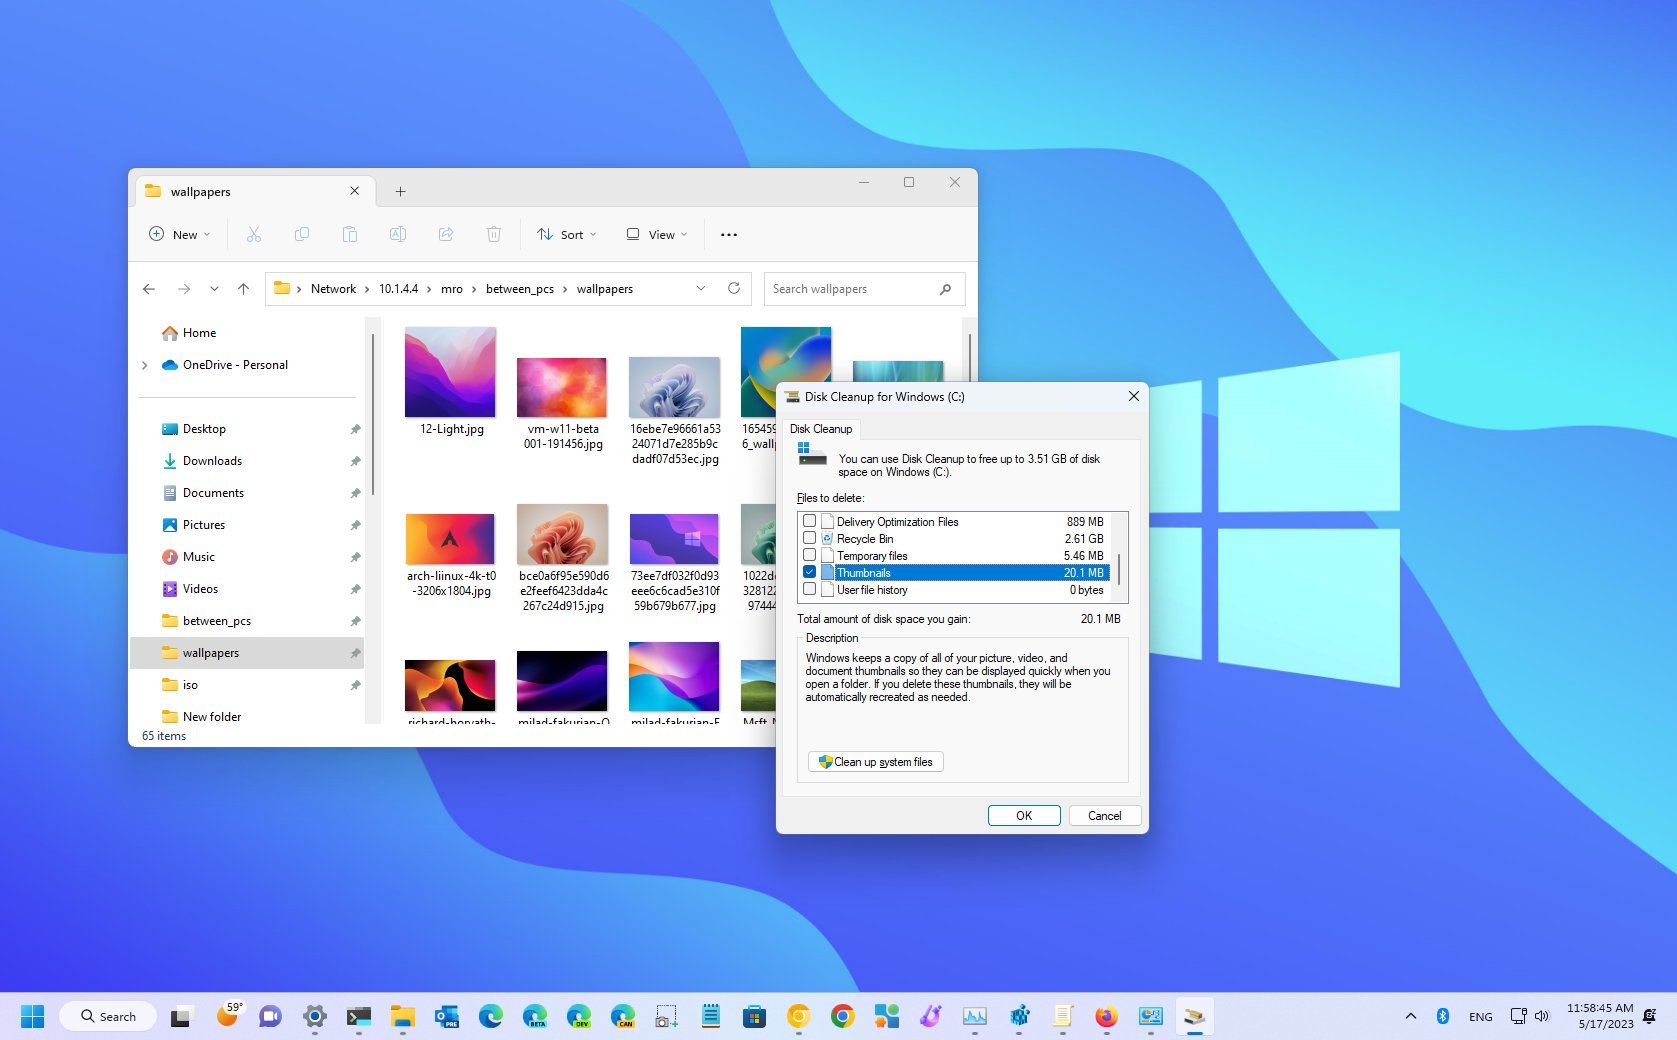
Using Disk Cleanup (Legacy Tool)
- Open Disk Cleanup: Press
Windows Key + R, typecleanmgr, and pressEnter. - Select Drive: If prompted, select your main system drive (usually C:) and click OK.
- Scan for Files: Disk Cleanup will scan your drive for temporary files.
- Check “Thumbnails”: In the “Disk Cleanup” window, scroll down the “Files to delete” list and check the box next to “Thumbnails”. Uncheck all other options unless you intend to delete other temporary files.
- Delete Files: Click OK, then click Delete files when prompted for confirmation.
Through Windows Settings (Temporary Files)
- Open Settings: Press
Windows Key + I. - Navigate to Storage: Go to System > Storage.
- Access Temporary Files: Click on Temporary files.
- Check “Thumbnails”: Clear any existing selections, then ensure the “Thumbnails” item is checked.
- Remove Files: Click the Remove files button.
Using Command Prompt (Advanced Method)
For users comfortable with command-line interfaces, this method offers a quick way to clear the cache.
- Open Command Prompt as Administrator: Press
Windows Key + S, type “Command Prompt,” right-click the top result, and select “Run as administrator.” - Terminate File Explorer: Type
taskkill /f /im explorer.exeand pressEnter. This will temporarily close File Explorer. - Delete Cache Files: Type
del /f /s /q /a %LocalAppData%\Microsoft\Windows\Explorer\thumbcache_*.dband pressEnter. - Restart File Explorer: Type
start explorer.exeand pressEnter.
After clearing the cache using any of these methods, Windows will automatically regenerate new thumbnails as you navigate through your folders. This is particularly useful for photographers and designers who constantly update their image libraries, ensuring fresh, uncorrupted previews.
Advanced Troubleshooting for Persistent Thumbnail Problems
If the basic configuration and cache clearing steps haven’t resolved the issue, it’s time to delve into more advanced troubleshooting. These steps address deeper system or application-specific conflicts.
Verifying File Associations and Restarting Explorer
Incorrect file associations or a glitched File Explorer process can prevent thumbnails from displaying correctly.
Checking File Associations
If you’ve recently installed new image editing software or changed your default photo viewer, the system might struggle to generate thumbnails for certain file types.
- Right-Click the Problematic File: Find any image or video file that isn’t showing a thumbnail. Right-click on it.
- Choose “Open with”: Select “Open with”, then click “Choose another app”.
- Set Default App: Select your preferred photo or video application (e.g., Photos app, IrfanView, Photoshop). Crucially, make sure to check the box that says “Always use this app to open .[file extension] files”.
- Confirm: Click OK.
Repeat this for a few different file types (e.g., JPG, PNG, MP4). This helps Windows correctly identify which application should handle the preview generation for that file format, a subtle but important aspect of digital photography and image tools.
Restarting File Explorer
A simple restart of the File Explorer process itself can often resolve temporary glitches without requiring a full system reboot.
- Open Task Manager: Press
Ctrl + Shift + Esc(orCtrl + Alt + Deleteand select Task Manager). - Locate Windows Explorer: In the “Processes” tab, scroll down and find “Windows Explorer”. You might need to click “More details” if you only see a simplified view.
- Restart: Right-click on “Windows Explorer” and select “Restart”.
File Explorer, including your desktop and taskbar, will momentarily disappear and then reappear. Check your folders to see if thumbnails have returned.
Ensuring System File Integrity with SFC and DISM
Deep-seated system file corruption can manifest in various ways, including issues with thumbnail generation. Windows provides built-in tools to scan for and repair such corruption.
Running the DISM Tool
Before running the System File Checker (SFC), it’s often recommended to use the Deployment Image Servicing and Management (DISM) tool. DISM can repair the Windows image itself, ensuring that SFC has healthy source files to work with.
- Open Command Prompt as Administrator: Press
Windows Key + S, type “Command Prompt,” right-click, and select “Run as administrator.” - Run DISM Commands: Type the following commands, pressing
Enterafter each:DISM.exe /Online /Cleanup-image /Restorehealth- (This command may take some time to complete. Be patient and do not close the window.)
- Close Command Prompt: Once the process finishes, you can type
exitand pressEnter.
Running the System File Checker (SFC)
After DISM, or as a standalone step, SFC scans for and repairs corrupted Windows system files.
- Open Command Prompt as Administrator: (As described above).
- Run SFC Scan: Type
sfc /scannowand pressEnter. - Wait for Completion: The scan will take some time. Once it’s 100% complete, it will report if any integrity violations were found and successfully repaired.
- Reboot (Optional but Recommended): While not always strictly necessary, a reboot after system file repairs can help ensure all changes take effect.
These powerful tools are vital for maintaining the health of your operating system, which is paramount for any demanding visual application, including those focused on high-resolution image editing and digital photography.
When Images Themselves Are the Problem: Repairing Corrupted Files with Tophinhanhdep.com Tools
Sometimes, the issue isn’t with Windows 11 itself, but with the integrity of the image files. If your thumbnails are not showing, and you also struggle to open these specific images, it’s a strong indicator of file corruption. This is particularly relevant for photographers who download images from various sources or use specialized camera formats.
Corrupted images can result from various factors: incomplete transfers (e.g., from camera to PC), issues during saving, bad sectors on a storage drive, or even malware. When an image file is corrupt, Windows cannot read its metadata or pixel data correctly, making it impossible to generate a thumbnail preview or even open the full image.
At Tophinhanhdep.com, we understand that your images – whether they are personal memories, artistic expressions, or professional stock photos – are invaluable. Losing access to them due to corruption can be devastating. This is where specialized image repair tools become essential.
Our platform offers robust solutions, like the Tophinhanhdep.com Photo Repair tool, designed to address a wide array of image corruption scenarios. This tool is built to handle:
- Grainy, Dark, or Pixelated Photos: Often a sign of deeper corruption that affects visual quality.
- Faded or Discolored Images: When color data is compromised.
- Unsupported File Formats Displaying Errors: Although Windows might struggle, a repair tool can often reconstruct the data.
- Thumbnails Not Showing Due to Internal File Damage: The repair process often fixes the underlying issue that prevents thumbnail generation.
How Tophinhanhdep.com Photo Repair Works (General Steps):
- Download and Launch: Obtain the Tophinhanhdep.com Photo Repair tool from our website and install it on your Windows or Mac system.
- Add Corrupted Photos: The user-friendly interface allows you to easily add one or multiple damaged image files. Our tool supports diverse formats, including common ones like JPG, JPEG, PNG, and specialized RAW formats (CR3, CR2, NEF, NRW, DNG, etc.) favored by professional photographers.
- Initiate Repair: With a simple click of the “Repair” button, the software analyzes and attempts to mend the corrupted data within your images. It employs advanced algorithms to reconstruct the file structure and recover visual information.
- Preview Repaired Images: Before saving, you can preview the repaired photos. This allows you to verify the success of the repair and ensures the quality meets your expectations. The tool can even extract thumbnails from repaired images, restoring that crucial visual cue.
- Save Repaired Files: Once satisfied, you can save the restored images to a location of your choice on your computer.
For users dealing with a small number of images, Tophinhanhdep.com might also offer an online photo repair service for convenience. However, for large collections or critically damaged files, the desktop version provides more extensive capabilities without limitations on file size or quantity, ensuring that your entire collection of aesthetic, nature, or abstract images can be recovered and managed effectively.
This focus on image integrity reinforces our commitment at Tophinhanhdep.com to providing not just inspiration, but also practical image tools that empower creators to preserve and enhance their visual assets, transforming potential frustration into a seamless creative experience.
Beyond the Fix: Maintaining Optimal Visual Workflow
Once your thumbnails are happily displaying again, maintaining this optimal visual workflow is key, especially for those leveraging Tophinhanhdep.com for their image needs. Consider these practices:
- Regular Cache Maintenance: Periodically clear your thumbnail cache, perhaps once every few months or after major system updates, to prevent it from becoming too large or corrupt. This is part of general system optimization, akin to defragmenting a drive or cleaning temporary files.
- Organized Storage: For vast collections of images – be it wallpapers, backgrounds, or stock photos – maintaining a structured folder hierarchy can help reduce the load on File Explorer and improve overall performance.
- Reliable Image Viewers/Editors: While Windows’ native tools are improving, investing in or utilizing a robust third-party image viewer or editing suite can offer better compatibility and faster thumbnail generation for specialized formats, particularly for digital photography and graphic design assets.
- Cloud Synchronization Awareness: As highlighted in some user comments, cloud services like OneDrive can sometimes interfere with local thumbnail generation, especially if files are “online-only.” Be mindful of your sync settings and consider unlinking or adjusting them if issues persist for cloud-stored images.
- Stay Updated: Keep your Windows 11 operating system updated. Microsoft often releases patches that address performance and display issues, including those related to File Explorer and thumbnail generation.
- Backup Your Work: Beyond just thumbnails, regular backups of your high-resolution photography, digital art, and creative projects are paramount. Image corruption can happen, and having a reliable backup ensures that your visual inspiration and hard work are always protected.
Conclusion
The disappearance of image previews in Windows 11 can be a significant hurdle for anyone engaged with visual content, particularly for the dedicated community of photographers, designers, and enthusiasts that Tophinhanhdep.com serves. From curating aesthetic backgrounds to managing intricate photo manipulations, quick visual access to files is not a luxury but a necessity for an efficient and inspired workflow.
This guide has walked you through a comprehensive array of solutions, from straightforward File Explorer adjustments and system performance optimizations to the critical step of clearing and rebuilding the thumbnail cache. We’ve also covered more advanced troubleshooting methods like verifying file associations, restarting File Explorer, and using powerful system integrity tools like SFC and DISM.
Crucially, we’ve emphasized that sometimes the problem lies not with the system but with the images themselves. For such scenarios, specialized image repair solutions, like the Tophinhanhdep.com Photo Repair tool, stand ready to restore your corrupted files, ensuring that your precious visual assets – whether beautiful photography or creative digital art – are never lost.
By systematically applying these steps and adopting best practices for visual file management, you can overcome the frustration of missing thumbnails and restore the seamless, visually-driven experience that Windows 11 is designed to offer. Tophinhanhdep.com remains committed to empowering your visual journey, providing the knowledge and tools you need to manage, enhance, and be inspired by the world of images.