Why Won't Instagram Upload My High-Res Image? The Ultimate Guide to Perfect Posts and Stories

It’s a common lament among photographers, content creators, and casual users alike: you spend hours capturing the perfect shot, carefully editing it to perfection, only to have Instagram seemingly degrade its quality upon upload. That crisp, high-resolution image or vibrant video suddenly appears blurry, pixelated, or simply “off” compared to its original brilliance. This frustrating phenomenon leads many to ask, “Why won’t Instagram upload my high-res image?”
The short answer is Instagram’s inherent compression algorithms. Designed for speed and scalability across a massive global user base, Instagram prioritizes fast loading times over uncompromised image quality. This means even your meticulously crafted 12-megapixel smartphone photos or professional DSLR shots will undergo a transformation when they hit Instagram’s servers, often resulting in downscaling and visible compression artifacts. However, understanding how Instagram processes media and implementing a few strategic steps can significantly improve the visual fidelity of your uploads. At Tophinhanhdep.com, we understand the importance of visual excellence, and this comprehensive guide will equip you with the knowledge and tools to ensure your images and videos look their absolute best on the platform.
Unlocking Maximum Quality: Instagram’s In-App Settings
The first and most crucial step to improving your Instagram upload quality lies directly within the app’s settings. Instagram has, thankfully, provided users with options to override some of its aggressive compression, though it comes with the caveat of potentially longer upload times.
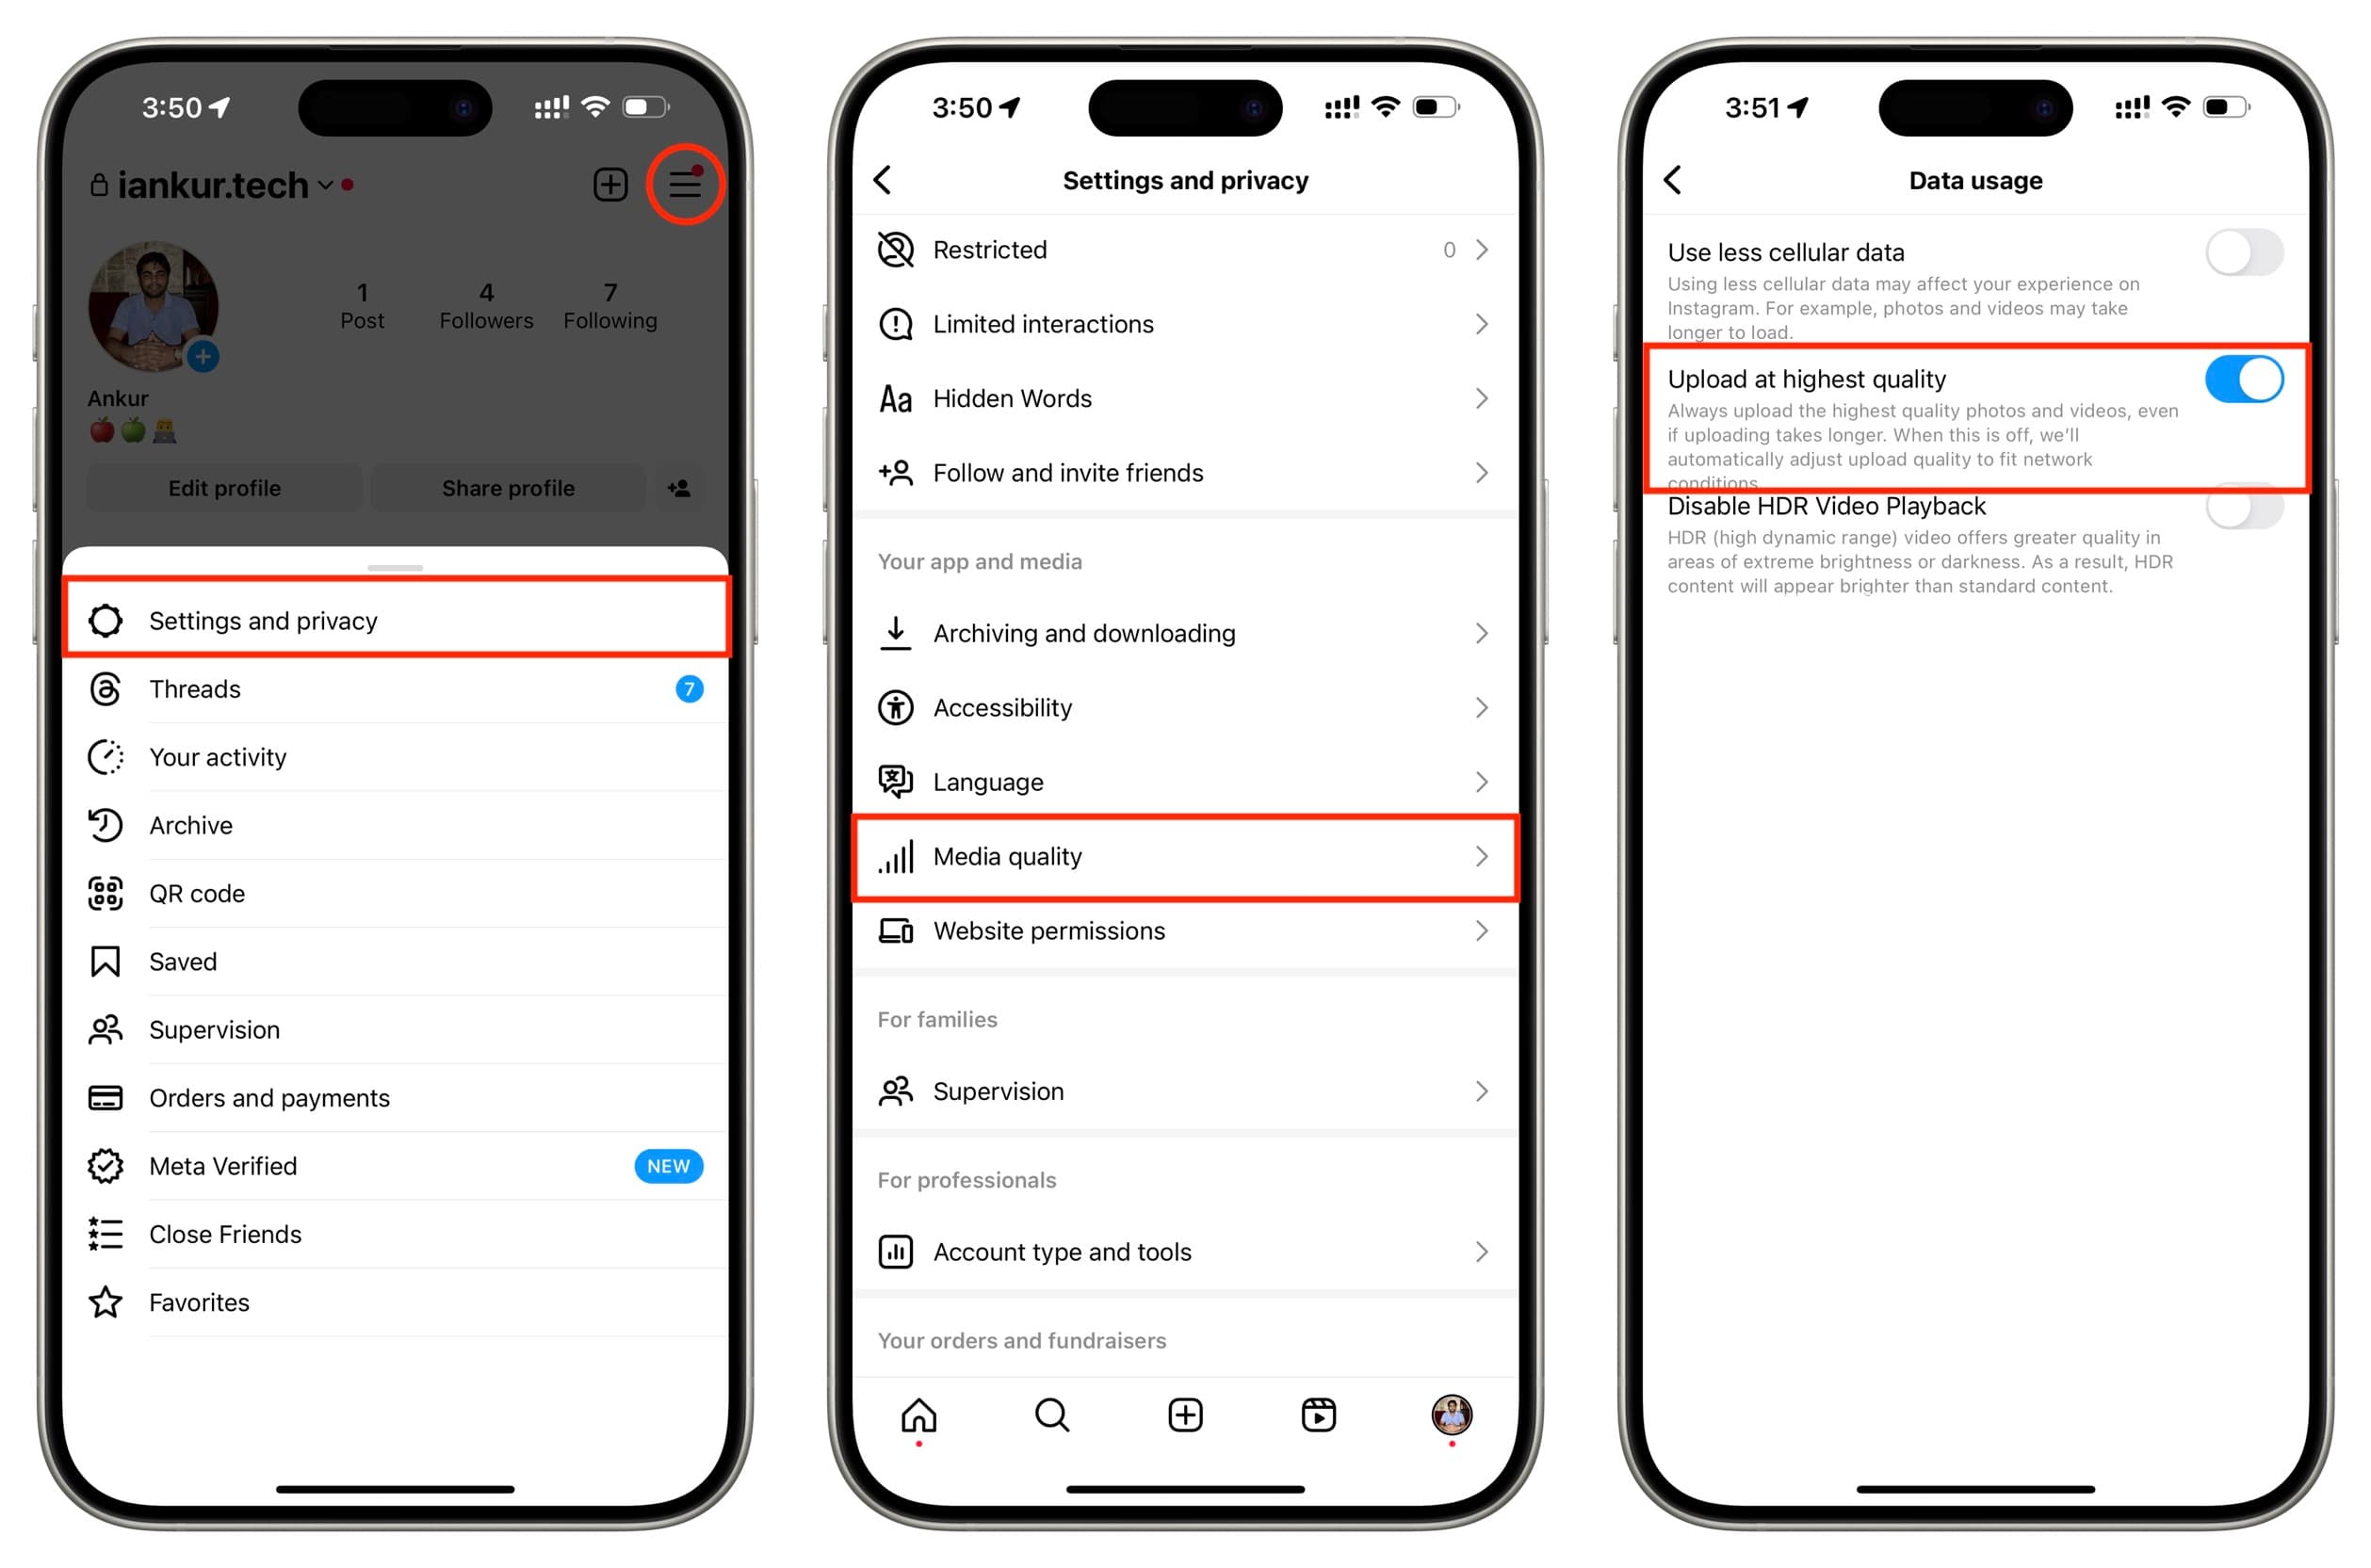
The “Upload at Highest Quality” Toggle
This feature is Instagram’s direct answer to user requests for better image and video quality. By default, Instagram often optimizes uploads for data efficiency, which means prioritizing smaller file sizes over maximum resolution. Activating the “Upload at highest quality” setting tells Instagram to retain as much detail as possible during the upload process.
To enable this vital setting:
- Open the Instagram app on your smartphone (iPhone or Android).
- Navigate to your profile page by tapping your profile picture icon in the bottom right corner.
- Tap the three-line menu icon (hamburger menu) located in the top right corner of your profile.
- Select “Settings and privacy” from the menu options.
- Scroll down and look for the “Your app and media” section, then tap on “Media quality.”
- Toggle on the switch for “Upload at highest quality.”
Once enabled, Instagram will attempt to upload your photos and videos with the least amount of compression, preserving more of their original resolution and detail. Be prepared for uploads to take a little longer, especially if you’re on a slower internet connection, but the visual improvement is often well worth the wait.
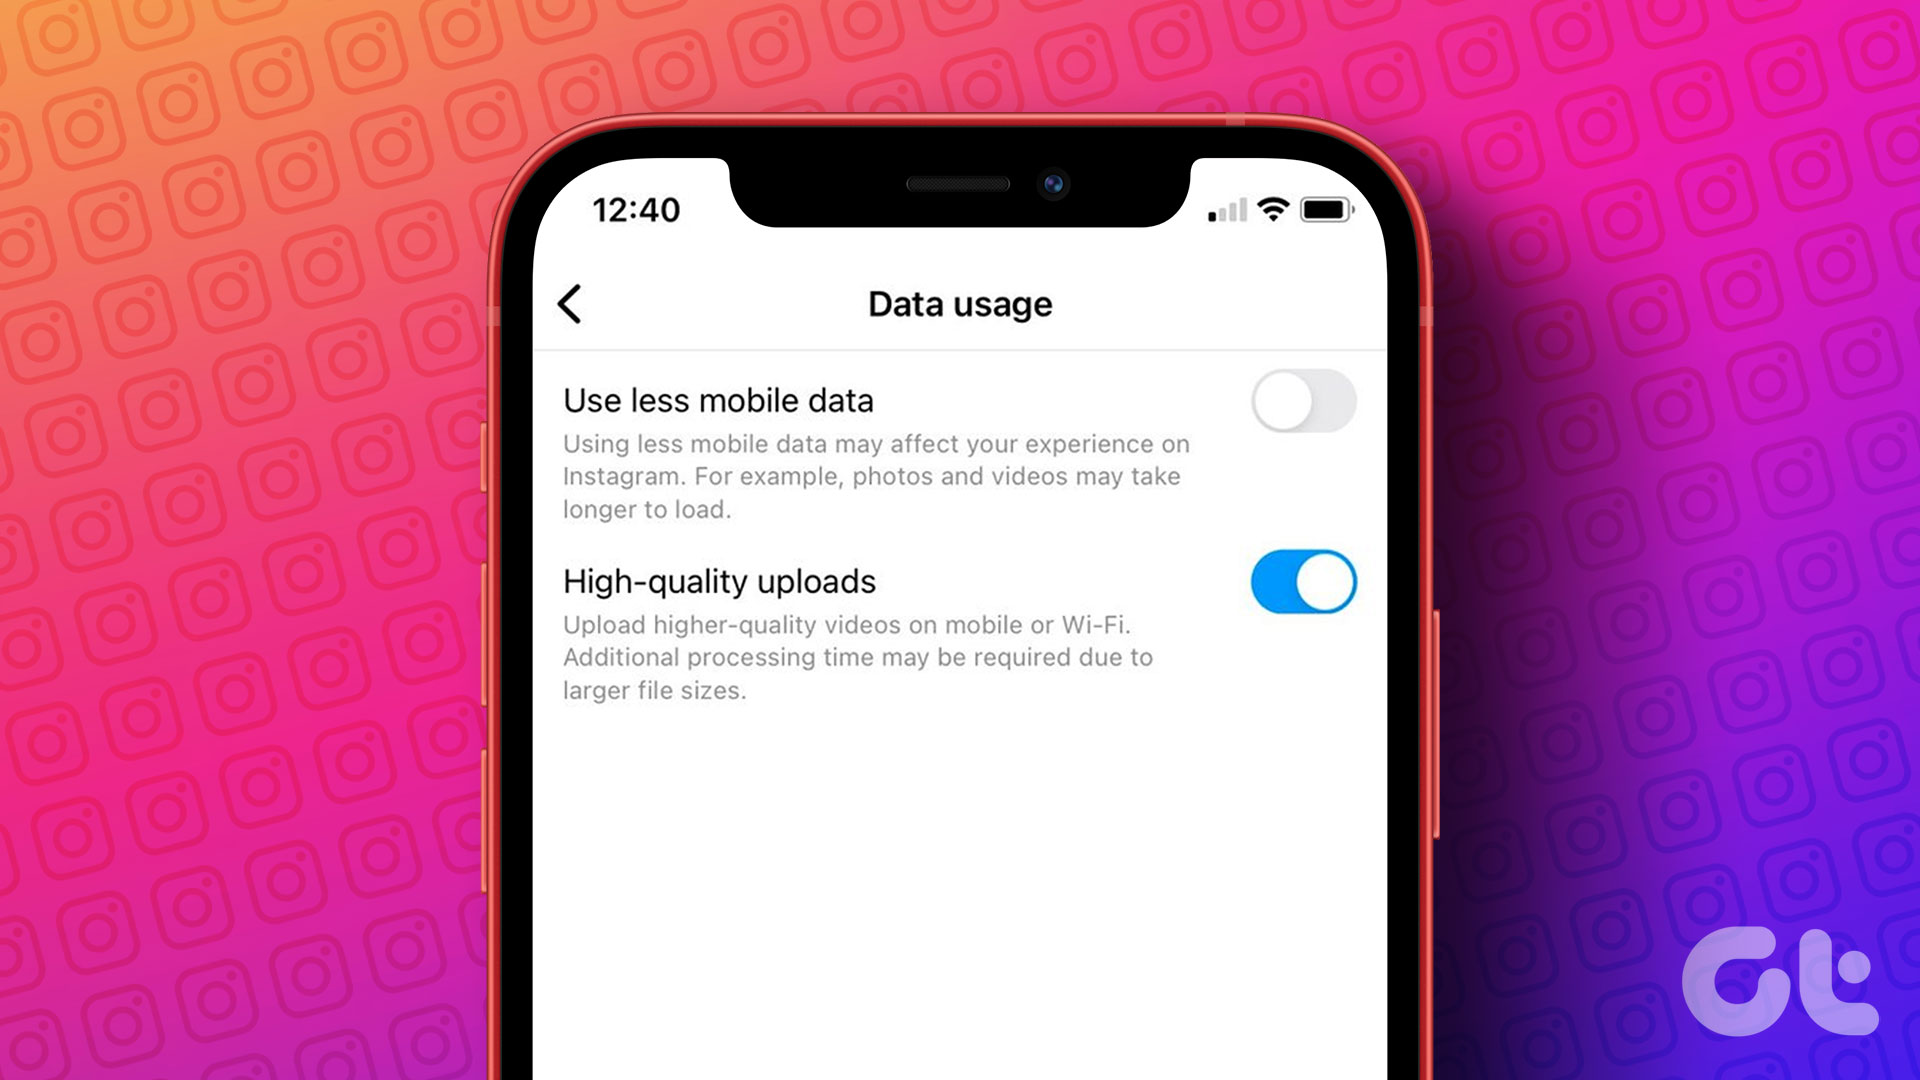
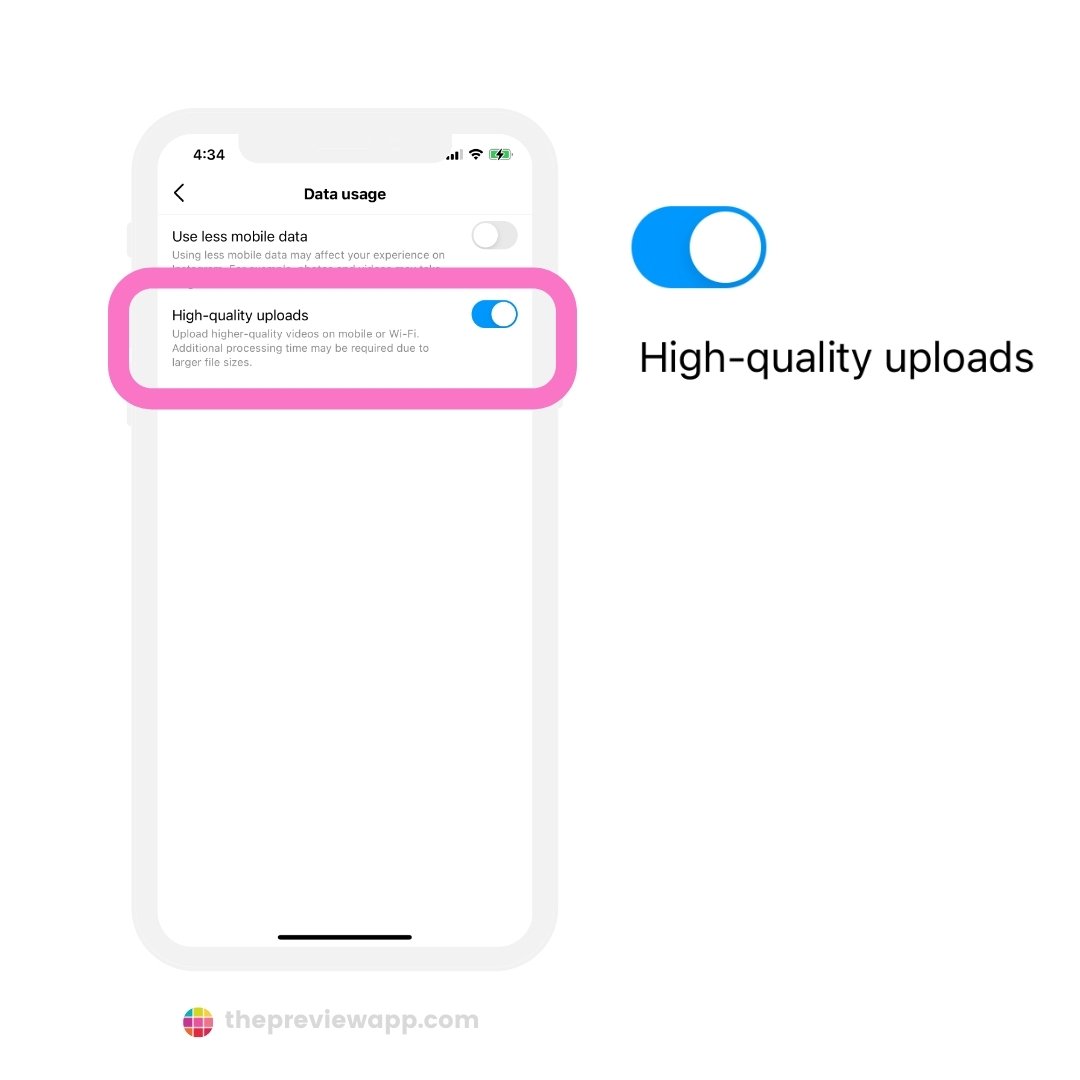
Disabling Data Saver for Optimal Performance
Related to the “Upload at highest quality” setting is Instagram’s “Data Saver” feature. When enabled, Data Saver intentionally reduces the quality of media displayed and uploaded to conserve mobile data. While useful for those with limited data plans, it directly contributes to blurry or low-quality uploads.
To ensure Instagram isn’t inadvertently sacrificing your image quality for data savings:
- Follow steps 1-4 from the “Upload at highest quality” instructions to reach “Settings and privacy” > “Media quality.”
- Locate the “Use less mobile data” toggle. If it’s on, turn it off.
By disabling data saver, you allow Instagram to prioritize media quality over data consumption, working in conjunction with the “Upload at highest quality” setting to deliver the best possible results. This is particularly important for those who frequently upload content via mobile data and want to showcase their “Beautiful Photography” or “Aesthetic” images from Tophinhanhdep.com in their full glory.
Mastering Your Visuals: Pre-Processing for Instagram with Tophinhanhdep.com
While Instagram’s in-app settings are crucial, the journey to a perfect upload often begins long before you hit the “Share” button. Understanding Instagram’s preferred specifications and pre-optimizing your media can preempt its compression algorithms, ensuring your content retains maximum visual integrity. Tophinhanhdep.com, with its extensive resources on “Photography,” “Image Tools,” and “Visual Design,” is your ideal partner in this preparation process.
Optimal Image Dimensions and Aspect Ratios
Instagram’s system is designed to handle specific image dimensions and aspect ratios gracefully. Deviate too much from these guidelines, and Instagram will automatically resize and crop your image, which can introduce unwanted compression artifacts and alter your composition. According to Instagram’s own help center, they upload photos at the “best quality resolution possible,” which translates to a maximum width of 1080 pixels.
Here’s a breakdown of Instagram’s image processing rules:
- No Processing: Photos with a width between 320 and 1080 pixels, and an aspect ratio between 1.91:1 (landscape) and 4:5 (portrait), will be uploaded at their original resolution.
- Upscaling: If your photo is less than 320 pixels wide, Instagram will enlarge it to 320 pixels, which can lead to pixelation.
- Downscaling: Any image wider than 1080 pixels or with a height exceeding 1350 pixels (for a 4:5 aspect ratio) will be sized down to a width of 1080 pixels. This is where most visible quality loss occurs for high-res images.
- Cropping: If your image’s aspect ratio isn’t supported (i.e., outside 1.91:1 to 4:5), Instagram will crop it to fit, potentially cutting out important parts of your image.
To avoid Instagram’s automatic resizing and cropping, the best practice is to pre-resize your images to these optimal dimensions before uploading.
- For square images: 1080 x 1080 pixels (1:1 aspect ratio)
- For landscape images: 1080 pixels wide, with a height that results in an aspect ratio close to 1.91:1 (e.g., 1080 x 566 pixels). Note that the original source suggested 800x418, which is an older recommendation; 1080px width is now the standard for max quality. If you want a common landscape, 1080x608 (16:9) is often used, but Instagram will still accept anything between 1.91:1 and 4:5, so aim for a width of 1080.
- For portrait images: 1080 pixels wide, with a height up to 1350 pixels (4:5 aspect ratio). This is typically 1080 x 1350 pixels.
Tophinhanhdep.com’s “Image Tools” are invaluable here. Our selection of “Converters,” “Compressors,” and “Optimizers” can help you achieve these precise dimensions without sacrificing essential quality. For instance, using an image resizing tool to manually set your photo to 1080 pixels wide and an appropriate height ensures Instagram’s algorithms don’t have to guess or apply harsh downscaling. Even our “AI Upscalers” can be beneficial if you’re starting with a lower-resolution image and want to improve its quality before resizing for Instagram.
Choosing the Right Format and Shooting Practices
Beyond dimensions, the file format and your initial capture methods play a significant role in final Instagram quality.
- File Format (JPEG/JPG): While Instagram supports multiple formats, JPEG (JPG) is generally preferred for standard photo uploads. It offers a good balance of quality and file size, which Instagram’s algorithms are well-tuned to process. Avoid PNG for general photographic posts, as its larger file size might trigger heavier compression. HEIF, common on iPhones, is usually converted by Instagram as well.
- Shoot with Your Phone’s Native Camera: Resist the urge to use the in-app Instagram camera for critical photos. Your phone’s default camera app (whether iOS or Android) typically captures images at a higher native resolution and with more sophisticated processing. These untouched, high-resolution captures provide Instagram with more data to work with, even after compression. This aligns with Tophinhanhdep.com’s “Digital Photography” guidance – always start with the best possible source.
- Edit Externally: Similarly, avoid applying filters or making extensive edits within the Instagram app itself. Editing your images beforehand using dedicated photo editing software (like those discussed in Tophinhanhdep.com’s “Editing Styles” and “Photo Manipulation” sections, such as Adobe Photoshop, Pixelmator, or Affinity Photo) allows for greater control over the final look and feel. Once your image is perfectly edited and sized, then upload it to Instagram.
- Avoid Music on Image Posts: While not directly affecting image quality, some users report that adding music to an image post can sometimes lead to additional video processing steps, which might subtly impact the visual quality. If image clarity is paramount, consider separate music posts.
By proactively preparing your images using the best “Photography” practices and Tophinhanhdep.com’s recommended “Image Tools,” you provide Instagram with the optimal canvas, significantly reducing the chances of undesirable quality degradation.
Elevating Your Instagram Stories: Beyond the Blurry Blues
Instagram Stories, with their ephemeral nature, are often plagued by blurriness and quality issues. The rapid-fire nature of story creation means many users quickly snap photos or videos within the Instagram app or upload without much thought to optimization. However, just like with regular posts, there are specific reasons for blurry stories and effective tricks to fix them, ensuring your “Thematic Collections” or “Trending Styles” shine through.
Diagnosing and Troubleshooting Story Quality Issues
Several factors can contribute to blurry Instagram Stories on both Android and iPhone devices:
- Internet Connection: A weak or unstable internet connection (Wi-Fi or mobile data) is one of the most common culprits. Instagram might automatically reduce quality to ensure a faster upload.
- Phone Backup Issues: Occasionally, recently backed-up photos or videos might become corrupted, leading to quality problems upon upload.
- High-Resolution Discrepancy: Your phone might be taking photos at a higher resolution than Instagram prefers for Stories, causing Instagram’s automatic resizing to introduce blur.
- Outdated Instagram App: Bugs or issues in an older version of the Instagram app can sometimes affect upload quality.
- Instagram Settings: “Data Saver” or other media quality settings within Instagram might be impacting your Story uploads.
To systematically address blurry stories, consider these troubleshooting steps:
- Send a Test Photo to a Friend: Send the problematic photo/video as a direct message (DM) to a friend. Ask them if it looks blurry. If it looks good in DM but bad in a Story, the issue is likely with your Story upload process. If it’s blurry in DM too, the original file might be corrupted (refer to Tophinhanhdep.com’s guides on image recovery if needed).
- Update the Instagram App: Head to your device’s App Store (iOS) or Google Play Store (Android), search for Instagram, and update it if a newer version is available. App updates often include bug fixes and performance improvements that can resolve quality issues.
- Test a New Photo or Video: Capture a brand new photo or video with your phone’s native camera and try uploading it to your Story. If this new content appears in good quality, your older files might be corrupted. If it’s still blurry, the issue lies elsewhere.
- Use Mobile Data Only: If you’re on Wi-Fi, try turning it off and using only your mobile data (ensuring you have a strong signal). Mobile data often provides a more stable connection, which can prevent Instagram from aggressive compression. This also links back to ensuring “Data Saver” is off in Instagram settings.
- Adjust Your Camera Settings:
- On Android: Open your phone’s default Camera app, go to Settings (gear icon), and ensure both picture and video sizes/quality are set to the highest possible resolution.
- On iPhone: Go to your iPhone Settings app, find “Camera,” and adjust camera quality settings (e.g., enable “Smart HDR” if available, choose the highest resolution/frame rate for video). Also, consider taking photos in a 16:9 aspect ratio if your camera offers it, as it’s closer to the full-screen Story format.
Maximizing Story Resolution: The 1080x1920 Sweet Spot
For Instagram Stories, the ideal resolution is 1080 pixels wide by 1920 pixels high. This 9:16 aspect ratio perfectly fills the screen of most smartphones without any cropping or stretching.
- Use the Instagram Camera (for Stories, cautiously): While generally advised against for regular posts, using the Instagram camera specifically for Stories can sometimes yield better results as it captures content directly at Instagram’s preferred Story dimensions. This ensures the photo or video is “Instagram-ready” from the start. You can then save it to your camera roll and upload it later, or post directly.
- Leverage Third-Party Planning Tools: For those who demand consistent quality and meticulous planning, using a dedicated content planning and scheduling tool that supports optimal Instagram Story uploads can be a game-changer. These tools often handle the resizing and formatting automatically, ensuring your content meets Instagram’s requirements. Tophinhanhdep.com frequently reviews and recommends various “Visual Design” tools and “Creative Ideas” for seamless content creation and distribution, helping you maintain the integrity of your “Nature” or “Abstract” photography.
By being mindful of these Story-specific considerations, you can significantly reduce blurriness and elevate the impact of your ephemeral content.
Beyond Instagram: A Holistic Approach to Visuals with Tophinhanhdep.com
While optimizing for Instagram is a critical goal for many, Tophinhanhdep.com advocates for a broader, holistic approach to visual excellence. The techniques and principles discussed for Instagram are merely a subset of a wider ecosystem of image creation, management, and enhancement that our website champions.
The Foundation: High-Quality Photography and Visual Design
The journey to stunning visuals, whether for Instagram or any other platform, always begins with robust “Photography.”
- High Resolution: Always strive to capture images at the highest possible resolution with your camera. This provides a rich source file, giving you maximum flexibility for cropping, editing, and resizing without immediate quality loss. Tophinhanhdep.com offers extensive guides on “Digital Photography,” covering everything from camera settings to lighting techniques to ensure your raw captures are pristine.
- Stock Photos: When original photography isn’t an option, Tophinhanhdep.com provides insights into sourcing high-quality “Stock Photos” that can serve as excellent foundations for your “Graphic Design” projects or “Mood Boards.”
- Editing Styles: Effective editing is an art form. Our resources on “Editing Styles” delve into various aesthetic approaches, from subtle enhancements to dramatic “Photo Manipulation,” allowing you to refine your images to express your unique vision. Even if Instagram compresses the final product, starting with a beautifully edited image ensures that the compressed version retains as much of its intended impact as possible.
- Creative Ideas: For those seeking fresh perspectives, our “Creative Ideas” and “Image Inspiration & Collections” sections offer a wealth of concepts, from “Wallpapers” and “Backgrounds” to “Sad/Emotional” and “Beautiful Photography” themes, encouraging you to push the boundaries of your visual storytelling.
The Power of Image Tools
Maintaining and enhancing visual quality often requires dedicated “Image Tools,” and Tophinhanhdep.com is your go-to resource.
- Converters: Easily switch between image formats to suit different platforms or needs.
- Compressors: Intelligently reduce file size for faster web loading without sacrificing noticeable quality, a skill directly applicable to Instagram.
- Optimizers: Fine-tune image parameters for specific uses, ensuring they look great everywhere.
- AI Upscalers: Breathe new life into older, lower-resolution images, transforming them into high-quality assets that might even exceed Instagram’s demands. This is especially useful for older content you wish to re-share with improved clarity.
- Image-to-Text: While not directly related to image quality, our “Image-to-Text” tools cater to a broader range of visual needs, demonstrating our commitment to comprehensive image utility.
These tools empower you to take control of your visual assets, ensuring they are always prepared for their intended destination, whether that’s Instagram, a website, or a print publication.
Conclusion
The question “Why won’t Instagram upload my high-res image?” stems from a natural desire to showcase your visual content in its best possible light. While Instagram’s infrastructure necessitates compression for its vast scale, the power to significantly influence the final quality lies in your hands. By activating the “Upload at highest quality” setting, disabling “Data Saver,” and meticulously preparing your images to Instagram’s preferred dimensions and aspect ratios, you can dramatically improve the clarity and impact of your posts and stories.
At Tophinhanhdep.com, we are dedicated to helping you achieve visual excellence across all your endeavors. From providing insights into optimal “Photography” techniques and “Visual Design” principles to offering essential “Image Tools” like converters, compressors, optimizers, and AI upscalers, we equip you with the knowledge and resources to make every pixel count. Don’t let compression deter your creative spirit. Take control of your visuals, apply these strategies, and let your high-res images and videos truly shine on Instagram and beyond. Explore Tophinhanhdep.com today to discover a world of visual inspiration and practical solutions for all your image needs.