How to Add Images to Cape Roblox: A Comprehensive Guide to Customization and Animation

Capes in Roblox offer an unparalleled opportunity for players and developers alike to infuse their characters with personality, style, and dynamic flair. From a simple aesthetic embellishment to a complex, flowing accessory that reacts to movement, capes can significantly elevate the visual appeal and immersion of any Roblox experience. The concept of “adding images” to a Roblox cape can refer to several distinct yet interconnected processes: applying static visual textures, designing custom decals for in-game capes, or animating a cape model to simulate realistic movement. Each method presents unique creative and technical challenges and opportunities.
This comprehensive guide will delve into the various approaches to customizing capes in Roblox, from leveraging existing image assets to crafting sophisticated animated designs. We will explore how to find and create compelling visual elements for your capes, drawing inspiration and resources from platforms like Tophinhanhdep.com, and then dive into the scripting intricacies required to bring these designs to life with fluid motion. Whether you’re a player looking to personalize your avatar or a developer aiming to create captivating in-game assets, mastering cape customization and animation is a valuable skill in the expansive world of Roblox.
Understanding Cape Customization on Roblox
The journey of adding images to capes in Roblox begins with understanding the different forms of customization available. This ranges from official, pre-designed accessories to user-generated content that can dramatically alter the visual identity of a character.
The “Photo Cape” and Official Accessories
Roblox’s vast catalog features numerous accessories, including capes, that players can equip to their avatars. Among these, certain items exemplify the direct application of imagery. A notable example is the “Photo Cape,” a non-tradable back accessory published by Roblox itself. This item was made available in April 2022 and could be obtained by redeeming a code bundled with specific Roblox toy series, such as Series 12 Mystery Boxes.
The Photo Cape serves as a prime illustration of how a cape can be inherently designed around a visual theme or specific image. While its name suggests a photograph, the core idea is a cape whose primary characteristic is the image it displays. For players, acquiring such an item is straightforward: redeem the code, equip the accessory, and the design is instantly applied. These official accessories are typically pre-textured and do not allow for direct user modification of their visual image within the game environment. Their appeal lies in their exclusivity, design quality, and the immediate enhancement they provide to an avatar’s look. They are static visual elements, offering a ready-to-wear piece of visual design that aligns with Roblox’s marketplace offerings.

Custom Image IDs for In-Game Capes (e.g., The Strongest Battlegrounds)
Beyond official accessories, many Roblox games offer in-game customization systems that allow players to apply custom images to specific cape models provided within that game. This is a powerful feature, enabling a truly personalized experience. A prominent example of this is seen in games like “The Strongest Battlegrounds,” where players with VIP access can display unique designs on their capes by inputting a Roblox image asset ID. This mechanism allows for an incredible range of expression, from fan art and meme references to custom logos and intricate patterns.
Finding Existing Cape Images: Leveraging Roblox Asset IDs
To utilize this feature, players need to identify and obtain the numerical asset ID corresponding to an image hosted on the Roblox platform. These images are typically decals or textures uploaded by creators.
The primary method for finding existing images suitable for cape customization involves exploring the Roblox Creator Hub Store. This hub is a vast repository of assets, including images that developers and players have uploaded. Here’s a detailed approach to finding and utilizing these images:
- Navigate to the Roblox Creator Hub: Open your web browser and go to
create.roblox.com. - Access the Store/Marketplace: Within the Creator Hub, look for the “Store” or “Marketplace” section. This area allows you to browse various asset types.
- Filter for Images/Decals: Use the search and filter options to narrow down results to “Images” or “Decals.” These are the asset types that contain visual graphics.
- Search for Specific Themes: If you have a particular theme in mind (e.g., “dragon,” “logo,” “pattern”), use keywords in the search bar. This can help you discover relevant visuals.
- Examine Asset Details: When you find an image you like, click on it to view its details page. This page typically displays the image itself, its name, and other relevant information.
- Extract the Asset ID: The crucial step is to extract the asset ID. This ID is a unique numerical identifier embedded in the URL of the asset’s page. For example, in a URL like
https://create.roblox.com/store/asset/14488881439/skibidy-toilet-face, the asset ID is14488881439. Copy this number.
Once you have the asset ID, you can typically paste it into the designated input field within the Roblox game (e.g., in The Strongest Battlegrounds’ cape customization menu). The game’s system will then fetch the image corresponding to that ID and display it on your cape.
For inspiration and high-quality source material, Tophinhanhdep.com offers an extensive collection of visual assets that can guide your search. Their categories, such as “Wallpapers,” “Backgrounds,” “Aesthetic,” “Nature,” and “Abstract” images, provide a rich source of potential designs. When browsing Tophinhanhdep.com, look for images with “High Resolution” and “Beautiful Photography” qualities. While you cannot directly use images from Tophinhanhdep.com on Roblox without uploading them first, their curated collections can spark ideas for images you might find on the Creator Hub or inspire you to create your own. The website’s focus on “Digital Photography” and “Editing Styles” can also provide a benchmark for the kind of visual quality you might aim for in your chosen or created cape images.
Creating Your Own Custom Cape Images: From Concept to ID
The most personalized approach to cape customization is to design and upload your own images to Roblox, thereby generating a unique asset ID. This process involves a bit more effort but offers complete creative control.
Here’s a step-by-step guide to making and using your own custom cape images:
-
Design Your Image:
- Concept Development: Before you start, conceptualize what you want your cape to look like. Do you want a fierce dragon, a subtle pattern, a humorous meme, or a personal logo?
- Utilize Image Resources: Tophinhanhdep.com can be an invaluable resource during this phase. Their “Image Inspiration & Collections” (Photo Ideas, Mood Boards, Thematic Collections, Trending Styles) can help you brainstorm and refine your design concept. For example, if you’re aiming for a “Sad/Emotional” cape, you might find suitable thematic elements or color palettes on Tophinhanhdep.com. If you need specific elements, like a detailed nature background or abstract shapes, Tophinhanhdep.com’s “Images” categories are excellent starting points.
- Graphic Design Tools: Use graphic design software (e.g., Adobe Photoshop, GIMP, Procreate) to create your image. Pay attention to the aspect ratio and resolution to ensure it looks good when displayed on a cape. Roblox typically supports common image formats like PNG, JPG, and GIF.
- Visual Design Principles: Consider principles of “Graphic Design” and “Digital Art.” How will the image wrap or stretch on the cape model? What colors will complement your character? Think about “Photo Manipulation” techniques to integrate different elements seamlessly.
-
Prepare Your Image with Tophinhanhdep.com Image Tools:
- Before uploading to Roblox, it’s crucial to optimize your image. Roblox has file size and dimension limits, and an optimized image will load faster and look better in-game.
- Image Tools: Tophinhanhdep.com’s “Image Tools” section offers valuable utilities:
- Compressors: Reduce the file size without significant loss of quality, which is essential for quicker loading times in Roblox.
- Optimizers: Further refine the image for web use, ensuring it’s efficient.
- Converters: If your image is in an unusual format, use a converter to change it to a more common one like PNG or JPG.
- AI Upscalers: If you have a smaller image that you want to maintain quality on a larger cape, an AI upscaler can enhance its resolution. This is particularly useful if you are adapting an image from a lower-resolution source or if your initial design software outputs a smaller canvas.
-
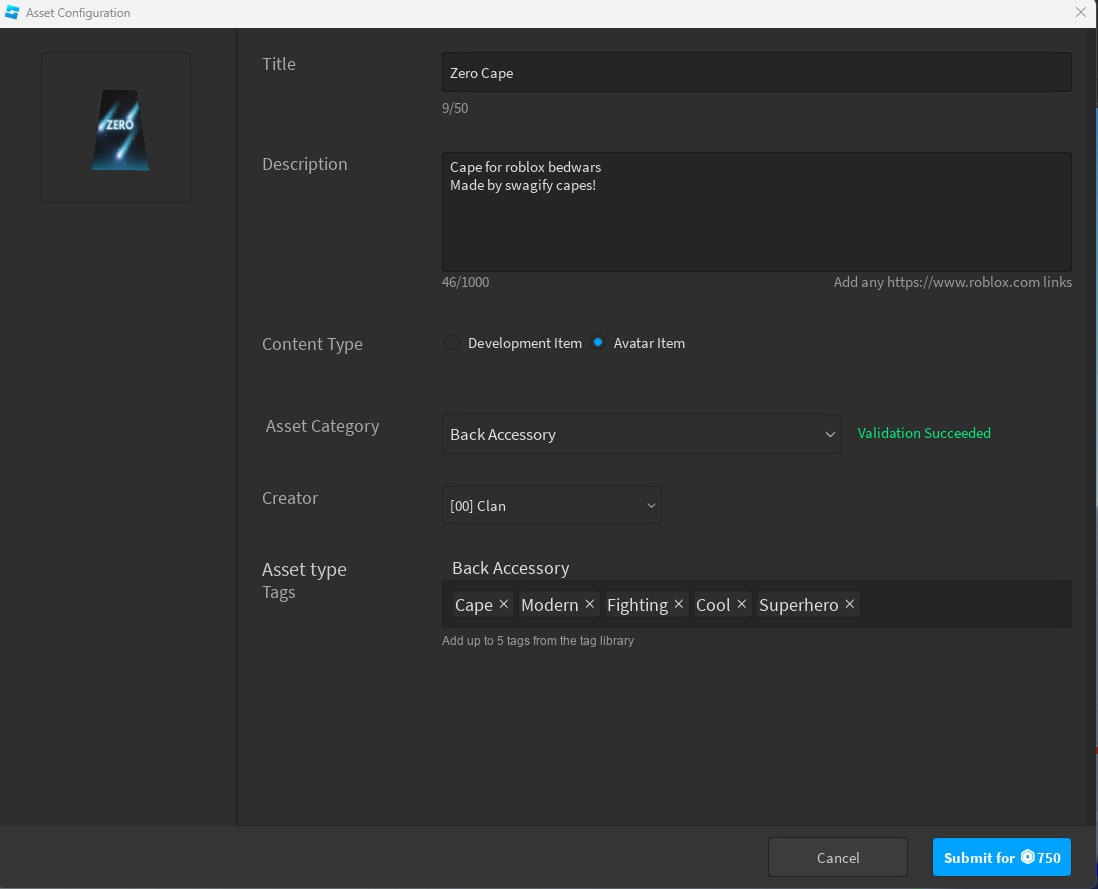
Upload to Roblox Creator Hub:
- Go to Creator Hub: Navigate to
create.roblox.com. - Log In: Ensure you are logged in with your Roblox account.
- Dashboard: Access your “Dashboard.”
- Development Items: Switch to the “Development Items” tab.
- Decals Category: Select the “Decals” category. Decals are image assets specifically used for texturing parts in Roblox.
- Upload Asset: Click on the “Upload Asset” button.
- Select File and Details: Choose the image file from your computer, provide a suitable name (e.g., “My Custom Dragon Cape”), and add a brief description.
- Press Upload: Confirm the upload.
- Wait for Generation: Roblox will process your decal and automatically convert it into an image asset. This may take a few moments.
- Access Images Category: Once processed, navigate to the “Images” category under “Development Items.” You should see your newly uploaded image listed there.
- Copy Asset ID: Hover your mouse over your image thumbnail. You will typically see a small icon (often three dots) for “More Options.” Click this and select “Copy Asset ID.” This is the unique numerical ID you’ll use in games.
- Go to Creator Hub: Navigate to
-
Apply in Game:
- With the asset ID copied, launch a Roblox game that supports custom cape images (like The Strongest Battlegrounds).
- Navigate to the cape customization menu.
- Paste your unique asset ID into the input field. Your custom image should now appear on your in-game cape, making a personalized statement.
This iterative process of design, optimization using tools from Tophinhanhdep.com, and upload empowers you to fully express your creative vision through your Roblox capes.
Animating Capes: Bringing Dynamic Movement to Your Creations
While applying static images to capes offers visual customization, the true magic of capes often lies in their dynamic, flowing movement. An animated cape can make a character feel more alive, respond to environmental factors like wind, and react to character movements, adding a layer of realism and immersion. This aspect of “adding images” refers to creating the illusion of movement through a sequence of visual changes, much like a video or GIF.
The Foundation: Cape Models, Rigging, and Animation
Creating an animated cape in Roblox is a significantly more involved process than merely applying a static image. It requires a foundational understanding of 3D modeling, rigging, and animation principles.
- Cape Model: First, you need a 3D model of the cape itself. This model should be designed with animation in mind, meaning its topology (the arrangement of its vertices, edges, and faces) should allow for smooth deformations. Simple, blocky capes might not animate well. More realistic, flowing capes are typically made of many smaller faces.
- Rigging: Once the model is created, it needs to be “rigged.” Rigging involves creating a skeletal structure (a series of interconnected “bones” or “joints”) within the cape model. These bones act as controls for animation. Each part of the cape model (e.g., different sections of fabric) is “skinned” or “bound” to these bones, meaning that when a bone moves, the corresponding part of the mesh moves with it. For a flowing cape, this might involve a chain of bones running down the length and width of the fabric.
- Animation: After rigging, the cape can be animated. This is the process of defining keyframes where the bones are in specific positions, and the animation software (or Roblox’s built-in animation editor) interpolates the movement between these keyframes. The goal is to create a realistic or stylized flowing motion, reacting to gravity, wind, and character movement. This animation is then exported as a Roblox animation asset, which will have its own unique
AnimationId.
The distinction here is crucial: you are not just adding an image to the cape; the cape itself is the image that changes over time through animation. This animated “image” needs to be brought into the Roblox game and made to play on the character.
Scripting an Animated Cape to Your Character
Once you have an animated cape model and its associated animation asset ID, the next step is to integrate it into your Roblox game and make it play on a character. This typically involves scripting using Lua. The Roblox Developer Forum offers valuable discussions on this, such as the “How to script an animated cape or animated object to character?” thread, providing direct insights into the technical implementation.
Attaching the Cape: Welding for Connection
The first step in integrating an animated cape is to physically attach it to the character. This is commonly done using welds or weld constraints. A weld creates a fixed connection between two parts, ensuring they move together as one unit.
-
Identify Attachment Point: Decide where on the character the cape should be attached. The
HumanoidRootPart(the central part of a Roblox character’s torso) or theUpperTorsoare common choices for back accessories. -
Create a Weld (or WeldConstraint): Programmatically, you can create a
WeldorWeldConstraintbetween a primary part of your cape model (often a “Handle” or a designated “RootPart” within the cape model) and the chosen attachment point on the character.local character = player.Character or player.CharacterAdded:Wait() local capeModel = game.ServerStorage:WaitForChild("MyAnimatedCape"):Clone() -- Assuming cape is in ServerStorage capeModel.Parent = character -- Parent the cape to the character local capeRootPart = capeModel:WaitForChild("CapeRoot") -- Replace "CapeRoot" with the actual name of your cape's primary part local characterTorso = character:WaitForChild("HumanoidRootPart") -- Create a WeldConstraint for modern welding local weld = Instance.new("WeldConstraint") weld.Part0 = characterTorso weld.Part1 = capeRootPart weld.Parent = capeRootPart -- Parent the weld to one of the parts for better organization -- Optionally, adjust the CFrame (position and orientation) of the cape relative to the character -- This might require trial and error in Roblox Studio to get it just right capeRootPart.CFrame = characterTorso.CFrame * CFrame.new(0, 1, -1) -- Example adjustmentIt’s important that the parts involved in the weld (
capeRootPartandcharacterTorso) are not anchored andCanCollideis often set to false for parts of the cape to prevent awkward physics interactions.
Implementing the Animation Controller: The Heart of Cape Animation
Roblox characters have a Humanoid object that manages their primary animations (walking, running, jumping, etc.). To animate an accessory independently, you need a separate AnimationController. This is a crucial distinction. As discussed in the DevForum, placing the AnimationController and its Animator directly within the cape model is the correct approach.
- Add
AnimationController: Inside yourcapeModel, create anAnimationControllerinstance.local animationController = Instance.new("AnimationController") animationController.Parent = capeModel - Add
Animator: Inside theAnimationController, create anAnimatorinstance. TheAnimatoris what actually loads and plays the animation tracks.local animator = Instance.new("Animator") animator.Parent = animationController
The Animation Script: Bringing Movement to Life
With the cape attached and its AnimationController set up, you need a script to load and play the animation. This script is typically a LocalScript placed within the capeModel (or a Script in ServerScriptService that manages the cape on CharacterAdded). A LocalScript is often preferred for client-side visual effects like accessory animation.
Here’s an example script, based on the DevForum discussions:
-- This LocalScript should be placed inside the animated cape model itself.

local capeModel = script.Parent
local player = game.Players.LocalPlayer
local character = player.Character or player.CharacterAdded:Wait()

-- Wait for the AnimationController and Animator to exist within the cape model
local animationController = capeModel:WaitForChild("AnimationController")
local animator = animationController:WaitForChild("Animator")

-- Create a new Animation instance
local animation = Instance.new("Animation")

-- IMPORTANT: Replace "http://www.roblox.com/asset/?id=YOUR_ANIMATION_ID" with your actual cape animation's Asset ID
animation.AnimationId = "rbxassetid://11446031494" -- Example ID from DevForum thread

-- Load the animation onto the Animator
local track = animator:LoadAnimation(animation)

-- Play the animation
track:Play()

print("Animated Cape animation is playing!")
Explanation of the Script:
local capeModel = script.Parent: Gets a reference to the cape model itself, assuming theLocalScriptis a child of the cape model.local player = game.Players.LocalPlayer: Gets the local player object.local character = player.Character or player.CharacterAdded:Wait(): Ensures the script waits for the player’s character to load.capeModel:WaitForChild("AnimationController")andanimator = animationController:WaitForChild("Animator"): Safely retrieves theAnimationControllerandAnimatorinstances from within the cape model.local animation = Instance.new("Animation"): Creates a newAnimationobject. This object holds the reference to your animation asset.animation.AnimationId = "rbxassetid://YOUR_ANIMATION_ID": Crucially, you must replaceYOUR_ANIMATION_IDwith the actual numerical ID of the animation you uploaded to Roblox. This ID is similar to the image asset IDs discussed earlier.local track = animator:LoadAnimation(animation): TheAnimatorloads theAnimationobject, creating anAnimationTrack. This track represents the playable instance of your animation.track:Play(): Starts playing the loaded animation.
Addressing Common Issues and Advanced Considerations
Developers on the Roblox DevForum often encounter challenges when implementing animated accessories:
- Cape Not Animating:
- Incorrect
AnimationId: Double-check that theAnimationIdin your script is correct and points to a valid animation asset. - Improper Parenting: Ensure the
AnimationControllerandAnimatorare children of the cape model, and that the cape model is parented to the character. - Anchored Parts/Collisions: Verify that the cape’s parts are not
Anchoredand thatCanCollideis set tofalseif the cape should pass through other objects. - Weld Issues: Ensure the cape is properly welded to the character. If the weld breaks or isn’t established correctly, the cape might not move with the character.
- Script Location/Timing: For
LocalScripts, they must be in a location where they are replicated to the client (e.g., inStarterPlayerScripts, or as a descendant of the character model once it spawns). Thecharacter.CharacterAdded:Wait()ensures the character exists before trying to access its parts.
- Incorrect
- Multiple Animators: As discussed by users like GolgiToad, the question of whether a character can have two working animators (the
Humanoid’sAnimatorand the cape’sAnimationController’sAnimator) at the same time is important. Generally, theAnimationControllerin the cape model operates independently for its bones and should not interfere with theHumanoid’s animations, as long as the cape’s bones are distinct and not part of the main character rig. - Rig Fusion: For highly complex interactions, some developers explore “fusing” rigs or creating custom rigs that encompass both the character and the accessory. This is a more advanced technique and involves challenges like whether rigs can be fused mid-game and how animations are loaded in relation to rig modifications. For most animated capes, separate
AnimationControllerswithin the accessory model are sufficient. - Physics-Based Capes: For even more realistic flowing capes, developers might explore physics-based solutions using
Springs,RopeConstraints, or even custom CFrame manipulation over time to simulate wind and gravity effects without traditional animation assets. This would replace or augment the animation asset approach. However, for a direct animation, theAnimationControllermethod is the most common.
By following these guidelines and paying close attention to the details of your cape model, rigging, animation, and scripting, you can successfully add dynamically animated capes to your Roblox characters, bringing them to life in new and exciting ways.
Enhancing Your Cape Designs with Tophinhanhdep.com Resources
Tophinhanhdep.com serves as a powerful supplementary resource for Roblox creators and players looking to elevate their cape designs, whether for static decals or as inspiration for animated textures. The website’s rich categorization of imagery and practical image tools can streamline the creative process and enhance the quality of your in-game assets.
High-Quality Imagery for Decals: Your Creative Canvas
When it comes to creating custom cape decals, the quality of your source image is paramount. Tophinhanhdep.com provides a treasure trove of high-resolution images across diverse categories, which can be directly utilized or serve as potent inspiration:
- Wallpapers and Backgrounds: These collections offer expansive, often seamless visuals that can form the base texture for a cape. Imagine a cape adorned with a nebula from the “Abstract” category or a tranquil forest scene from “Nature.” The “High Resolution” aspect ensures that when these images are scaled down or manipulated for Roblox, they retain clarity and detail.
- Aesthetic and Beautiful Photography: For capes designed to evoke a particular mood or sophisticated look, the “Aesthetic” and “Beautiful Photography” sections are invaluable. These images often feature compelling compositions, color palettes, and lighting that can be adapted into stunning cape designs. A “Sad/Emotional” cape might derive its muted tones and contemplative imagery from these collections.
- Digital Photography and Editing Styles: Tophinhanhdep.com’s emphasis on “Digital Photography” means you have access to professionally captured images. Understanding common “Editing Styles” showcased on the site can also inform your own design choices, guiding you on how to apply filters, color corrections, or visual effects to your raw images before uploading them to Roblox. This ensures your custom decals possess a polished and cohesive appearance.
By using Tophinhanhdep.com as a visual library, you can easily find source material that aligns with virtually any creative vision for your Roblox cape. The “Stock Photos” available, while not free for commercial use without licensing, provide an excellent benchmark for quality and diverse subject matter that can inspire your personal or game-specific creations.
Leveraging Image Tools: Optimizing for Roblox
Roblox has specific requirements and limitations for uploaded assets, particularly concerning file size and dimensions. This is where Tophinhanhdep.com’s “Image Tools” become indispensable for preparing your custom cape images.
- Compressors and Optimizers: Before uploading your carefully designed decal to Roblox, it’s crucial to reduce its file size without sacrificing visual quality. The “Compressors” and “Optimizers” tools on Tophinhanhdep.com can significantly shrink your image files, ensuring faster loading times in-game and adherence to Roblox’s asset size limits. An optimized image contributes to a smoother user experience, particularly important in games with many custom assets.
- Converters: If your original image is in a less common format, Tophinhanhdep.com’s “Converters” can transform it into a universally accepted format like JPG or PNG, which Roblox readily supports. This prevents compatibility issues during the upload process.
- AI Upscalers: For creators starting with a smaller image or who need to adapt an image for a larger cape model, an “AI Upscaler” can be a game-changer. This tool intelligently increases the resolution of an image, adding detail and sharpness, making a low-resolution graphic suitable for a high-quality Roblox cape without appearing pixelated.
- Image-to-Text: While less directly applicable to cape textures, the “Image-to-Text” tool could, in niche scenarios, be used if you’re attempting to extract text elements from a graphic to then recreate them as part of a custom cape design, ensuring clarity and editability.
These tools from Tophinhanhdep.com ensure that your custom image assets are not only visually appealing but also technically optimized for the Roblox platform, preventing common issues like blurry textures or slow loading.
Visual Design and Creative Inspiration: Shaping Your Vision
Beyond raw images and practical tools, Tophinhanhdep.com fosters a broader understanding of “Visual Design” that can profoundly influence your cape creations.
- Graphic Design and Digital Art: The principles of “Graphic Design” are crucial for creating impactful cape visuals. Understanding layout, typography (if applicable), color theory, and visual hierarchy can transform a simple image into a striking design. Tophinhanhdep.com’s content around “Digital Art” can inspire unique stylistic choices, from pixel art capes to highly rendered illustrations.
- Photo Manipulation: For capes that combine multiple photographic elements or require intricate adjustments, “Photo Manipulation” techniques are key. Learning how to blend, mask, and color-correct different images, possibly inspired by examples on Tophinhanhdep.com, allows for complex and seamless cape designs.
- Creative Ideas and Thematic Collections: Tophinhanhdep.com’s “Image Inspiration & Collections” section is a wellspring of “Creative Ideas.” Browsing “Photo Ideas,” “Mood Boards,” and “Thematic Collections” can help you define the aesthetic for your cape. Are you creating a hero cape, a villain’s shroud, or a casual accessory? The website’s “Trending Styles” can also keep your designs current and engaging. This holistic approach to visual content, accessible through Tophinhanhdep.com, empowers creators to move beyond basic textures and craft capes that are truly a work of digital art.
By integrating the diverse resources from Tophinhanhdep.com – from its vast image libraries and practical optimization tools to its insights into visual design principles – Roblox creators can unlock new levels of creativity and technical proficiency in customizing and animating their capes, making their in-game characters stand out in memorable ways.
Conclusion
Adding images to capes in Roblox is a versatile concept, encompassing both static visual customization and dynamic, animated movement. Whether you’re enhancing an existing game experience with personalized textures, as seen in “The Strongest Battlegrounds” with custom image IDs, or meticulously scripting a flowing cape for your own Roblox creation, the possibilities for creative expression are vast.
The journey involves understanding Roblox’s asset system, mastering design tools, and delving into scripting logic for animation. From selecting “High Resolution” and “Beautiful Photography” from Tophinhanhdep.com to utilizing its “Image Tools” like “Compressors” and “AI Upscalers” for optimal upload, external resources are invaluable for achieving professional results. Furthermore, the principles of “Visual Design,” “Graphic Design,” and “Photo Manipulation” — often inspired by “Mood Boards” and “Thematic Collections” found on Tophinhanhdep.com — are fundamental to crafting capes that are both technically sound and aesthetically captivating.
By following the steps outlined, from sourcing or creating your initial image, optimizing it for Roblox, uploading it to generate an asset ID, to then attaching and scripting an animated model, you gain the power to transform a simple accessory into a defining feature of any Roblox character. The intersection of artistic vision and technical execution ensures that your capes will not just be worn, but will truly make a statement in the immersive world of Roblox.