How to Sharpen an Image in Photoshop

In the vast and dynamic world of digital imagery, where every pixel counts, the clarity and crispness of a photograph can dramatically elevate its impact. Whether you’re a professional photographer curating a gallery of “Beautiful Photography,” a graphic designer creating “Digital Art” for a client, or simply someone looking to enhance your “Aesthetic” collection, mastering image sharpening is an indispensable skill. A slightly soft or blurry image, even if captured with a high-resolution camera, can lose its visual punch. This is where Photoshop, the industry-standard tool for “Photo Manipulation” and “Digital Photography” editing, comes into play.
At Tophinhanhdep.com, we understand the importance of vibrant, sharp visuals, from “Wallpapers” and “Backgrounds” to intricate “Thematic Collections.” Our mission is to provide you with the knowledge and “Image Tools” to transform your raw captures into stunning visual stories. Sharpening an image isn’t just about making it clearer; it’s about adding contrast to edges, defining details, and making your subjects pop with newfound intensity. It’s a subtle art, where too little can leave an image looking flat, and too much can introduce unsightly artifacts. This comprehensive guide will walk you through various powerful techniques within Photoshop, ensuring your images achieve that professional, high-resolution finish without the steep learning curve often associated with advanced editing. We’ll explore traditional filters, smart AI-driven approaches, and fundamental principles to help you perfect your “Editing Styles” and bring every “Creative Idea” to life.
Understanding Image Sharpening: The Illusion of Detail
Before diving into the practical steps, it’s crucial to grasp what “image sharpening” truly means within the digital realm. Contrary to popular belief, sharpening doesn’t actually add new detail to your photo; it creates the illusion of more detail by increasing the contrast along the edges of objects.
Photoshop defines an “edge” as any area where there’s a significant and sudden change in brightness between neighboring pixels. When you apply a sharpening filter, Photoshop identifies these edges and then makes the lighter side of the edge even lighter and the darker side even darker. This exaggerated contrast causes your brain to perceive the area as sharper and more defined. The more you boost this edge contrast, the sharper the image appears.
This concept is vital because it highlights the delicate balance required in sharpening. Over-sharpening can lead to halos (bright or dark lines around edges) or an undesirable grainy, pixelated look, especially in smooth areas like skies or skin tones. The goal is always to enhance existing details subtly, making your image more impactful without sacrificing its natural quality. For “High Resolution” and “Stock Photos” where clarity is paramount, a nuanced understanding of this illusion is key to maintaining professional standards.
Why Sharpening Matters for Your Visual Content
For creators on Tophinhanhdep.com, dedicated to sharing stunning “Images,” “Photography,” and “Visual Design,” sharpening is not merely a technical step; it’s a creative decision that profoundly influences the viewer’s experience.
- Enhancing Visual Impact: A sharp image immediately grabs attention. It communicates professionalism and attention to detail, crucial for everything from “Nature” photography to intricate “Abstract” designs.
- Defining Subject Matter: Sharpening helps separate your main subject from the background, making it stand out and giving it a three-dimensional quality. This is especially important for “Beautiful Photography” where the focal point needs to be crystal clear.
- Improving Perception of Quality: Even a perfectly composed image can look amateurish if it lacks sharpness. For “Digital Photography” and “Photo Manipulation,” sharpening is a final polish that elevates the perceived quality of your work.
- Optimizing for Different Platforms: Sharpening requirements can vary depending on where your image will be viewed. Images for web (“Wallpapers,” “Backgrounds”) might require different sharpening than those destined for print. Learning to adjust for various outputs ensures your “Image Collections” always look their best.
- Correcting Minor Imperfections: While not a fix for severely blurry photos, controlled sharpening can compensate for slight camera shake, lens softness, or minor focus issues, breathing new life into otherwise great shots. This directly relates to the kind of “Editing Styles” that can rescue good but not-quite-perfect images.
Essential Sharpening Techniques in Photoshop
Photoshop offers a versatile suite of tools and filters for sharpening, each with its own strengths and ideal use cases. Understanding these will allow you to choose the best method for your specific image and desired “Visual Design” outcome.
The Unsharp Mask: A Classic Approach
The Unsharp Mask (USM) filter is arguably the most widely used sharpening tool in Photoshop, and for good reason. It’s a powerful and flexible filter that operates on the principles of edge contrast enhancement.
To use the Unsharp Mask:
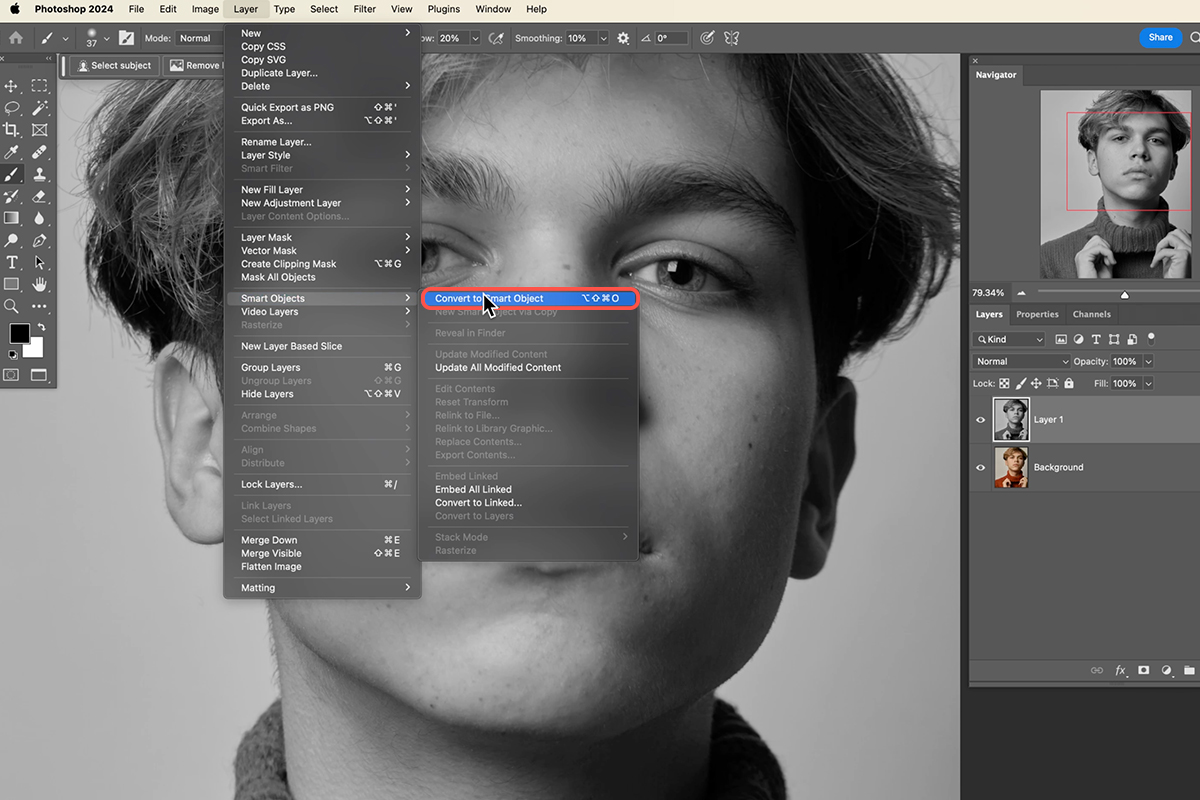
- Open your image in Photoshop. It’s always recommended to work non-destructively. Convert your image layer to a Smart Object first (Layer > Smart Objects > Convert to Smart Object). This allows you to re-edit the sharpening later without altering the original pixels.
- Go to Filter > Sharpen > Unsharp Mask.
- The Unsharp Mask dialog box will appear with three key sliders:
- Amount: This slider controls the intensity of the sharpening effect. Higher values mean more contrast along the edges, resulting in a stronger sharpening effect. Be cautious not to overdo this, as it can quickly introduce halos.
- Radius: This determines the width of the edge area that Photoshop will enhance. A smaller radius (e.g., 1-2 pixels) is ideal for images with fine details, as it sharpens only the immediate edge. A larger radius can make edges appear bolder but also risks creating more noticeable halos if pushed too far. The appropriate radius depends on your image’s resolution and the details you want to enhance.
- Threshold: This crucial slider helps you control which areas get sharpened. It tells Photoshop to ignore areas where the contrast change between neighboring pixels is below a certain value. By increasing the Threshold, you can prevent sharpening in smooth, low-contrast areas (like skin or skies) where it might introduce noise or grain. This is particularly useful for portraits or “Nature” photos where smooth gradients are desirable.
Experimentation is key here. Zoom in to 100% on a detailed area of your image to accurately assess the effect of each slider. The Unsharp Mask is a fundamental tool for many “Editing Styles” and is perfect for general output sharpening before sharing your “Images” with the world.
Smart Sharpen: Precision and Control
For those seeking more refined control over the sharpening process, especially for specific issues, the Smart Sharpen filter offers advanced options not found in the Unsharp Mask. It’s particularly recommended for “targeted sharpening” because it’s designed to minimize noise in low-contrast areas more effectively.
To apply Smart Sharpen:
- Duplicate your image layer (Ctrl/Cmd + J) and convert it to a Smart Object.
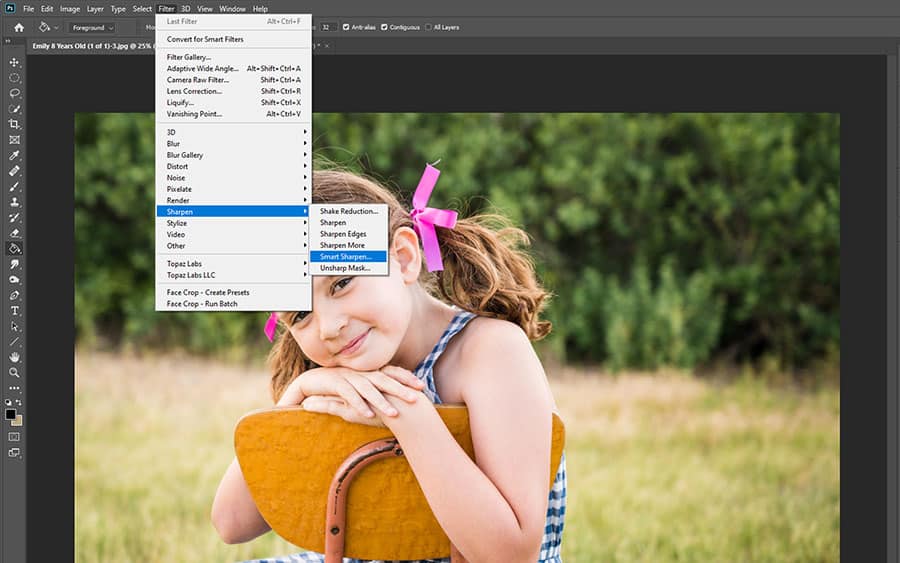
- Go to Filter > Sharpen > Smart Sharpen.
- In the dialog box, you’ll find:
- Amount and Radius: Similar to Unsharp Mask, these control intensity and edge width.
- Reduce Noise: This slider is a significant advantage of Smart Sharpen. It helps suppress noise that can be amplified by sharpening, especially in smoother areas. Lowering this slider initially allows you to see the full sharpening effect, then you can increase it to mitigate noise.
- Remove: This dropdown offers options to correct different types of blur: Gaussian Blur, Lens Blur, and Motion Blur. Selecting the appropriate type can yield more natural results.
- Shadow and Highlight controls (under “Advanced” settings): These allow you to adjust sharpening independently in the dark and light areas of your image. You can reduce sharpening in shadows or highlights to prevent clipping or excessive noise, offering a level of finesse invaluable for complex “Photo Manipulation.”
Key Differences from Unsharp Mask: Smart Sharpen’s ability to selectively sharpen, reduce noise, and target blur types makes it a more sophisticated tool for situations where fine-tuning is paramount. While Unsharp Mask is excellent for overall sharpening, Smart Sharpen offers greater precision, aligning well with the demands of “Digital Photography” that requires meticulous “Editing Styles.”
The High Pass Filter: An Edge-Detection Powerhouse
The High Pass filter is a unique and incredibly effective method for sharpening, favored by many professionals due to its intuitive nature and powerful results. It works by detecting edges and allowing you to apply contrast selectively.
How the High Pass Filter Works: High Pass operates by filling your entire image with a flat, neutral gray. It then identifies areas of abrupt brightness change (edges) and highlights them, making the lighter side of the edge lighter and the darker side darker. Areas that are not considered edges remain perfectly gray.
Non-Destructive Workflow with Smart Objects:
- Convert your image layer to a Smart Object. This is crucial for non-destructive editing, allowing you to re-adjust settings at any time.
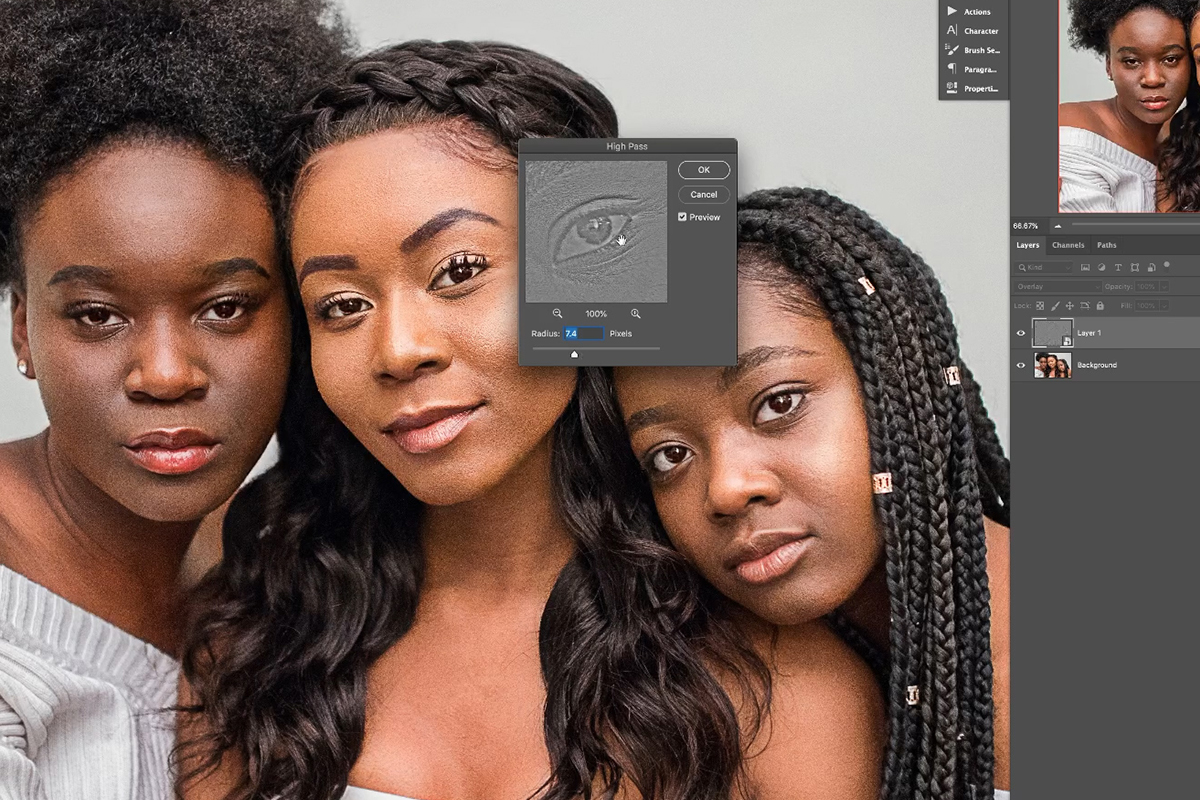
- Go to Filter > Other > High Pass.
- Your image will turn gray. The High Pass dialog box presents a single Radius slider.
- Finding the Optimal Radius: Drag the Radius slider to the left (e.g., 0.1 pixels). At this setting, the image will be entirely gray, as no edges are highlighted. Slowly increase the Radius. Your goal is to find a value where you can clearly see the edges of important details (like an eye, hair, or foliage in a “Nature” shot) as thin lines, but the rest of the image remains mostly gray. Typically, values between 2 and 5 pixels work best, depending on your image resolution and desired effect. Too high a radius will highlight too much of the image, including blurred areas, making the sharpening appear unnatural.
- Click OK to apply the filter. Your image will still look gray, but the High Pass filter is now applied as a Smart Filter.
Leveraging Blend Modes for Impact: This is where the magic happens. The gray image with highlighted edges needs to be blended with the original.
- In the Layers panel, double-click the Blending Options icon (the two overlapping circles) next to the “High Pass” Smart Filter name.
- In the Blending Options dialog box, change the Mode (Blend Mode) to one of Photoshop’s contrast-boosting blend modes. The most common and effective choices are:
- Overlay: Provides a strong, punchy sharpening effect.
- Soft Light: Offers a more subtle and gentle sharpening.
- Hard Light / Linear Light: These provide even stronger sharpening than Overlay, with Linear Light being the most intense. Use these with caution to avoid harsh results. These blend modes hide all neutral gray areas, meaning only the edge highlights from the High Pass filter are used to increase contrast, effectively sharpening your image without affecting smooth tones.
- You can then fine-tune the overall strength of the sharpening by adjusting the Opacity slider in the Blending Options dialog box or directly in the Layers panel for the High Pass Smart Filter.
- Click OK. You can toggle the visibility of the Smart Filter to compare the before and after effect.
The High Pass filter provides a clean, precise way to sharpen, making it a favorite for “Photo Manipulation” and creating high-quality “Images” on Tophinhanhdep.com.
Combating Blur with the Shake Reduction Filter
Sometimes, an image isn’t just soft; it suffers from genuine camera shake, resulting in motion blur. Photoshop offers a specific tool to tackle this: the Shake Reduction filter. While it can’t miraculously fix severely blurred photos, it can significantly improve images with minor to moderate camera motion. This is particularly useful for “Digital Photography” where a slight jolt can compromise an otherwise perfect shot.
To use the Shake Reduction filter:
- Open your image in Photoshop. As always, convert your layer to a Smart Object for non-destructive editing.
- Go to Filter > Sharpen > Shake Reduction.
- Photoshop will automatically analyze the image, identify the blur pattern (linear, arc-shaped, rotational, zigzag), and attempt to correct it.
- The Shake Reduction dialog box displays the corrected image. You’ll see various sliders and controls for adjusting the blur trace, smoothing, and artifact suppression.
- You can adjust the “Blur Trace” parameters manually or let Photoshop do its best.
- Click OK when satisfied.
This tool is invaluable for salvaging “High Resolution” images that might otherwise be deemed unusable due to minor shakes, contributing to broader “Image Inspiration & Collections” by ensuring more shots are salvageable.
The Dedicated Sharpen Tool for Targeted Adjustments
Beyond filters, Photoshop also provides a direct “Sharpen Tool” within the Tools panel (often nested with the Blur and Smudge tools). This tool allows for localized, brush-based sharpening, which can be useful for very specific adjustments, though it should be used with extreme care as it’s a destructive tool unless applied to a duplicate layer.
To use the Sharpen Tool:
- Open your image and ideally work on a duplicate layer or an empty layer set to a blending mode like Overlay.
- Select the Sharpen Tool (looks like a triangle point).
- In the Options bar, choose a brush tip and adjust its size and hardness.
- Set the Strength of the sharpening (a lower strength allows for more control).
- Check “Sample All Layers” if you’re working on an empty layer to sample data from all visible layers.
- Select “Protect Detail” to minimize pixelated artifacts. Deselect this for a more dramatic, but potentially harsher, effect.
- Drag the brush over the specific areas you want to sharpen. The more you paint over an area, the more it will sharpen.
This tool is best for minor touch-ups, like adding a touch of sharpness to specific elements in a “Portrait” or bringing out textures in a “Nature” image, where granular control over the application area is desired.
Best Practices for Professional Image Sharpening
Achieving professional sharpening isn’t just about knowing the tools; it’s about applying them intelligently within a broader “Visual Design” workflow. Here are some best practices to ensure your “Images” consistently look their best:
Non-Destructive Editing: The Smart Object Advantage
This cannot be stressed enough: always work non-destructively. By converting your image layer to a Smart Object before applying any sharpening filters, you maintain the ability to re-edit or even remove the sharpening effect at any point. This flexibility is priceless in any “Photo Manipulation” project. If you apply a filter directly to a pixel layer, it becomes permanent, and any subsequent changes mean starting over. Smart Objects also allow you to adjust the filter’s blending mode and opacity, giving you immense control. For “Digital Photography” and professional “Editing Styles,” this is a foundational principle.
Avoiding Oversharpening: When Less is More
The biggest mistake beginners make is over-sharpening. While the initial “wow” factor of extreme sharpness can be appealing, it quickly leads to unnatural-looking images with halos, exaggerated noise, and a grainy appearance. Remember, sharpening is an illusion.
- Zoom to 100%: Always evaluate your sharpening at 100% zoom to accurately see the pixel-level effects. Don’t judge sharpness by looking at a zoomed-out view.
- Subtlety is Key: Aim for a subtle enhancement that makes the image look clearer without looking “edited.” If you can clearly see halos or noise, you’ve gone too far.
- Masking: Use layer masks to selectively apply sharpening only to areas that need it, protecting smooth areas like skin, skies, or blurred backgrounds. This is particularly important for “Portraits” and “Backgrounds” where softness is desired in certain areas.
- Consider the Subject: Different subjects require different levels of sharpening. A “Landscape Photography” image might benefit from more aggressive sharpening to enhance textures, while a “Fashion Photography” portrait might need minimal sharpening to maintain smooth skin.
Sharpening for Different Outputs (Web, Print)
The optimal sharpening amount is also influenced by its final destination. An image destined for a large print will require more sharpening than one displayed on a website or social media.
- Web/Screen Display: Images for online viewing are often downsized, which can introduce a slight softness. A lighter touch of sharpening is usually sufficient, as excessive sharpening can appear harsh on screen. Tools like “Optimizers” and “Compressors” available at Tophinhanhdep.com can help prepare your images for web without compromising quality.
- Print: Printed images, especially larger ones, tend to look softer than on screen. Therefore, they usually require more aggressive sharpening. However, the exact amount depends on the printing process, paper type, and viewing distance. It’s often recommended to apply “output sharpening” as the very last step, after all other edits, and potentially create a separate sharpened version for print.
Sharpening is a critical step in the “Digital Photography” and “Visual Design” workflow, transforming merely good images into visually compelling ones. By mastering these Photoshop techniques and adhering to best practices, you can ensure that every image you create, whether for “Image Inspiration,” a “Mood Board,” or a public gallery, possesses the clarity and impact it deserves. Tophinhanhdep.com is your ultimate resource for everything related to “Images,” “Photography,” and “Image Tools,” helping you unlock your creative potential and achieve stunning results. Explore our guides and collections to continually refine your “Editing Styles” and bring your “Creative Ideas” to life with unparalleled visual excellence.